BriskHeat Centipede 2 Instruction Manual Download Page 9

BriskHeat

®

 Corporation.  All rights reserved


17 

Centipede 2® Module™ Temperature Control System 

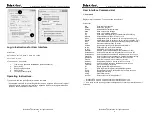
Operator Interface Reset  


‘Reset’ Command 

Type Reset and then press [Enter]. 


Resets the operator interface.  The communications session ends.  This is the equivalent 
as turning the power off to the operator interface and turning it back on. 

 
Screenshot: 

Welcome to Brisk Heat's OEM OI setup 
Version 1.8.xxx 
Please enter password: 


Time and Date parameters are reset if power loss or reset command is initiated. 
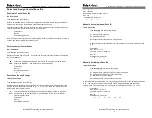
 

Exit Session 


‘Bye’ Command 

Type bye and then press [Enter]. 


Ends the current communications session.   

 
The Centipede 2

®

 continues to operate after exiting the communication session. 

 
Screenshot: 

BH>bye 
 
Disconnected 

 
If Bye command has not given, then communications hang up. 

BriskHeat

®

 Corporation.  All rights reserved


18 

Centipede 2® Module™ Temperature Control System 

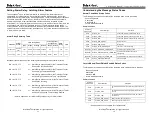
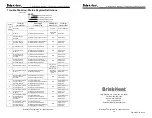
Appendix A: Centipede 2

®

 Operator Interface Register 

Definitions


Register Description  Address 

Memory  Access  Default 

Description 

Firmware Revision 

Flash 

NA 


Controller Status 
Word 

Flash 

NA 


Modbus Comms Error 
Register 

RAM 

R/W 


Module Focus 
Address 

RAM 

R/W 

Jacket Module 
address 

Jacket Command 
Register 

RAM 

R/W 


Jacket Poll response 
register 

RAM 


Time1 

RTC 

R/W 

Current 

time 

BCD hours, minutes 

Time2 

RTC 

R/W 

Current 

time 

BCD seconds, month 

Time3 

RTC 

R/W 

Current 

time 

BCD day, year 

Module address 

EEPROM 

R/W 

Modbus address 

Module (controller) 
Settings 

10 

EEPROM 

R/W 

Settings 

Low Temperature 
Timer 

11 

EEPROM 

R/W 

1800 

Low temp timer (secs) 

Reserved 

12-100 


Summary of Contents for Centipede 2

Page 1: ...Zone IDs 8 Reload Default Parameters 8 Program Temperature Control Zones 9 Read View Status of Temperature Control Zones 10 Dump Command Data Logging 10 Setting Alarm Relay Latching Alarm Feature 11 Alarm Relay Summary Table 11 Understanding the Message Status Codes 12 Normal Conditions Status Codes 12 Locate Module Zone ID Mode Enabled Status Codes 12 Operator Interface Set up 13 Time and Date Se...

Page 2: ...al COM ports dial up modems and TCP IP networks Website http www hilgraeve com hyperterminal b Go to Step2 Step 2 Input Connection Description a Input a Connection Name Example BriskHeat Centipede 2 Temperature Control b Select Icon c Click OK button BriskHeat Corporation All rights reserved 4 Centipede 2 Module Temperature Control System Step 3b Input Connect To parameters a Connect using COM3 Co...

Page 3: ...ues nn ID nn phys position 1 n IdSetR Sets Module Zone ID values nn ID qty nn phys position 1 n lmon Locate Module Zone ID and blink corresponding LED lmon ID lmoff Discontinue Module Zone ID locate Unlatch One shot unlatching of all latched heater alarms LUIOn Enable RS 232 Local User Interface LUIOff Disable RS 232 Local User Interface ModAddr Modbus Address ModAddr Address address 1 255 Dnsaddr...

Page 4: ...one ID e g 1 1 2 2 3 3 or when you wish to reset all temperature zone register values This function resets all temperature zone register values set point high limit etc back to its default parameters See Appendix B for a list of all default module register values Screenshot BH sm Enumerated modules BriskHeat Corporation All rights reserved 8 Centipede 2 Module Temperature Control System 1 1 2 BH i...

Page 5: ...o 130 00 C 4 Disable Enable Zone Disable wr 4 4 0 Enable wr 4 4 64 Default setting Enabled BriskHeat Corporation All rights reserved 10 Centipede 2 Module Temperature Control System Read View Status of Temperature Control Zones 1 Select the Temperature Zone that you would like to view a Command wr 3 X X zone number 2 Select the Temperature Zone Setting that you would like to view See Appendix B fo...

Page 6: ...arms needs Condition Control Action Latch Configuration Low Temp Timer Configuration Alarm Relay LED Type Scope Storage Default Scope Default High Temp Disable heat user Global Non volatile enabled n a Yes Yes Low Temp none user Global Non volatile disabled Global 30min Yes Yes BriskHeat Corporation All rights reserved 12 Centipede 2 Module Temperature Control System Understanding the Message Stat...

Page 7: ...System Password Change Password Command Type password XXXXXX and then press Enter Allows the user to enter a new password for access to the local user interface Default password briskheat Communication Mode Set up The default communication mode is Com Mode 1 LUIon LUIOn Command Type LUIOn and then press Enter Turns on the LUI Communication functionality This can be confirmed by the Com 1 mode ligh...

Page 8: ...Dns address1 192 168 10 104 Dns address2 64 118 139 51 Modulename CENTIPEDE II Time Zone 1 Time 14 06 47 1 8 2014 BriskHeat Corporation All rights reserved 16 Centipede 2 Module Temperature Control System Locate Zone ID Orange LED Quickly detect the location of a zone by causing the LED to flash orange This function does not affect the performance of the zone control The zone will remain in the fl...

Page 9: ...ssion Screenshot BH bye Disconnected If Bye command has not given then communications hang up BriskHeat Corporation All rights reserved 18 Centipede 2 Module Temperature Control System Appendix A Centipede 2 Operator Interface Register Definitions Register Description Address Memory Access Default Description Firmware Revision 0 Flash R NA Controller Status Word 1 Flash R NA Modbus Comms Error Reg...

Page 10: ...HIGH TEMP LATCH Set to enable latch of high temperature alarm 3 OPEN RTD LATCH Set to enable latch of open rtd alarm 4 SHORT RTD LATCH Set to enable latch of short rtd alarm 5 NOT USED 6 NOT USED 7 PASSWORD ENABLE Set to enable GUI password 8 TIMER DISPLAY 12 HOURS Display timer GUI in 12 hour mode AM PM 9 TEXT UI SESSION TIMEOUT DISABLE Disables text ui session timeouts 14 ALARM LOG CLEAR Clear a...

Page 11: ...ng the Message Status Codes Hexidemical to Binary Conversion To understand the displayed Status code you first need to convert the displayed hexadecimal code into the equivalent binary code You can use the conversion charts below to easily convert between hexadecimal and binary Hexidecimal to Binary Conversion Chart Status Decoding Example Example Hex Value of 8401 is displayed is Heater Status Re...

Page 12: ...d Status Rtd Short 9 Enable Heater Control Blink Id Calibrate Rtd Circuit Status Network Comm Bad Status Triac Driver Bad Status Rtd Open Status Rtd Short Status Ok A Enable Heater Control Adaptive Tuning Enabled Calibrate Rtd Circuit Status Heater Config Comm Bad N A Status Rtd Short Status High B Enable Heater Control Adaptive Tuning Enabled Blink Id Calibrate Rtd Circuit Status Heater Config Co...

Reviews: