Bricasti Design M7 Owner's manual Owner'S Manual Download Page 21


Selecting a Preset Program 


The first thing you may want to do is browse through the preset programs and select one that you 
want to hear.  The “out of the box” default is set to Large Hall 01 in the Hall bank of programs.   


Prog: 

Press the 

Prog

 (program) key.  This will bring you to the program select mode.  If you 

are in another display, such as 

System

, pressing the 

Prog

 key will bring you to the 

program select state and display the last program viewed or accessed. If it is the current 
running program there will be no 

*

 displayed.  If it is not the current running program, or 

when browsing for a new preset, the upper program display will show an 

*

 if the program 

displayed is not the current running one.  Pressing 

Prog

 will take you home and display 

the current running program. 


Adjust Knob: 

In program mode, turning the adjust knob will step you through the presets one by one, 
displayed on the upper section. You can simply turn the knob either direction until you 
see a program that you want.  This will rotate through the programs in the bank that has 
been selected by the cursor keys.  For example if HALLS are selected, the knob will only 
move through presets in the HALLS bank until the bank is changed.  Pressing the 

Enter 

key will load the program selected. If the program is not loaded, there will be an 

*

 at the 

last character display to the right, indicating that the program is not the one that is 
running.  Pressing 

Prog 

will bring the display back to show the current running program. 


Cursor Keys: 

The cursor keys will step through banks of programs. This allows for quick access to the 
type of program you want, by selecting the type and not having to scroll through all 
programs one by one. 
 
The BANK information is displayed on the lower display. Pushing one the cursor keys up 
or down will change the display to show the BANK information:  HALLS, PLATES, 
ROOMS, etc. After selecting a BANK, you can then browse through the programs in that 
bank with the adjust knob and press 

Enter 

if you want to load that preset for listening.  


Enter: 

As described above, pressing  

Enter

 will load the program displayed.  On the upper 

display the 

*

 will disappear when the new preset is loaded, showing the loaded preset 

name without the 

*

.  


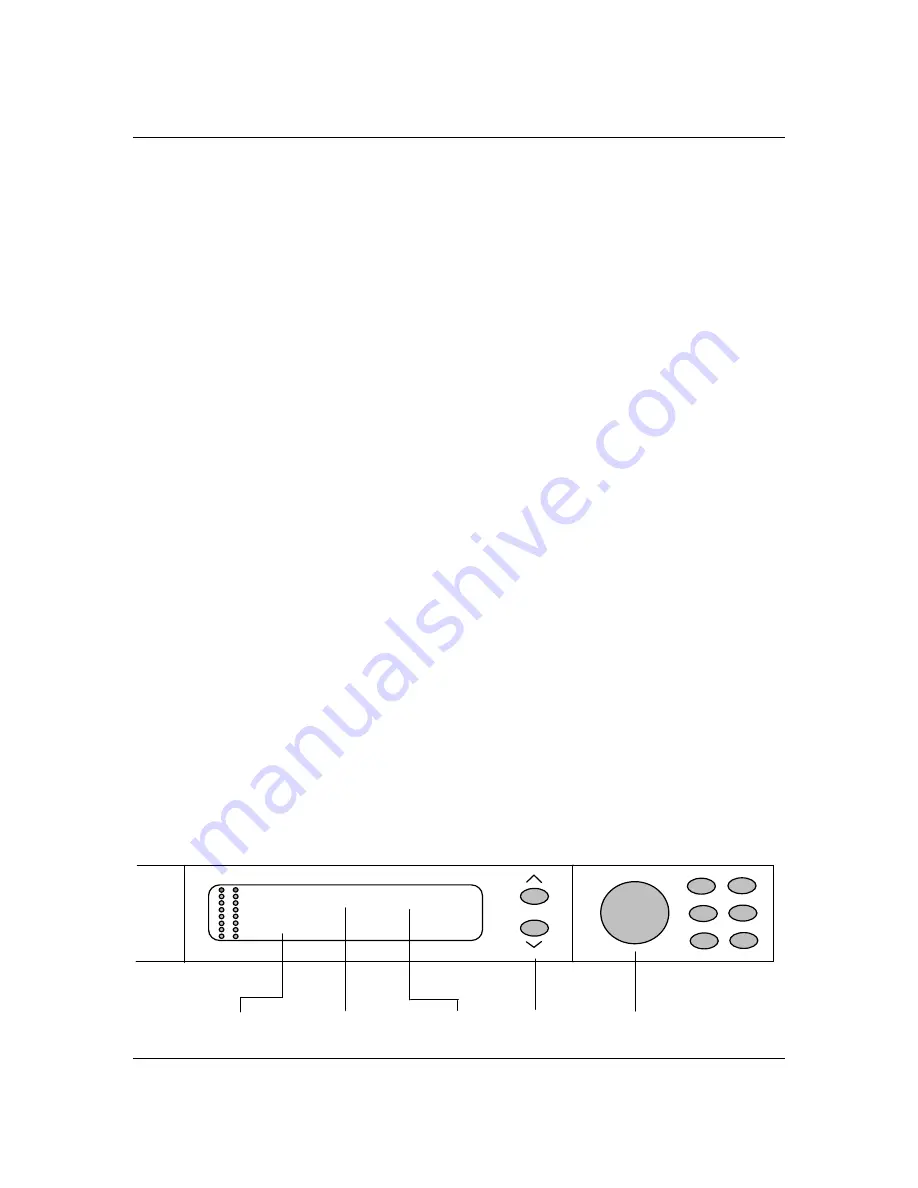
Example of the display in program select mode

L a r g e   H a l l           *

PROG

ENTER

H a l l s


Displays program group 

Program name 

Program  Load *  Steps through Banks 

Adjust Knob Scrolls


through 

pgms. 

2-2 


Summary of Contents for M7 Owner's manual

Page 1: ...Owner s Manual M7 The Model Seven Stereo Digital Reverb Processor Rev 6 22 09...

Page 2: ......

Page 3: ...use the M7 to enter thermal shutdown and stop processing sound as a safety precaution and may cause damage to the internal processors and components y The M7 is built with a temperature controlled coo...

Page 4: ...SA hereby declares on own responsibility the following products M7 Stereo Reverb Processor that is covered by this certificate and marked with the CE label conforms to the following standards EN 60065...

Page 5: ...erwise does not operate normally Service There are no user serviceable parts inside All service must be performed by qualified personnel Warning To reduce the risk of fire or electrical shock do not e...

Page 6: ......

Page 7: ...d Analog I O 1 6 2 Operation 2 0 Front Panel Operation 2 1 Selecting Preset Programs 2 2 Editing a Preset Program 2 3 Storing and Recalling edited programs 2 4 Setting System Parameters 2 7 The System...

Page 8: ......

Page 9: ...ht easy to read display legible at a distance and at any angle Technology We use the latest digital technologies the best DSPs state of the art A D conversion together with uncompromising great classi...

Page 10: ......

Page 11: ...1 Installing the M7 Installing the M7 1 The basic controls and functions 2 Mounting and installation 3 Mains power requirements 5 Setting the analog audio levels 6 Digital audio connections 1 0...

Page 12: ...and scrolls through programs in the program mode adjusts effect parameters in edit mode 6 System Key Takes you to the system menu to select system setup parameters 7 Edit Key Brings you to the effect...

Page 13: ...SET BY THE MANUFACTURER 3 MIDI I O MIDI in and out These have no function for V1 and are reserved for future enhancement and functions 4 AES Digital I O Balanced AES single wire digital I O Self cloc...

Page 14: ...ld be used only with balanced AES sources Care should be taken to only use cabling for the installation that is designed for AES digital audio data and not mic cable or other analog audio patch or ins...

Page 15: ...d in a rack or road case we recommend that you provide support for the rear of the unit during transport to prevent possible damage from severe mechanical shock Also care should be taken for proper ve...

Page 16: ...LED is 0 dB 0 db 6 db 12 db 18 db 24 db 36 db 72 db 48 db Front panel meter level indicator values 4 Set the output level found in the System menu and select 8 dB 16 dB or 24dB to best match the inpu...

Page 17: ...ample rates from 44 1k to 192k and is displayed on the Digital Status display by pressing the down key to move to the next screen EDIT A u d i o F o r m a t D i g i t a l Value Parameter selects param...

Page 18: ...1 7...

Page 19: ...2 Operation This chapter describes the front panel controls and functions of the M7 2 0...

Page 20: ...which adjusts these parameters Lower display is for displaying MODE program edit system and register and for program group or type register groups edit parameter type system parameter type Metering se...

Page 21: ...are selected the knob will only move through presets in the HALLS bank until the bank is changed Pressing the Enter key will load the program selected If the program is not loaded there will be an at...

Page 22: ...keys will step you through the available parameters for that program shown on the upper display Adjust Knob Turning the adjust knob will adjust the parameter value shown on the lower display Example...

Page 23: ...t in the registers These work like a car radio you just press and hold to store a program at that location tap 1 2 3 4 The Favorite Keys Saving to a Favorite key While in PROG or EDIT mode simply pres...

Page 24: ...ge locations so you can choose the right place to store your edited effects along with others of similar type or from the same session etc To choose a different location turn the adjust knob to find a...

Page 25: ...user registers by groups of 10 the adjust knob scrolls one by one After finding one press Enter and the program will be loaded As with selecting programs the will appear when you are viewing a regist...

Page 26: ...he parameters Pressing Enter will set the parameter that has been selected using the adjust knob An will appear when a parameter displayed is not the active one Note An important difference between ed...

Page 27: ...l mixing functions sets level of the processed or reverb signal 0 to 60dB in 1 2dB steps Off Used in conjunction with the Dry Gain this parameter will set the level for the processed audio the reverb...

Page 28: ...d lock to that external clock If the digital input is removed or fails for some reason the M7 will mute the outputs If the digital input is renewed with a valid data stream the M7 will switch back to...

Page 29: ...sing Store on the front panel On the lower display after the bank number the character L will disappear in both the system menu and the register select menu when the bank is unlocked Turn the adjust k...

Page 30: ...2 11...

Page 31: ...3 The Reverb Programs 1 The Reverb Types 2 The Reverb Parameters 3 Preset list 3 0...

Page 32: ...ction applications and adding space to dialog and solo instruments in music mixes Plates The programs found in the Plates group are reverberation programs designed to emulate the sound of an analog me...

Page 33: ...set of reverberation Reverb Diffusion Control Range Low 1 9 High Sets initial diffusion of the reverb Displayed and controlled as a percentage change from the initial value defined by the preset Rever...

Page 34: ...d late reverberant fields Early Reverb Mix Control Range 0 20 0 20 Sets the balance between the early and later parts the reverberant fields Early Rolloff Control Range 80 Hz 20 kHz Sets the rolloff f...

Page 35: ...oom Heavy Room Large Wooden Small Wooden Large Tiled Medium Tiled Small Tiled Drum Chamber Diagnose Room Small Vox Glass Room Percussion Rm Marble Foyer Large Q Room Small Q Room Large Red Room Red Ro...

Page 36: ...3 5...

Page 37: ...4 Software Upgrades Upgrading your M7 4 0...

Page 38: ...d to change the parts and although a full detailed installation instruction guide is supplied with every upgrade and no special tools are required the work should be performed by a qualified service t...

Page 39: ...5 Technical Specifications Technical details about the M7 5 0...

Page 40: ...nce 100 k ohm Max input level 24 dbm Min input level 4 dbm A D Conversion 24 bit 96 kHz Dynamic Range 117dB A Weighted THD N 001 Frequency Response 10 hz 20 kHz 002 dB CMMR 100dB 1 kHz Analog Outputs...

Page 41: ...rature 22 f to 167 F 30 C to 70 C General Finnish Anodized Aluminum front panel Stainless Steel Top Cover and Chassis Dimensions 19 x 1 75 x 11 Weight 9 lbs Shipping Weight 12 lbs Mains Voltage 100 24...

Page 42: ...Notes 5 3...

Page 43: ......

Page 44: ...M7 The Model Seven Bricasti Design Ltd Bricasti Design com All rights reserved...

Reviews: