background image

Inspection, Service and Maintenance 

Bri-Mar 

                   121                                 

manual to see how to adjust your brakes.  If you do not have this manual, 
call Bri-Mar Manufacturing LLC at 1-717-263-6116 for a free copy. 


Jack up the trailer and secure it on adequate capacity jack stands. 


Be sure the wheel and brake drum rotate freely. 


Remove the adjusting-hole cover from the adjusting slot on the 
bottom of the brake backing plate. 


With a screwdriver or standard adjusting tool, rotate the starwheel of 
the adjuster assembly to expand the brake shoes.  Adjust the brake 
shoes out until the pressure of the linings against the drum makes the 
wheel very difficult to turn.  Note:  Your trailer maybe equipped with 
drop spindle axles.  See axle manual for your axle type.  You will 
need a modified adjusting tool for adjusting the brakes in these axles.  
With drop spindle axles, a modified adjusting tool with about an 80 
degree angle should be used. 


Rotate the starwheel in the opposite direction until the wheel turns 
freely with a slight drag. 


Replace the adjusting-hole cover. 


Repeat the above procedure on all brakes. 


Lower the trailer to the ground. 

8.2.3.3  Trailer Brakes - Electric 

Two different types of electric brakes may be present on the trailer: an 
emergency electric breakaway system, which acts only if the trailer 
comes loose from the hitch and the breakaway pin is pulled.  The other 
brake is an electric braking system that acts whenever the brakes of the 
tow vehicle are applied. 
 

Breakaway Brake 
 
Breakaway Battery

 – Dump trailers use the DC power unit battery to 

supply the power to operate the trailer brakes if the trailer uncouples 
from the tow vehicle.  If the internal battery is allowed to drain below a 
15% level, external charging is required using a commercial battery 
charger  Be sure to check, maintain and replace the battery according to 
the battery manufacturer’ instructions.  Check the fuses in the battery box 
before each tow. 
 

Trailers                    

Summary of Contents for DT508LP

Page 1: ...nd instructions for your trailer You must read this manual before loading or towing your trailer You must follow all safety precautions and instructions BWise Manufacturing LLC 1002 Wayne Avenue Suite...

Page 2: ...Please pay particular attention to the boxes throughout this manual highlighting certain caution yellow warning orange and danger red situations...

Page 3: ...of Breakaway Brake 9 2 2 7 Mismatch of Trailer and Hitch 10 2 2 8 Unsafe Tire Lug Nuts or Wheels 10 2 2 9 Improper Loading 12 2 2 10 Unsafe Load Distribution 13 2 2 11 Shifting Cargo 14 2 2 12 Inappr...

Page 4: ...Vehicle 51 4 2 COUPLING AND UNCOUPLING THE TRAILER 53 4 2 1 Various Coupler Designs 54 4 2 2 Trailer with Ball Hitch Coupler 55 4 2 2 1 Before Coupling the Trailer to the Tow Vehicle 57 4 2 2 2 Prepar...

Page 5: ...ponents 106 5 4 6 Body safety prop 106 5 4 7 Securing the cargo 108 6 CHECKING THE TRAILER BEFORE AND DURING EACH TOW 109 6 1 PRE TOW CHECKLIST 109 6 2 MAKE REGULAR STOPS 109 7 ACCESSORIES 111 7 1 ACC...

Page 6: ...ng and Pintle 127 8 2 5 3 Gooseneck 127 8 2 5 4 Fifth Wheel Kingpin 128 8 2 6 Landing Leg or Jack 128 8 2 7 Lights and Signals 128 8 2 8 Accessory Battery 129 8 2 9 Accessory DC Power Unit 129 8 2 9 1...

Page 7: ...from the trailer causing a crash leading to death or serious injury Lug nuts are prone to loosen after being first assembled Death or serious injury can result Check lug nuts for tightness on a new t...

Page 8: ...d stop is used to Confirm that the brakes work Confirm that the trailer brakes are properly synchronized with the tow vehicle brakes using the brake controller in the tow vehicle Adjust the brake shoe...

Page 9: ...assemblies brake systems wheels tires light systems hitch couplers jacks power units cylinders or other accessories or purchased parts are covered by the warranty of the original manufac turer The war...

Page 10: ...nt dealer or company is authorized to change modify or extend its terms in any manner whatsoever EXCLUSIONS AND LIMITATIONS This warranty shall not extend to Equipment which has been modified repaired...

Page 11: ...Some of these items have separate instruction manuals Where this manual indicates that you should read another manual and you do not have that manual call Bri Mar Manufacturing LLC at 1 717 263 6116 f...

Page 12: ...Not maintaining proper tire pressure Not keeping lug nuts tight 2 2 1 Improper Sizing of the Trailer to the Tow Vehicle Trailers that weigh too much for the towing vehicle can cause stability problems...

Page 13: ...at is on the inside corner Furthermore the trailer will change the handling characteristics of your towing vehicle making it more sensitive to steering inputs and more likely to be pushed around in wi...

Page 14: ...erly Coupled to the Hitch It is critical that the trailer be securely coupled to the hitch ball and that the safety chains and emergency break away brake cable are correctly attached Uncoupling may re...

Page 15: ...ights are connected and checked 2 2 5 Proper Use of Safety Chains If your trailer comes loose from the hitch for any reason we have provided safety chains so that control of the trailer can still be m...

Page 16: ...tch fails The breakaway cable must be connected to the tow vehicle and NOT to any part of the hitch Before towing the trailer test the function of the breakaway brake system If the breakaway brake sys...

Page 17: ...ire pressure causes increased tire wear and may reduce trailer stability which can result in a tire blowout or possible loss of control Therefore before each tow you must also check the tire pressure...

Page 18: ...sen after first being assembled When driving a new trailer or after wheels have been remounted check to make sure they are tight after the first 10 25 and 50 miles of driving and before each tow there...

Page 19: ...trailer can result in failure or in loss of control of the trailer leading to death or serious injury Never load a trailer so that the weight on any tire exceeds its rating Never exceed the trailer Gr...

Page 20: ...ch Fifth Wheel Hitch 20 25 Towing stability also depends on keeping the center of gravity as low as possible WARNING Improper tongue weight load distribution can result in loss of control of the trail...

Page 21: ...rgo may be ejected onto the road resulting in death or serious injury to other drivers Always secure the door latch after closing Place a linchpin in the catch 2 2 12Inappropriate Cargo A utility trai...

Page 22: ...oad you must operate the brake controller while trying to pull the trailer in order to confirm that the electric brakes operate While towing the trailer at less than 5 mph manually operate the electri...

Page 23: ...For Dump Trailers A dump trailer is specifically designed for hauling cargo that is to be dumped and in some cases hauling equipment It is not for transporting livestock The major hazards associated w...

Page 24: ...lt An altered or component substituted hydraulic system may malfunction resulting in the dump body falling without warning NEVER alter or substitute any hydraulic system component 2 2 16Hazards from A...

Page 25: ...ension cord designed for outdoor use Plug into a GFI Ground Fault Interrupted receptacle to prevent possible shock WARNING To reduce the risk of explosion explosive gases or injury while using your ba...

Page 26: ...rse order to prevent tools from contacting the frame and short circuiting the battery Please contact Bri Mar Manufacturing LLC for service information on your power unit Escaping fluid under pressure...

Page 27: ...General Safety Information Bri Mar 21 2 2 17Safety Warning Labels on Your Trailer Figure 2 1 Bumper Pull Safety Warning Label Locations Trailers...

Page 28: ...General Safety Information Bri Mar 22 Figure 2 2 Gooseneck Safety Warning Label Locations Trailers...

Page 29: ...lity of the tow vehicle with a loaded trailer Because of the significant differences in all aspects of maneuverability when towing a trailer the hazards and risks of injury are also much greater than...

Page 30: ...ly rotating the steering wheel clockwise with your hands at the bottom of the wheel will move the rear of the trailer to the left while backing up If you are towing a bumper hitch rig be careful not t...

Page 31: ...apply the trailer brakes with the hand controller Make regular stops about once each hour Confirm that The coupler is secure to the hitch and is locked Electrical connectors are made There is appropri...

Page 32: ...safercar gov or write to Administrator NHTSA 1200 New Jersey Avenue SE Washington DC 20590 You can also obtain other information about motor vehicle safety from http www safercar gov Call 1 717 263 61...

Page 33: ...Safety Everything Rides On It This brochure as well as the preceding subsections describe the following items Tire labeling including a description and explanation of each marking on the tires and inf...

Page 34: ...inflation levels Cold means that the tires are at the same temperature as the surrounding air such as when the vehicle has been parked overnight Wheel and tire manufacturers recommend adjusting the a...

Page 35: ...e tires are fully inflated to the maximum rated pressure and that you store them in a cool dry place such as a garage Use tire covers to protect the trailer tires from the harsh effects of the sun 3 2...

Page 36: ...vel needs When loading your cargo be sure it is distributed evenly to prevent overloading front to back and side to side Heavy items should be placed low and as close to the axle positions as reasonab...

Page 37: ...e Information Placard attached adjacent to or near the trailer s VIN Certification label at the left front of the trailer 3 2 2 Trailers Over 10 000 Pounds GVWR Note These trailers are not required to...

Page 38: ...cargo being loaded on the vehicle That weight may not safely exceed the available cargo and luggage capacity calculated in Step 4 6 If your vehicle will be towing a trailer load from your trailer will...

Page 39: ...ber compounds Cracking Any parting within the tread sidewall or inner liner of the tire extending to cord material CT A pneumatic tire with an inverted flange tire and rim system in which the rim is d...

Page 40: ...er coupler Innerliner The layer s forming the inside surface of a tubeless tire that contains the inflating medium within the tire Innerliner separation The parting of the innerliner from cord materia...

Page 41: ...or separably to the wheel center member and upon which the tire is attached Non pneumatic spare tire assembly A non pneumatic tire assembly intended for temporary use in place of one of the pneumatic...

Page 42: ...d tire including elevations due to labeling decorations or protective bands or ribs Pin Weight The downward force applied to the 5th wheel or gooseneck ball by the trailer kingpin or gooseneck coupler...

Page 43: ...t higher loads and at higher inflation pressures than the corresponding standard tire Rim A metal support for a tire or a tire and tube assembly upon which the tire beads are seated Rim diameter This...

Page 44: ...ss Treadwear indicators TWI The projections within the principal grooves designed to give a visual indication of the degrees of wear of the tread Vehicle capacity weight The rated cargo and luggage lo...

Page 45: ...al Traffic Safety Administration NHTSA has published a brochure DOT HS 809 361 that discusses all aspects of Tire Safety as required by CFR 575 6 This brochure is reproduced in part below It can be ob...

Page 46: ...res and overloaded vehicles are a major cause of tire failure Therefore as mentioned above to avoid flat tires and other types of tire failure you should maintain proper tire pressure observe tire and...

Page 47: ...our tires are not cold Because tires are designed to be used on more than one type of vehicle tire manufacturers list the maximum permissible inflation pressure on the tire sidewall This number is the...

Page 48: ...Check all the tires to make sure they have the same air pressure except in cases in which the front and rear tires are supposed to have different amounts of pressure If you have been driving your vehi...

Page 49: ...alanced This balance is achieved by positioning weights on the wheel to counterbalance heavy spots on the wheel and tire assembly A wheel alignment adjusts the angles of the wheels so that they are po...

Page 50: ...ge In general the larger the number the wider the tire Next number This two digit number known as the aspect ratio gives the tire s ratio of height to width Numbers of 70 or lower indicate a short sid...

Page 51: ...ed Rating The speed rating denotes the speed at which a tire is designed to be driven for extended periods of time The ratings range from 99 miles per hour mph to 186 mph These ratings are listed belo...

Page 52: ...Pressure This number is the greatest amount of air pressure that should ever be put in the tire under normal driving conditions 3 5 10 2 UTQGS Information Treadwear Number This number indicates the t...

Page 53: ...for light trucks or trailers ST An ST is an indication the tire is for trailer use only Max Load Dual kg lbs at kPa psi Cold This information indicates the maximum load and tire pressure when the tire...

Page 54: ...to strike the curb when parking Tire Safety Checklist Check tire pressure regularly at least once a month including the spare Inspect tires for uneven wear patterns on the tread cracks foreign object...

Page 55: ...n or equal to the tow vehicle s rated towing capacity If you already have or plan to buy a trailer make certain that the tow rating of the tow vehicle is equal to or greater than that of the trailer D...

Page 56: ...nd other supplies GVWR is sometimes referred to as GTW Gross Trailer Weight or MGTW Maximum Gross Trailer Weight GVWR GTW and MGTW are all the same rating GAWR The Gross Axle Weight Rating is the maxi...

Page 57: ...Vehicle Vehicle manufacturers will provide you with the maximum towing capacities of their various models as well as the GCWR No amount of reinforcement will give a 100 horsepower 2 500 pound truck th...

Page 58: ...er circuit Electrical Connector An Electrical Connector connects the light and brake systems on the trailer to the light and brake controls on the towing vehicle Heavy Duty Engine Oil Cooling System T...

Page 59: ...extend and are attached to the towing vehicle including bumpers intended to serve as hitches Safety chains Chains permanently attached to the trailer such that if the coupler connection comes loose t...

Page 60: ...to raise and lower the trailer tongue On larger trailers the jack is sometimes called the landing gear WARNING An improperly coupled trailer can result in death or serious injury Do not move the trai...

Page 61: ...4 2 This system of coupling a trailer to a tow vehicle is sometimes referred to as bumper pull The tongue jack is mounted to the A frame front or tongue part of the trailer By rotating the jack handl...

Page 62: ...rovide a hitch and ball for your tow vehicle where the load rating of the hitch and ball is equal to or greater than that of your trailer Also the ball size must be the same as the coupler size If the...

Page 63: ...and inspect it visually and by feel for flat spots cracks and pits WARNING A worn cracked or corroded hitch ball can fail while towing and may result in death or serious injury Before coupling trailer...

Page 64: ...bricate the hitch ball and the inside of the coupler with a thin layer of automotive bearing grease If your trailer is equipped with a jack raise the coupler above the ball height Open the coupler loc...

Page 65: ...e the rear of the tow vehicle Using the trailer jack test to see that you can raise the rear of the tow vehicle by 1 inch after the coupler is locked to the hitch Notice The tongue jack can be damaged...

Page 66: ...pintle is too small too large is underrated is loose or is worn the trailer can come loose from the tow vehicle and may cause death or serious injury THE TOW VEHICLE HITCH AND PINTLE MUST HAVE A RATED...

Page 67: ...the pintle for wear corrosion and cracks Replace worn or damaged pintle Rock the pintle to make sure it is tight to the hitch and visually check that the pintle fasteners are solid against the hitch...

Page 68: ...g to the pintle Insert the safety lock pin through the hole in the locking mechanism Be sure the ring is all the way on the pintle and the locking mechanism is engaged A properly engaged locking mecha...

Page 69: ...the safety chains can hold the tongue up above the road Loop around a frame member of the tow vehicle or to holes provided in the hitch system but do not attach them to an interchangeable part of the...

Page 70: ...ctors Check all lights for proper operation Clearance and Running Lights Turn on tow vehicle headlights Brake Lights Step on tow vehicle brake pedal Turn Signals Operate tow vehicle directional signal...

Page 71: ...breakaway brake system will apply electric brakes on the trailer The safety chains will keep the tow vehicle attached and as the brakes are applied at the trailer s axles the trailer tow vehicle combi...

Page 72: ...will not necessarily be locked If the brakes do not function do not tow the trailer until brakes or battery are repaired Immediately replace the pullpin The breakaway brake system battery discharges r...

Page 73: ...ehicle attached to the trailer allowing the trailer tow vehicle combination to come to a stop If the safety chains also fail a properly connected and working breakaway system will apply the hydraulic...

Page 74: ...mooth trailer braking without special application by the tow vehicle driver While this is extremely convenient it can sometimes be difficult to determine if the surge setup is functioning properly The...

Page 75: ...ance but continued force on the board will switch them into free backing mode and you ll be able to move the trailer backwards If you have uni servo or duo servo brakes and stroking the actuator as de...

Page 76: ...ed in the bed of the tow vehicle See figure 4 8 A gooseneck trailer with a king pin on the trailer connects to a fifth wheel that you must have installed in the bed of the tow vehicle This system of c...

Page 77: ...T THE GOOSENECK BALL BE OF THE SAME SIZE AS THE GOOSENECK BALL RECEIVER The ball size and load rating capacity are marked on the ball hitch capacity is marked on the hitch Coupler to hitch mismatch ca...

Page 78: ...seneck ball clean and inspect it visually and by feel for flat spots cracks and pits WARNING A worn cracked or corroded gooseneck ball can fail while towing and may result in death or serious injury B...

Page 79: ...handle or crank from its holder Rotate the handle crank clockwise to raise the bottom surface of the gooseneck to be above the top of the gooseneck ball 4 2 8 1 Prepare the Gooseneck Receiver Release...

Page 80: ...hat you can raise the rear of the tow vehicle by 1 inch The drop leg jack can be damaged by overloading Do not use the drop leg jack to raise the tow vehicle more than 1 inch If the gooseneck ball can...

Page 81: ...rs in the bed of the truck See figure 4 10 If you are not certain of the provisions for receiving safety chains contact the hitch manufacturer or installer Do NOT attach the safety chains to the goose...

Page 82: ...way Brake System If the coupler or hitch fails a properly connected and working breakaway brake system will apply electric brakes on the trailer See figure 4 11 The safety chains will keep the tow veh...

Page 83: ...r installer if you are not certain of the hitch provisions for breakaway brake connection To check the breakaway brake battery pull out the pullpin from the switch and attempt to pull the trailer forw...

Page 84: ...trical connectors Check all lights for proper operation Clearance and Running Lights Turn on tow vehicle headlights Brake Lights Step on tow vehicle brake pedal Turn Signals Operate tow vehicle direct...

Page 85: ...the electrical connector Disconnect the breakaway brake switch lanyard Disconnect the safety chains from the tow vehicle Move the spring loaded gooseneck receiver lock plate locking pin to the OPEN p...

Page 86: ...er pin housing If your trailer has two drop leg jacks lower them both to the same level following the above instructions Notice If the drop legs are not set at the same level one of the drop leg jacks...

Page 87: ...y is level while connected to the tow vehicle A level trailer allows equal weight distribution on the axles Your dealer or a trailer service center can perform this adjustment or you can use the follo...

Page 88: ...ck nut Two new lock nuts are provided with your trailer to use for the hitch adjustment Use new lock nuts each time the hitch height is adjusted Contact your dealer for the proper grade and size of lo...

Page 89: ...er and the sides of the tow vehicle bed Connect trailer to tow vehicle see Coupling To The Tow Vehicle and load the trailer to rated capacity see Loading and Unloading The Trailer Park the tow vehicle...

Page 90: ...he maximum the receiver can be extended is 8 inches See figure 4 14 Reinstall locking pin 2 Tighten bolt 1 to 150 170 lb ft of torque Tighten jam nut to 80 90 lb ft of torque prevent bolt from looseni...

Page 91: ...loaded trailer weight otherwise the trailer can develop an undesirable sway at towing speeds or the rear of the towing vehicle can be overloaded Read the Tongue Weight information in Section 5 1 The l...

Page 92: ...m a solid and level foundation Not fully opening rear doors when dumping Jerking the trailer or hydraulics to loosen the load Trailer coming near or contacting overhead power lines when body is raised...

Page 93: ...ter or substitute any hydraulic system component 5 1 TONGUE WEIGHT It is critical to have a portion of the trailer load carried by the tow vehicle That is the trailer tongue must exert a downward forc...

Page 94: ...t wheels are driving In addition to tow vehicle control tongue weight is necessary to insure that the trailer axle s do not exceed their Gross Axle Weight Rating GAWR In the following table the second...

Page 95: ...ry called a tongue weight scale If a tongue weight scale is not available from your dealer call Bri Mar Manufacturing LLC at 1 717 263 6116 for assistance An alternate method of checking tongue weight...

Page 96: ...e proper number of chain links attached to the snap up brackets 5 3 LOADING FIXED LOADS Including equipment such as skid steer loaders mowers etc Fixed loads that are to be carried or dumped should be...

Page 97: ...load or unload trailer unless coupled to tow vehicle and is on a firm and level surface Place blocking under the rear of the trailer so the weight of the cargo does not raise the front of the trailer...

Page 98: ...weight of each loading ramp is 90 lbs Use a safe lifting procedure to prevent personal injury when handling ramps Remove ramps from storage position and place bracket 2 on ramps in channel on trailer...

Page 99: ...s and tensioning devices Refer to www fmsca dot gov for regulations regarding cargo securement rules Remove ramps and place in storage position Be carefully not to pinch fingers when sliding ramps in...

Page 100: ...trailer so the weight of the cargo does not raise the front of the trailer during unloading Open and secure rear doors with pins See figure 5 1 Remove ramps from storage position and place bracket 2...

Page 101: ...acity and must be distributed evenly 5 4 1 Prepare Trailer For Loading Couple the trailer to the towing vehicle before loading This is essential because the tongue can raise during loading To measure...

Page 102: ...jack crane heavy equipment etc If the load does not leave the dump body Lower the dump body and manually free the load Never attempt to free a load from a raised dump body 5 4 2 Loading Bulk Material...

Page 103: ...round the dump trailer Park the tow vehicle and trailer on a firm and level surface both left right and front rear Attempting to unload on a soft or uneven surface may cause the trailer to overturn wh...

Page 104: ...latched causing serious injury Stand away from the trailer to unlatch spreader gate Unlock spreader gate by removing pins 1 See figure 5 5 Figure 5 5 Unlock Spreader Gate Install metering chains 2 as...

Page 105: ...efore raising dump body Danger A lowering or falling dump body can result in death or serious injury NEVER enter the area under the dump body unless the empty dump body is supported by the body safety...

Page 106: ...equipped with a wireless remote dump control turn the remote on at the remote control module in the battery box Press and hold button 3 to raise the dump body Release the button when the body has reac...

Page 107: ...Stop tow vehicle after all material has exited the dump body Press and hold button 4 to lower the dump body See figure 5 7 Release the button when the dump body is fully lowered Place dump body contro...

Page 108: ...th or serious injury An overloaded trailer can cause the hydraulic system to malfunction resulting in the dump body falling A load that is improperly distributed in the trailer can result in the trail...

Page 109: ...s remote dump control turn the remote on at the remote module While using the dump body controller position yourself in a safe location clear of the dump body Check for overhead power lines and other...

Page 110: ...he body safety props are designed to support an empty dump body only NEVER support a loaded dump body by the body safety props Unload the dump body before using body safety props Standing well clear o...

Page 111: ...ious step See figure 5 9 Standing well clear of the dump body raise the dump body to the three quarter point of the maximum dump angle Discontinue pushing the up button and walk to the rear of trailer...

Page 112: ...ssure or flow rate to the hoist system Danger NEVER alter or substitute any hydraulic system component Death or serious injury may result An altered or component substituted hydraulic system may malfu...

Page 113: ...crushing Dump body can drop unexpectedly Never go under a raised dump body Use body safety prop for maintenance WARNING Risk of death by crushing Make sure dump body is empty DO NOT manipulate the bo...

Page 114: ...e all cargo that is not flowable so that it does not shift while the trailer is being towed The tarp rail on trailers so equipped is to be used only to secure a cover for any materials or equipment in...

Page 115: ...the Tow Vehicle section starting at Page 49 of this manual Test Tail Stop and Turn Lights Test trailer brakes Safety breakaway switch cable fastened to tow vehicle not to safety chains see the Couplin...

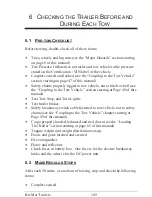
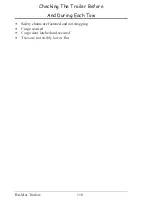
Page 116: ...Checking The Trailer Before And During Each Tow Bri Mar 110 Safety chains are fastened and not dragging Cargo secured Cargo door latched and secured Tires are not visibly low or flat Trailers...

Page 117: ...carbon monoxide poisoning If you have an accessory on your trailer make sure you have a fire extinguisher charged and ready before operating the accessory Check the fire extinguisher at least once a m...

Page 118: ...upted receptacle to prevent possible shock WARNING To reduce the risk of explosion explosive gases or injury while using your battery charger follow the precautions listed below Read all instructions...

Page 119: ...igher capacity charger first and use the trailer charger to maintain the battery after it has been charged 7 3 DC HYDRAULIC POWER UNIT A DC hydraulic power unit is used on dump trailers Most trailers...

Page 120: ...and protective clothing when working around hydraulic systems Remove jewelry and objects that might conduct electricity while working on power units Fluid under pressure can pierce the skin and enter...

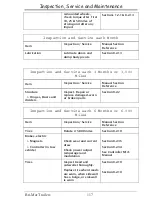
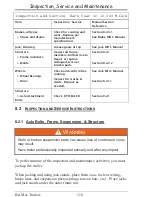
Page 121: ...ARTS You must inspect maintain and service your trailer regularly to insure safe and reliable operation If you cannot or are unsure how to perform the items listed here have your dealer do them Note I...

Page 122: ...trailer GVW Rating Grease Check locking device replace Section 4 2 2 1 Section 4 2 2 1 Section 8 2 5 1 Ring and Pintle Check for cracks pits and flats Replace w ring pintle having same trailer GVW Ra...

Page 123: ...ference Structure Hinges Doors and dividers Inspect Repair or replace damaged worn or broken parts Section 8 2 2 Inspection and Service each 6 Months or 6 000 Miles Item Inspection Service Manual Sect...

Page 124: ...rings Rims Check and confirm free running Inspect for cracks dents Replace as needed See Axle Mfr s Manual Section 8 2 11 Structure Axle Attachment Bolts Check BY DEALER Section 8 2 1 8 2 INSPECTION A...

Page 125: ...fastener and repair the frame member If you have any questions about the condition or method of repair of fasteners or frame members get the recommendation of or have the repair done by your dealer W...

Page 126: ...3 Trailer Brakes Electric 8 2 3 1 Brake Shoes and Drums Properly functioning brake shoes and drums are essential to ensure safety You must have your dealer inspect these components at least once per y...

Page 127: ...ool with about an 80 degree angle should be used Rotate the starwheel in the opposite direction until the wheel turns freely with a slight drag Replace the adjusting hole cover Repeat the above proced...

Page 128: ...serious injury can occur Check emergency breakaway brake system BEFORE each tow 8 2 3 4 Tow Vehicle Operated Electric Brakes The electric brakes that operate in conjunction with the tow vehicle brake...

Page 129: ...lers to keep them moving freely and to prevent corrosion Also apply grease to the front roller via the zerk fitting Grease every 5000 miles or 90 days of use See the surge brake manufacturer s manual...

Page 130: ...to return to its rest position Repeat the process until no more bubbles are released with the stroke Air trapped in the brake lines will greatly reduce your braking efficiency Be sure to close the ble...

Page 131: ...tely have your dealer inspect them to determine the proper action to prevent possible failure of the ball and coupler system All bent or broken coupler parts must be replaced before towing the trailer...

Page 132: ...vent proper operation of the latching mechanism When replacing a ring the load rating must match or exceed the GVWR of the trailer 8 2 5 3 Gooseneck The gooseneck receiver on the trailer connects to a...

Page 133: ...this manual call Bri Mar Manufacturing LLC at 1 717 263 6116 for more information 8 2 6 Landing Leg or Jack If a grease fitting is present you must use a grease gun to lubricate the jack mechanism Gr...

Page 134: ...r unit is not operating Never disconnect a hydraulic line or fitting without first supporting the empty dump body using the body safety prop In the event of a system leak hydraulic fluid can be expell...

Page 135: ...ingle acting cylinder on most trailers Some trailers are equipped with a double acting cylinder Refer to the proper schematics when servicing your trailer 8 2 9 1 DC Power Unit Maintenance Check fluid...

Page 136: ...th a load can be rapid Caution should be used when lowering the body with a load The double acting system M 3551 operates the motor in both UP and DOWN operation Selecting UP energizes the 4 way 2 pos...

Page 137: ...e manufacturers recommend adjusting the air pressure to the maximum pounds per square inch PSI listed on the sidewall of the tire when the trailer is fully loaded If the tires are inflated to less tha...

Page 138: ...the trailer tires with new ones should be considered even if the tires have adequate tread depth After five years trailer tires are considered worn out and should be replaced even if they have had min...

Page 139: ...y can drop unexpectedly Never go under a raised dump body Use body safety prop for maintenance Risk of death by crushing Make sure dump body is empty DO NOT manipulate the body safety prop if a person...

Page 140: ...nder a raised dump body without first supporting the empty dump body up with the body safety prop Pump grease into the each fitting 1 on the dump body pivot hinges and rear door hinges 2 every month S...

Page 141: ...rk the trailer on a firm and level surface Raise the dump body and hold the body safety prop 3 in the upright position Lower the dump body so the body safety prop engages the socket on the dump body S...

Page 142: ...ounted to a hub When driving on a remounted wheel check to see if the lug nuts are tight after the first 10 25 and 50 miles of driving and before each tow thereafter WARNING Lug nuts are prone to loos...

Page 143: ...uds or permanently deforming the mounting stud holes in the wheels Remove all excess paint oil and grease from mounting surfaces Start all lug nuts by hand to prevent cross threading Tighten lug nuts...

Page 144: ...Electrical Drawings Bri Mar 138 Trailers...

Page 145: ...Bri Mar 139 9 ELECTRICAL DRAWINGS Trailers...

Page 146: ...Bri Mar 140 Trailers...

Reviews: