background image

6

BREvILLE RECOMMENdS SAFETy FIRST

• 

Do not, under any circumstances, cut or 

remove the third (ground) prong from 

the power cord or use an adapter.

• 

Consult a qualified electrician if 

the grounding instructions are not 

completely understood, or if doubt 

exists as to whether the appliance is 

properly grounded.

BREvILLE ASSIST™ PLUG

Your Breville appliance comes with a unique 

Assist™ Plug, conveniently designed with 

a finger hole in the power plug for easy 

and safe removal from the wall outlet. For 

safety reasons it is recommended you 

plug your Breville appliance directly into 

its own electrical outlet on a dedicated 

circuit separate from other appliances. If 

the electric circuit is overloaded with other 

appliances, your appliance may not function 

properly. Use in conjunction with a power 

strip or extension cord is not recommended.

SHORT CORd INSTRUCTIONS

Your Breville appliance is fitted with a short 

power supply cord as a safety precaution to 

prevent personal injury or property damage 

resulting from pulling, tripping or becoming 

entangled with a longer cord. Do not allow 

children to use or be near this appliance 

without close adult supervision. Longer 

detachable power supply cords or extension 

cords are not recommended but may be 

used if care is exercised. If an extension cord 

is used, (1) the marked electrical rating of 

the cord set or extension cord should be at 

least as great as the electrical rating of the 

appliance, (2) the cord should be arranged 

so that it will not drape over the countertop 

or tabletop where it can be pulled on by 

children or tripped over unintentionally 

and (3) the extension cord must include a 

3-prong grounding plug.

FOR HOUSEHOLd USE ONLy

SAvE THESE INSTRUCTIONS

Summary of Contents for BFP800A

Page 1: ...otographed in this booklet may vary slightly from the actual product BFP800XL A Issue E13 USA Mail Breville USA 19400 S Western Ave Torrance CA 90501 1119 Phone 1 866 273 8455 1 866 BREVILLE Email ask...

Page 2: ...Suits all BFP800XL A models Pour tous les modeles BFP800XL A the Sous Chef Instruction Book Livret d instructions...

Page 3: ...your Breville product Registering is not a substitute for proof of purchase when submitting a Warranty Claim USA Consumers www brevilleusa com Canadian Consumers www breville ca Register online for pr...

Page 4: ...ping with the S Blade 18 Pur eing with the S Blade 20 Mixing with the S Blade 21 Kneading with the dough blade 22 Mini bowl function 22 Slicing shredding and grating with the multi function discs 26 W...

Page 5: ...e power outlet before attaching any blade disc or lid Handle the food processor and attachments with care Blades and discs are razor sharp and should be kept out of reach from children Always secure t...

Page 6: ...sher assembly in locked position This appliance is for household use only Do not use the appliance for anything other than its intended purpose as described in this book Do not use outdoors Do not use...

Page 7: ...perly Use in conjunction with a power strip or extension cord is not recommended SHORT CORD INSTRUCTIONS Your Breville appliance is fitted with a short power supply cord as a safety precaution to prev...

Page 8: ...KNOW your Breville product...

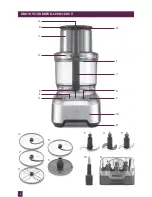
Page 9: ...8 KNOW your Breville PRODUCT A E F C D G L K H J I M N O R T X W U V P Q S B...

Page 10: ...safety and stability O Julienne Disc Use this disc for julienning vegetables P French Fry Vegetable Stick Disc Use this disc for french fries or thick cut vegetables Q Reversible Shredding Disc Use on...

Page 11: ...ASSEMBLING your Breville product...

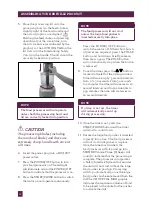
Page 12: ...bowl clockwise until the handle aligns with the TURN TO LOCK graphic The processing bowl should be securely locked into position 3 If using a disc first assemble the disc spindle onto the bowl drive c...

Page 13: ...the motor off When short bursts of power are required press the PULSE button and hold down briefly release then press again The PULSE action will automatically stop when the button is released 9 To se...

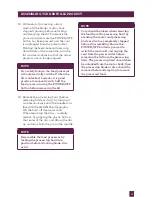
Page 14: ...blade or discs by turning it counter clockwise until the handle is in line with the ALIGN Handle graphic Lift the bowl off the motor shaft When removing the discs carefully remove by gripping the plas...

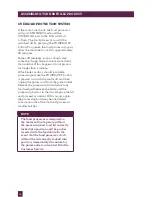
Page 15: ...processing ensure the POWER OFF button is pressed to switch the motor off and then unplug the power cord from the power outlet Remove the processing lid and adjust any food wedged between the blade an...

Page 16: ...BASIC FOOD PROCESSING TECHNIQUES for your Breville product...

Page 17: ...we recommend to use the PULSE button as it may only take a few seconds to fully process the food to the desired consistency If necessary press the POWER OFF button unlock the lid and use the spatula t...

Page 18: ...rocess no more than 2 bunches approx 4 cups at a time using the PULSE button at 1 2 second intervals until chopped to desired size or consistency Basil leaves Chopped basil Nuts Process no more than 6...

Page 19: ...ing bread crumbs add one slice at a time Dried breadcrumbs Tear bread into chunks and toast in oven until golden and crisp Do not over brown Process no more than 6 cups at a time using the PULSE butto...

Page 20: ...ually add no more than 4 cups stock and cream or milk through the small feed chute Do not exceed LIQUID MAX level Cooked pumpkin Pur ed pumpkin Cooked meat and pat s Trim and cut cooked meat into 1 in...

Page 21: ...feed chute mixing well after each addition Add liquid and dry ingredients to the mixture in the processing bowl and process using the PULSE button until folded through evenly If necessary interrupt t...

Page 22: ...rystals Using the emulsifying disk beat egg whites until foamy see Egg Whites pg 27 Add frozen fruit pur e to egg white foam and process using PULSE button until folded through evenly Freeze until rea...

Page 23: ...ng mixing whipping and blending a variety of foods SLICING SHREDDING AND GRATING WITH THE DISCS Slicing with the Adjustable Slicing Disc NOTE Use Adjustable Slicing Disc with Disc Spindle The adjustab...

Page 24: ...hredding 1 Place the desired cutting disc onto the disc spindle in the processing bowl 2 Prepare food as directed in the following food categories or recipes 3 Pack food into the feed chute as directe...

Page 25: ...length of the feed chute no more than 5 inches 14cm If food fits without the need to cut trim one end so that it sits flat in feed chute or the food should be able to lie on the side if you require a...

Page 26: ...so the flat end is facing the disc For wedge shaped cheese pack 2 pieces side by side into chute to form a rectangular shape one piece with tip facing down other piece with tip facing up Slice or shr...

Page 27: ...her is quickly removed from the feed chute after each piece of food is processed so the motor stops quickly Insert the next piece of food and repeat the process With some foods it may be necessary to...

Page 28: ...and using the emulsifying disc process using the PULSE button until whipped to desired consistency Egg sauces Mayonnaise Hollandaise Bearnaise Using the emulsifying disc place a minimum of 6 egg yolk...

Page 29: ...FOOD PROCESSING AT A GLANCE for your Breville product...

Page 30: ...uliflower soup Celery S Blade or mini blade Use Vegetable soup Thin 1 2 med 2 3 Use Salad Chili Pepper S Blade or mini blade Use Seasoning Eggplant S Blade or mini blade Use Accompaniment soups 2 5 Us...

Page 31: ...ooked S Blade or mini blade Use Creamed spinach Tomatoes S Blade or mini blade Use Salsa 2 5 Use sandwich filling caprese salad tomato relish Turnip S Blade or mini blade Use Vegetable soup Zucchini 3...

Page 32: ...Blade Use Cakes pancake waffle batter Emulsifying Use Cakes muffins crepes Breadcrumbs S Blade or mini blade Use Coatings breadcrumb stuffing Cheese 2 5 Use Garnish sandwich fillings Shredder Coarse...

Page 33: ...tter made in the food processor will separate on standing Stir just before use When processing a variety of ingredients it is not necessary to remove them after each addition unless they exceed the MA...

Page 34: ...CARE CLEANING STORAGE of your Breville product...

Page 35: ...other foods such as garlic may leave a strong odor To remove either soak the parts for 5 minutes in 2 liters of water with cup lemon juice added Rinse and wash as normal Storage Ensure the food proce...

Page 36: ...power cord or power plug in water or any other liquid Never store your food processor with the bowl fixed and lid locked into position Doing so will cause unnecessary strain on the auto operating swi...

Page 37: ...TROUBLESHOOTING...

Page 38: ...ue processing If not add more flour 1 tablespoon at a time until the motor speeds up Process until dough cleans the side of the processing bowl Dough blade doesn t fully incorporate ingredients When k...

Page 39: ...arge food pusher is inserted in the feed chute low enough to engage safety interlock switch LCD screen will read Insert Pusher If the motor still will not start check the power cord and power outlet T...

Page 40: ...RECIPES...

Page 41: ...to serve Serve chilled with slices of pita bread Mayonnaise Makes approximately 2 cups INGREDIENTS 3 egg yolks 2 teaspoons Dijon mustard 1 teaspoon seeded mustard 2 cloves garlic peeled optional 1 ta...

Page 42: ...processing bowl and PULSE 10 to 15 times or until medium chop is achieved 7 Heat a medium sauce pan on medium high heat Add olive oil and onions Sweat for 2 min or until onions turn translucent 8 Add...

Page 43: ...little extra oil over the top of the pesto and place a piece of plastic wrap on top of the pesto This will prevent excess browning Aioli Makes approximately 2 cups INGREDIENTS 1 whole head garlic 4 eg...

Page 44: ...ternut Squash Soup hot garnished with 1 tablespoon sour cream and a sprinkle of chives NOTE When making soups always allow the hot ingredients to cool for approx 30 minutes Leek and potato soup Makes...

Page 45: ...0 F 180 C Lightly grease a 9 22 5cm x 3cm loose base round pie pan 6 Assemble the processor with the adjustable slicing disc set to setting 3 4 Slice leeks 7 Heat butter and oil in a frying pan over a...

Page 46: ...pices into the processing bowl PULSE 4 to 6 times and then process until finely chopped 4 Add the eggs and water and PULSE until just combined being careful not to over process 5 Shape the mixture int...

Page 47: ...ocessing blade 4 Process the garlic until finely minced and set aside 5 Reassemble the food processor using S Blade 6 In a pre heated large skillet or large saucepan add the olive oil over medium heat...

Page 48: ...OUGH Makes enough for four 12 30cm thin crust pizzas or two 12 30cm thicker crust pizzas INGREDIENTS 3 cups 450g bread flour 3 teaspoons dry yeast 3 teaspoons sugar 3 teaspoons salt 1 tablespoon olive...

Page 49: ...e S Blade inserted and add chicken cilantro fish sauce and sesame oil Process until meat is finely minced and paste is evenly distributed about 5 seconds 3 Wet hands with cold water and form chicken i...

Page 50: ...erries washed and hulled 2 tablespoons brandy optional METHOD 1 Assemble the food processor using the S Blade 2 Place eggs milk butter flour and sugar into the processing bowl Process until smooth All...

Page 51: ...ed surface Press dough out gently with hands to about inch 2cm thickness 5 Using a 1 4cm scone cutter dip cutting edge into the extra flour and cut 12 scone shapes from the dough If desired re knead l...

Page 52: ...to each of the cupcake papers about 1 tablespoon each Press the dough down onto the bottom of each of the papers making sure the bottoms are covered evenly 1 4 thick as this will be the crust of each...

Page 53: ...strement n est pas un substitut la preuve d achat lorsque vous soumettez une r clamation de garantie Consommateurs am ricains www brevilleusa com Consommateurs canadiens www breville ca Inscrivez vous...

Page 54: ...acher avec la lame S BladeMC 69 R duire en pur e avec la lame S BladeMC 70 M langer avec la lame S BladeMC 72 P trir avec la lame p te 72 Fonction du mini bol 73 Trancher d chiqueter et r per avec les...

Page 55: ...au gaz ou lectrique o un endroit o il pourrait toucher une source de chaleur Ne l utilisez pas sur le plateau d gouttement du lavabo Assurez vous que le robot est compl tement assembl avant de le fai...

Page 56: ...tirer le couvercle Soyez tr s prudent lorsque vous retirez les aliments du bol du robot Assurez vous que le moteur et les lames disque sont compl tement immobilis s au pr alable Assurez vous d avoir t...

Page 57: ...lifi si vous ne comprenez pas les instructions de mise la terre ou si un doute existe quant la mise la terre ad quate de l appareil FICHE ASSISTMC DE BREVILLE Votre appareil Breville est muni d une fi...

Page 58: ...FAITES LA CONNAISSANCE de votre produit Breville...

Page 59: ...58 FAITES LA CONNSAISSANCE DE VOTRE produit BREVILLE A E C D L K H J I M N O R T X W U V P Q S B F G...

Page 60: ...out s antid rapants Pour plus de s curit et de stabilit O Disque juliennes Utilisez pour couper les l gumes en juliennes P Disque frites b tonnets de l gumes Utilisez pour faire des frites ou des b to...

Page 61: ...ASSEMBLAGE de votre produit Breville...

Page 62: ...Tournez le bol du robot en sens horaire jusqu ce que la poign e soit align e sur l inscription TURN TO LOCK Le bol se verrouillera en place 3 Si vous utilisez un disque fixez d abord la tige de rotati...

Page 63: ...Le contour de la touche s illuminera en rouge pour indiquer que le robot est en marche 8 Enfoncez la touche MARCHE PAUSE pour faire d marrer le moteur et proc der au traitement NOTE Le robot culinaire...

Page 64: ...ens antihoraire pour que les fl ches ne soient plus align es NOTE Par mesure de s curit le robot culinaire s arr tera automatiquement quand le couvercle sera d verrouill Cependant il est recommand d t...

Page 65: ...tion assurez vous d avoir teint le moteur en enfon ant la touche MARCHE ARR T et d avoir retir la fiche de la prise murale Retirez le couvercle et d gagez les aliments coinc s entre la lame et le bol...

Page 66: ...TECHNIQUES DE TRANSFORMATION DE BASE de votre produit Breville...

Page 67: ...utiliser la touche IMPULSION pour obtenir la consistance requise en quelques secondes seulement Si n cessaire pressez la touche MARCHE ARR T d verrouillez le couvercle et raclez les parois du bol ave...

Page 68: ...de 2 bouquets environ 4 tasses la fois en utilisant la touche IMPULSION intervalles de 1 2 secondes jusqu ce que le tout soit hach en format ou consistance d sir e Feuilles de basilic Basilic hach No...

Page 69: ...aitez pas plus de 4 tasses la fois en utilisant la touche IMPULSION intervalles de 1 2 secondes jusqu consistance d sir e NOTE Pour la chapelure traitez une tranche de pain la fois Chapelure s che Bri...

Page 70: ...peu de bouillon par le petit entonnoir afin d obtenir une pur e plus onctueuse Potage aux l gumes Utilisez la m me m thode que pour les l gumes cuits ci dessus et pendant que le moteur tourne ajoutez...

Page 71: ...pour cong lation pr t tre utilis M LANGER AVEC LA LAME MICRODENTEL E S BladeMC La lame S BladeMC m lange les ingr dients pour pr parer g teaux p tes cr pe et sauces base d oeufs comme la mayonnaise S...

Page 72: ...s puis les liquides et enfin les ingr dients secs M langez les ingr dients en utilisant la touche IMPULSION jusqu consistance homog ne Si n cessaire cessez l op ration retirez le couvercle et raclez l...

Page 73: ...e que le beurre soit absorb par la farine Si vous utilisez de l huile pendant que le moteur tourne versez l huile par le petit tube d alimentation et transformez jusqu ce que le m lange forme une boul...

Page 74: ...gl e Installez le disque minceur r glable sur la tige de rotation dans le bol du robot Refermez le couvercle et ins rez le large poussoir pour faire fonctionner l appareil NOTE L paisseur des tranches...

Page 75: ...omme les produits de charcuterie et le salami 5 R p tez l op ration pour trancher d chiqueter ou r per le reste des aliments Fruits et l gumes ronds Lavez pelez videz ou grenez les fruits et les l gum...

Page 76: ...ranch e Fromage Soyez tr s prudent lorsque vous traitez le fromage dans le robot culinaire Les fromages p te molle comme la mozzarella ou le bocconcini doivent tre tr s fermes mi congel s sans quoi il...

Page 77: ...l soit utilis principalement pour les pommes de terre il peut aussi servir d autres aliments Si vous traitez de grosses pommes de terre disposez les l horizontale dans l entonnoir afin d obtenir de tr...

Page 78: ...le bol du robot et l aide du disque mulsionneur transformez en utilisant la touche MARCHE PAUSE jusqu consistance mousseuse Afin de r duire le d goulinage n utilisez pas plus de 3 tasses 800ml de liqu...

Page 79: ...TRANSFORMATION DES ALIMENTS EN UN CLIN D OEIL de votre produit Breville...

Page 80: ...Utilit Soupe de l gumes 0 5 D chiqueteur Utilit Salade C leri S BladeMC ou mini lame Utilit Soupe de l gumes Mince 1 2 moyenne 2 3 Utilit Salade Champignons crus S BladeMC ou mini lame Utilit Soupe de...

Page 81: ...e l gumes Panais cuit S BladeMC ou mini lame Utilit Accompagnement Panais cuit S BladeMC Utilit Accompagnement Piments forts S BladeMC ou mini lame Utilit Asaisonnement Pois cuits S BladeMC ou mini la...

Page 82: ...ne S BladeMC ou mini lame Utilit Salade de fruits sauce pour dessert Kiwi S BladeMC ou mini lame Utilit Salade de fruits sauce pour dessert 4 6 Utilit D coration pour dessert Mangue S BladeMC ou mini...

Page 83: ...sandwich D chiqueteur Fin ou grossier Utilit Fromage r p pour pizza Oeufs la coque S BladeMC ou mini lame Utilit Sandwich oeufs mimosa 2 5 Utilit sandwich Oeufs entiers ou jaunes mulsionneur Utilit Ma...

Page 84: ...chides pr par dans le robot culinaire aura tendance se s parer Bien m langer avant l utilisation Lorsque vous transformez une vari t d ingr dients il n est pas n cessaire de les retirer apr s chaque a...

Page 85: ...ENTRETIEN NETTOYAGE RANGEMENT de votre produit Breville...

Page 86: ...BladeMC la lame p te les disques et la tige de rotation peuvent galement tre mis au lave vaisselle sur le plateau sup rieur seulement Odeurs et taches d aliments Les aliments comme les carottes peuve...

Page 87: ...s disques sont extr mement coupantes Manipulez les avec soin et ce en tout temps Ne plongez jamais le socle motoris le cordon d alimentation ou la fiche dans l eau ou tout autre liquide Ne rangez jama...

Page 88: ...GUIDE DE D PANNAGE...

Page 89: ...iller e la fois jusqu ce que le moteur acc l re Continuez jusqu ce que la p te nettoie les parois du bol Les ingr dients ne sont pas compl tement incorpor s par la lame p te Lorsque vous p trissez la...

Page 90: ...ra Insert Pusher Ins rer le poussoir Si le moteur ne d marre toujours pas v rifiez le cordon d alimentation et la prise murale Le robot culinaire s arr te pendant le fonctionnement Le couvercle peut s...

Page 91: ...RECETTES...
Page 92: ...e servir Servir froid accompagn de pain pita MAYONNAISE Environ 2 tasses INGR DIENTS 3 jaunes d oeufs 2 c th de moutarde de Dijon 1 c th de moutarde en grains 2 gousses d ail pel es optionnel 1 c soup...

Page 93: ...et mixer par impulsions 10 ou 15 reprises ou jusqu ce qu il soit moyennement hach 7 Pr chauffer une casserole feu moyen lev Ajouter l huile d olive et faire tomber les oignons 2 min 8 Ajouter l ail e...

Page 94: ...ique Recouvrir de quelques gouttes d huile et d une pellicule plastique Cela pr viendra la d coloration A OLI Environ 2 tasses INGR DIENTS 1 t te d ail 4 jaunes d oeufs Jus de 1 citron 2 c th de vinai...

Page 95: ...e 1 c soupe de cr me sure et saupoudr e de ciboulette hach e NOTE Lorsque vous pr parez des soupes laissez refroidir les ingr dients environ 30 minutes avant de les traiter POTAGE PARMENTIER Environ 2...

Page 96: ...icule plastique et r frig rer 20 min 5 Pr chauffer le four 180 C 350 F Graisser l g rement une assiette tarte de 22 5 cm 9 po 6 R assembler le robot culinaire avec le disque minceur r gl 3 4 et tranch...

Page 97: ...le bol du robot Mixer par impulsions de 4 6 fois puis continuellement jusqu finement hach 4 Ajouter les oeufs et l eau et vr pour bien m langer en vitant de trop mixer 5 Fa onner le m lange en boulett...

Page 98: ...h et r server 5 R assembler le robot culinaire avec la lame S BladeMC 6 Dans un po lon pr chauff ou une large casserole ajouter l huile d olive 7 Une fois que l huile aura commenc fr mir ajouter l oig...

Page 99: ...e surplus d air puis p trir l g rement 4 Pour une croute mince diviser la p te en 4 boules de 6 oz 170 g et r server jusqu au moment de l utiliser 5 Pour une croute plus paisse diviser la boule de p t...

Page 100: ...le sel et chauffer feu doux jusqu ce que le sucre soit dissout Augmenter la chaleur et cuire feu lev environ 5 min ou jusqu ce que le liquide ait r duit et soit sirupeux Retirer du feu et incorporer l...

Page 101: ...ve l g re pour un beurre tartinable Cette recette peut se pr parer avec la moiti des ingr dients COLESLAW 4 6 portions INGR DIENTS 250 g lb lb de chou blanc coup en quartiers 250 g lb de chou rouge co...

Page 102: ...qu ce que le dessous de la cr pe soit dor Tourner et cuire l autre c t Retirer et d poser sur une assiette R p ter l op ration avec le reste du m lange en empilant les cr pes s par es d une feuille de...

Page 103: ...ment sur une surface enfarin e Presser la p te avec les mains jusqu une paisseur de 2 cm po 5 Enfariner un emporte pi ce pour scones de 4 cm 1 po et couper la p te en 12 scones Si d sir p trir nouveau...

Page 104: ...te de biscuits Oreo galement dans chaque moule environ 1 c soupe chacun Presser la p te dans le fond des moules environ po d pais en s assurant que le fond est bien recouvert Cela deviendra la croute...

Reviews: