background image

77

g

Light

Press 

 / 

 to select Klux, Kfc or W/m²

h

Skin type

Press 

 / 

 to select Light, Medium or Dark skin type for exposure level

4.9.5 

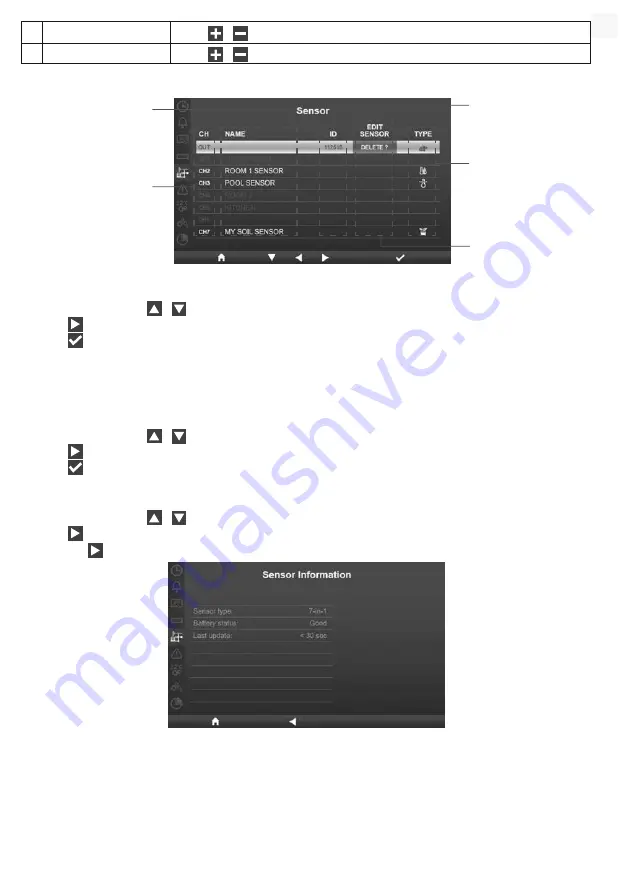
SENSOR STATUS & EDITING

Edit sensor column

Channel number 

column

Sensor type column

Sensor ID column

Sensor name column, 

you can name your 

sensor in setup UI 

4.9.5.1  ADD NEW SENSOR

1. In this section, press 

 / 

 key to select the empty channel.

2. Press 

 key to select the edit sensor column and it will show "Add?".

3. Press 

 key to start search the sensor.

4. In the meantime, select the channel in the sensor, then power up the sensor or press reset key of the 

sensor to start pairing.

5. Once connected, the sensor icon, ID and signal strength will show on the channel row.

4.9.5.2  DELETE CURRENT SENSOR

1. In this section, press 

 / 

 key to select the connected sensor.

2. Press 

 key to select the edit sensor column and it will show "Delete?".

3. Press 

 key to delete the sensor.

4.9.5.3  CHECK SENSOR STATUS

1. In this section, press 

 / 

 key to select the connected sensor.

2. Press 

 key twice to select the sensor type icon

3. Press the 

 key again to show the sensor connection status as below:

4.9.6 

ALERT SETTING

EN

Summary of Contents for 7003500

Page 1: ...DE BEDIENUNGSANLEITUNG EN INSTRUCTION MANUAL WIFI HD screen weather station with 7 in 1 professional sensor Art No 7003500...

Page 2: ...site nuestra p gina web utilizando el siguiente enlace c digo QR para ver las versiones disponibles IT Desidera ricevere informazioni esaustive su questo prodotto in una lingua specifica Venga a visit...

Page 3: ...DETAILANSICHT 19 4 3 3 BERSICHTSBILDSCHIRM 20 4 4 MERKMALE DER BASISSTATION 20 4 4 1 WETTERVORHERSAGE 20 4 4 2 MONDPHASE 21 4 4 3 TRENDINDIKATOR 21 4 4 4 DRAHTLOSER SIGNALEMPFANG 21 4 4 5 STATUS DER...

Page 4: ...SICH IHRE WETTERDATEN IN WUNDERGROUND AN 46 8 3 ANZEIGEN IHRER WETTERDATEN IN DER WATHERCLOUD 46 8 4 ANZEIGEN IHRER WETTERDATEN IN AWEKAS 47 9 FIRMWARE UPDATE 47 9 1 AKTUALISIEREN DER SYSTEM FIRMWARE...

Page 5: ...dhabung k nnen Kurzschl sse Br nde und sogar Explosionen ausgel st werden HINWEIS Bauen Sie das Ger t nicht auseinander Wenden Sie sich im Falle eines Defekts bitte an Ihren Fachh ndler Er nimmt mit d...

Page 6: ...ultisensor installieren beachten Sie bitte Folgendes 1 Der Regenmesser muss alle paar Monate gereinigt werden 2 Die Batterien m ssen alle 2 bis 2 5 Jahre gewechselt werden 3 Vermeiden Sie Strahlungsw...

Page 7: ...1 Windfahne 2 Windschalen 3 Antenne 4 Sonnenschutz 5 Thermo Hygrometer Sensor und L fter 6 Montageteile passend f r Mast mit 35 40mm Durchmesser 7 Batteriefachabdeckung 8 RESET Taste 9 LED f r den ber...

Page 8: ...Batterien nicht wiederaufladbar entsprechend der angegebenen Polarit t ein Die rote LED Anzeige auf der R ckseite des Multisensors leuchtet auf und beginnt dann alle 12 Sekunden zu blinken HINWEIS So...

Page 9: ...ntagebohrung des Sensors und ziehen Sie die Schrauben an Hinweis Bitte stellen Sie sicher dass der Sensor mit neuen Batterien ausgestattet ist und mit der Basisstation gekoppelt ist Schrauben Schritt...

Page 10: ...Befestigen Sie den Montagest nder und die Halterung im Lieferumfang enthalten an einem Pfosten oder einer Stange und lassen Sie sie mindestens 1 5 m ber dem Boden liegen F gen Sie vor der Montage an d...

Page 11: ...n Sensoren zusammen KANALNUMMER 7 BESCHREIBUNG Hochpr ziser Thermo Hygrometer Sensor Bodenfeuchte und Temperatursensor Pool Sensor BILD 3 4 EMPFEHLUNG F R BESTE DRAHTLOSE KOMMUNIKATION Eine effektive...

Page 12: ...20 Holz 10 30 Gipskarton Trockenbau 20 40 Ziegelstein 30 50 Isolierung aus Folie 60 70 Betonwand 80 90 Aluminium Verkleidung 100 Metallwand 100 Bemerkungen RF Signalreduzierung als Referenz 3 5 BASISS...

Page 13: ...t und das Datum sichern 3 Klappen Sie die Antenne auf der R ckseite aus 3 5 2 BASISSTATION EINRICHTEN Wenn Sie die Basisstation zum ersten Mal einrichten m ssen Sie eine Grundauswahl treffen 1 W hlen...

Page 14: ...NG DER BASISSTATION 4 1 STARTBILDSCHIRM Sobald die Basisstation mit dem 7 in 1 Multisensor und dem Thermo Hygrometer Sensor gekoppelt ist werden alle Wetterinformationen auf dem Bildschirm angezeigt w...

Page 15: ...n WEITERE FUNKTIONSTASTEN ZUR EINSTELLUNG SYMBOL BESCHREIBUNG Hoch Taste Dr cken Sie diese Taste um die obere Zeile oder den oberen Punkt auszuw hlen Runter Taste Dr cken Sie diese Taste um die untere...

Page 16: ...te Temperatur Feels like 9 Baro Druck UVI und Lichtintensit t 10 Windgeschwindigkeitslevel 11 Niederschlagsmenge und Regenrate 12 Wettervorhersage Mondphase 13 Datum 14 Mondphase 15 Sonnenaufgang Sonn...

Page 17: ...ondaufgang Monduntergang 30 Pegel der Regenrate 31 WI FI Verbindung und Zeitsynchronisationsanzeige 4 3 3 BERSICHTSBILDSCHIRM 5 6 7 8 9 10 12 11 1 2 3 4 13 14 15 16 1 Signalst rke Symbol des Innen Au...

Page 18: ...m atmosph rischen Druck sondern auf der Temperatur des gegenw rtigen Kanals Sinkt die Au entemperatur auf unter 3 C 26 F wird der Wettersymbol f r SCHNEE auf dem Display angezeigt 4 4 2 MONDPHASE Die...

Page 19: ...ur zwischen 26 C und 50 C liegt Hitze Index Bereich Warnung Erkl rung 27 C bis 32 C 80 F bis 90 F Vorsicht M glichkeit einer Hitzekollaps 33 C bis 40 C 91 F bis 105 F Besondere Vorsicht M glichkeit ei...

Page 20: ...ftdruck zu messen Da der absolute atmosph rische Druck mit der H he abnimmt korrigieren Meteorologen den Druck relativ zu den Bedingungen auf Meeresh he Daher kann Ihr ABS Druck in einer H he von 300...

Page 21: ...d zu gehen 31 38 mph 28 33 Knoten 13 9 17 1 m s 8 Orkan 62 74 km h Einige Bauzmzweige brechen Autos fahren auf der Stra e Der Fortschritt zu Fu wird ernsthaft behindert 39 46 mph 34 40 Knoten 17 2 20...

Page 22: ...rahlung Treffen Sie alle Vorsichtsma nahmen da ungesch tzte Haut und Augen in Minutenschnelle zu Verbrennungen f hren k nnen 4 4 11 SONNENAUF UND UNTERGANG MONDAUF UND UNTERGANG Die Basisstation berec...

Page 23: ...AGRAMM In diesem Bereich k nnen Sie alle Historie Verlaufsgrafiken anzeigen 1 Dr cken Sie die HOME Taste w hrend eines anderen Modus um die Symbole der Tastenfunktionen anzuzeigen 2 Dr cken Sie die Ta...

Page 24: ...r cken Sie die HOME Taste w hrend eines anderen Modus um die Symbole der Tastenfunktionen anzuzeigen 2 Dr cken Sie die Taste um den Bildschirm Datenprotokoll anzuzeigen 4 8 1 BEDIENUNG DES DATENPROTOK...

Page 25: ...e Taste um die Unterpunkte auszuw hlen Unterpunkt BETRIEB a Internet Zeitsynchronisation Dr cken Sie zum Einschalten oder Ausschalten b Zeitformate Dr cken Sie um das Format 12 oder 24 zu w hlen c Ein...

Page 26: ...ken Sie zum Aktivieren oder deaktivieren e Alarm Lautst rke Dr cken Sie um die Lautst rke einzustellen f Tasten Lautst rke Dr cken Sie um die Tasten Lautst rke einzustellen Standardeinstellung ist aus...

Page 27: ...um die Unterpunkte auszuw hlen Unterpunkt BETRIEB a Temperatur Dr cken Sie um C oder F auszuw hlen b Baro Druck Dr cken Sie um hPa inHg oder mmHg auszuw hlen c Baro Typ Dr cken Sie um Relativ oder Abs...

Page 28: ...lst rke in der Kanalzeile angezeigt 4 9 5 2 AKTUELLEN SENSOR L SCHEN 1 Dr cken Sie in diesem Bereich die Taste um den angeschlossenen Sensor auszuw hlen 2 Dr cken Sie die Taste um die Spalte Sensor be...

Page 29: ...ngen oder dr cken Sie die Taste home um zum normalen Bildschirm zur ckzukehren 4 9 6 3 ALARM F R KANAL KAN LE EINSTELLEN 1 Dr cken Sie in den Zeilen CH 1 7 die Taste um den Bildschirm f r die Einstell...

Page 30: ...m eine andere Zeile des Parameters auszuw hlen 5 Wenn Sie fertig sind dr cken Sie so lange bis Sie zum Kalibrierungsbildschirm zur ckkehren oder dr cken Sie die Taste home um zum normalen Bildschirm z...

Page 31: ...r Parameter Art der Kalibrierung Voreingestellter Wert Einstellungsbe reich Typische Kalibrierquelle Innen Au en oder Kanal Kan le Temperatur Versatz 0 20 C Alkohol oder Quecksilberthermometer Luftfeu...

Page 32: ...Basisstation zu l schen HINWEIS Standardeinstellung der Einheitenanzeige f r verschiedene Regionen Anzeige der Einheit Europa UK US Australien Datumsformat D M D M M D D M Zeitformate 24 Stunden AM PM...

Page 33: ...Einstellung Datenprotokoll Abschnitt 4 9 9 deaktivieren um die Datenaufzeichnung zu beenden 2 Entfernen Sie den USB Stick 5 3 DATENFORMAT UND BEDIENUNG Wenn Sie das USB Flash Laufwerk anzeigen werden...

Page 34: ...ein und klicken Sie dann im Pull Down Men auf Ger te bearbeiten Schritt 1 Schritt 2 Auf der Seite Ger te bearbeiten klicken Sie auf Hinzuf gen in der oberen rechten Ecke um ein neues Ger t zu erstelle...

Page 35: ...ichen f r L ngen oder Breitengrade ein wenn es sich um Westen bzw S den handelt Zum Beispiel 74 341 West ist 74 341 33 868 S d ist 33 868 5 W hlen Sie in der in Abschnitt 7 2 erw hnten Setup Oberfl ch...

Page 36: ...Men zu ffnen und klicken Sie auf My Weather Station Meine Wetterstation 3 Unten auf der Seite Meine Wetterstation bitte die Schaltfl che Neues Ger t hinzuf gen anklicken um Ihr Ger t hinzuzuf gen 4 W...

Page 37: ...er underground zu akzeptieren 4 klicken Sie auf Next Weiter um Ihre Stations ID und Ihren Schl ssel zu erstellen 2 2 3 4 1 7 Notieren Sie sich Ihre Station ID und den Station Key f r die weiteren Einr...

Page 38: ...elden Sie sich bei weathercloud an und gehen Sie dann auf die Seite Devices Ger te klicken Sie auf New Neu um ein neues Ger t zu erstellen 3 Geben Sie alle Informationen auf der Seite Neues Ger t erst...

Page 39: ...sszeile des Webbrowsers eingeben https join awekas at 3 F llen Sie dort alle ben tigten Angaben aus 4 Notieren Sie sich die Angaben Benutzername Passwort geografische Breite Latitude in Dezimalgraden...

Page 40: ...Netzwerkeinstellungen oder im Android iOS die Einstellung WI FI um die SSID der Basisstation auszuw hlen PWS XXXXXX in der Liste und es wird einige Sekunden dauern bis die Verbindung hergestellt ist P...

Page 41: ...tellungen abzuschlie en Einrichtungsseite der Setup Oberfl che Reserviert f r g ltigen Wetterserver z B AWEKAS Details bitte mit Ihrem H ndler kl ren Geben Sie die Station ID und das Passwort ein f r...

Page 42: ...UP ADVANCED In diesem Abschnitt k nnen Sie den die Sensor en benennen die an den Kan len gekoppelt sind WIFI Firmware Version Dr cken Sie das SETUP Symbol um die Seite einzurichten Die Firmware Update...

Page 43: ...ehr ber deren mobile App f r Android und iOS zu erfahren 8 3 ANZEIGEN IHRER WETTERDATEN IN DER WATHERCLOUD 1 Um die Live Daten Ihrer Wetterstation f r Temperatur Luftfeuchtigkeit Baro UV und Lichtinte...

Page 44: ...ash Laufwerk ben tigt 9 1 1 SCHRITTE ZUM FIRMWARE UPDATE 1 Laden Sie die neueste Firmware Version auf Ihren PC Mac herunter 2 Entpacken und kopieren Sie die upg Datei in das Stammverzeichnis des Flash...

Page 45: ...n siehe Abschnitt W LAN VERBINDUNG EINRICHTEN auf der vorherigen Seite 3 Klicken Sie auf Browse im Abschnitt Firmware Update und suchen Sie nach dem Speicherort der Datei die Sie in Schritt 1 herunter...

Page 46: ...n durch neue 2 F hren Sie den Schritt Neuen Sensor hinzuf gen in Abschnitt 4 9 5 1 aus um den Sensor erneut zu koppeln 10 2 KOPPELN SIE DEN DIE ZUS TZLICHEN FUNKSENSOR EN OPTIONAL Diese Basisstation u...

Page 47: ...ultisensors ist unterbrochen oder hat keine Verbindung 1 Stellen Sie sicher dass sich der Sensor innerhalb des bertragungsbereichs befindet 2 Wenn es immer noch nicht funktioniert setzen Sie den Senso...

Page 48: ...1 Minute lang unter 5 m s 13 SPEZIFIKATIONEN 13 1 BASISSTATION Grundlegende Spezifikationen Ma e B x H x T 190 x 140 x 19 5 mm 7 4 x 5 5 x 0 77 Zoll Gewicht 325g mit Batterien Hauptspannungsversorgun...

Page 49: ...oder ablaufen Temperatureinheit C and F Messbereich 40 5 C 40 41 F 5 1 60 C 41 2 140 F Aufl sung C F 1 Dezimalstelle Spezifikationen zur Luffeuchtigkeitsanzeige Funktion f r den Innenbereich Hinweis D...

Page 50: ...eigemodus Letzte Stunde letzte 24 Stunden letzter Monat Regenmenge heute und Regenrate SPEZIFIKATIONEN ZUR WETTERINDEX ANZEIGE FUNKTION Hinweis Die folgenden Details sind so aufgef hrt wie sie auf der...

Page 51: ...kommunalen Entsorgungsdienstleistern oder dem Umweltamt Werfen Sie Elektroger te nicht in den Hausm ll Gem der Europ ischen Richtlinie 2002 96 EG ber Elektro und Elektronik Altger te und deren Umsetzu...

Page 52: ...64 4 3 DISPLAY SCREEN SELECTION 65 4 3 1 HOME SCREEN 65 4 3 2 DETAILS SCREEN 66 4 3 3 OVERVIEW SCREEN 66 4 4 CONSOLE FEATURES 67 4 4 1 WEATHER FORECAST 67 4 4 2 MOON PHASE 67 4 4 3 TREND INDICATOR 68...

Page 53: ...OUR WEATHER DATA IN WUNDERGROUND 91 8 3 VIEWING YOUR WEATHER DATA IN WEATHERCLOUD 91 9 VIEWING YOUR WEATHER DATA IN AWEKAS 91 9 1 FIRMWARE UPDATE 91 9 1 1 SYSTEM FIRMWARE UPDATE STEP 92 9 2 UPDATE THE...

Page 54: ...or throw them into a fire Excessive heat or improper handling could trigger a short circuit a fire or an explosion NOTE Do not disassemble the device In the event of a defect please contact your deale...

Page 55: ...2 2 SITE SELECTION Before installing the Multisensor please consider the followings 1 Rain gauge must be clean every few months 2 Batteries must be changed every 2 to 2 5 years 3 Avoid radiant heat r...

Page 56: ...12 13 1 Wind vane 2 Wind cups 3 Antenna 4 Radiation shield 5 Thermo hygrometer sensor and Ventilating fan 6 Mounting parts fit for 35 40mm diameter pole 7 Battery door 8 RESET key 9 Transmission stat...

Page 57: ...larity indicated The red LED indicator on the back of the Multisensor will turn on and then begin flashing every 12 seconds NOTE Once the batteries installed correctly the red LED will begin flashing...

Page 58: ...tighten the screws Note Please make sure the sensor has new batteries installed and is paired up with the console Screws Step 2 Fasten the stainless steel pole on your fix pole purchase separately wi...

Page 59: ...h to properly orient the wind direction vane Secure the mounting stand and bracket included to a post or pole and allow minimum 1 5m off the ground Add rubber pad before mounting on pole or post 1 5 m...

Page 60: ...Precision Thermo Hygrometer sensor Soil Moisture and Temperature Sensor Pool Sensor IMAGE 3 4 RECOMMENDATION FOR BEST WIRELESS COMMUNICATION Effective wireless communication is susceptible to noise i...

Page 61: ...untreated 10 20 Wood 10 30 Plasterboard drywall 20 40 Brick 30 50 Foil insulation 60 70 Concrete wall 80 90 Aluminum siding 100 Metal wall 100 Remarks RF signal reduction for reference 3 5 DISPLAY CO...

Page 62: ...battery can backup the time date 3 Flip out the antenna on the back 3 5 2 SETUP DISPLAY CONSOLE When setup the display console for the first time user need to enter basic selection 1 Select the displa...

Page 63: ...he display as shown below 4 2 DISPLAY BUTTONS When home screen is shown you can press HOME or any other front key to show the key function icons as below ICON DESCRIPTION Home key Press this anytime t...

Page 64: ...ey to decrease the value or switch to other option Confirm key Press this key to confirm the action Search key Press this key to open the search box in record table Erase key Press this key to erase t...

Page 65: ...ike temperature 11 Outdoor temperature 12 Outdoor max min humidity 13 Outdoor humidity 14 Indoor or CH max min temperature 15 Indoor or CH temperature 16 Indoor or CH max min humidity 17 Indoor or Ch...

Page 66: ...tion in coming 12 24 hours within a 30 50 km 19 31 miles radius Sunny Partly cloudy Cloudy Rainy Rainy Stormy Snowy NOTE Weather forecast based on rate pressure changes is about 60 to 75 accurate Plea...

Page 67: ...w and the Heat Index 26 C or above For temperatures in the region between 18 1 C to 25 9 C where both wind and humidity are less significant in affecting the temperature the device will show the actua...

Page 68: ...ure and atmospheric pressure gradually decreases as altitude increases Meteorologists use barometers to measure atmospheric pressure Because absolute atmospheric pressure decreases with altitude meteo...

Page 69: ...s in motion Effort needed to walk against the wind 31 38 mph 28 33 knots 13 9 17 1 m s 8 Gale 62 74 km h Some twigs broken from trees Cars veer on road Progress on foot is seriously impeded 39 46 mph...

Page 70: ...ery high risk of harm from unprotected sun exposure Take extra precautions because unprotected skin and eyes will be damaged and can burn quickly 11 16 Extreme A UV Index reading of 11 or more means e...

Page 71: ...REEN 3 In this screen you can press or key to show indoor outdoor and channel s records NOTE The default max min records is daily records If you want to change the record method to accumulated please...

Page 72: ...to show other data graph 6 Press key and back to the HISTORY GRAPH LIST SCREEN NOTE When power off all the graph will reset 4 8 DATA LOG SCREEN This function can capture the all history records of th...

Page 73: ...SEARCH SCREEN using the or key to enter the number of the row 2 Once you complete press key to select Yes 3 Press key to go to that row 4 9 SETTING MENU 1 2 3 4 5 6 7 8 9 1 Time Date setting 2 Alarm...

Page 74: ...Daylight saving time Press to turn off or set the DST to auto h Time zone Press to select the your local time zone to get correct time i Hemisphere Press to select NORTH or SOUTH hemisphere for the 7...

Page 75: ...MAX MIN data records mode by Accumulate Acc or daily f Back light level Press to adjust the back light level in normal g Back light level Night mode Press to adjust the back light level during night m...

Page 76: ...search the sensor 4 In the meantime select the channel in the sensor then power up the sensor or press reset key of the sensor to start pairing 5 Once connected the sensor icon ID and signal strength...

Page 77: ...ss to select different row of the setting 5 Once finished Press until back to the alert screen or press home key for back to normal screen 4 9 6 2 SET OUTDOOR ALERT 1 In the outdoor row press key to e...

Page 78: ...ALERT FUNCTIONS Sub item Operation Description Reset all alert values 1 Press key to show the confirmation screen 2 Press key to select Yes to reset all values or No to go back 3 Press key to confirm...

Page 79: ...rmal screen 4 9 7 3 CALIBRATION FOR CHANNEL S PARAMETER 1 In the CH1 7 rows press key to enter different CH calibration screen 2 Press to adjust the value 3 Press to select different parameter 4 Press...

Page 80: ...I status Show the current console WI FI connection status d Mac address Show the console Mac address e System firmware version Show current system firmware version of the console f WI FI firmware vers...

Page 81: ...Press key to enter clear data log screen d Record start Show the record start date and time e Data log remain Show the data log storage remain 5 DATA LOG FUNCTION You can use the USB 2 0 flash drive t...

Page 82: ...e weather server website and APP are subjected to change without notice Use the valid email address to register your weather server s account 6 1 FOR PROWEATHERLIVE PWL 1 In https proweatherlive net c...

Page 83: ...degrees of longitude and latitude with 4 decimal places Round off to 3 decimal places before you enter these data Enter a negative sign for Longitudes or Latitudes when it s West or South respectivel...

Page 84: ...completed the Email validation please go back to the WUndergound web page to login Then click My Pro le button on the top to open the drop down menu and click My Weather Station 3 In My Weather Statio...

Page 85: ...Accept to accept Weather underground s privacy terms 4 click Next to create your station ID and key 2 2 3 4 1 7 Jot down Your Station ID and Station key for the further setup step 8 In the setup UI t...

Page 86: ...hercloud and then you will go the Devices page click New to create new device 3 Enter all the information in Create new device page for the Model selection box select the W100 Series under CCL section...

Page 87: ...download http www bresser de download 7003500 7 Enter the AWEKAS Server Information on the Setup page as follows Station ID URL Station key Enter the server URL http ws awekas at Enter username Enter...

Page 88: ...that you want to upload if you do not connect to cloud server just select N A Select time server Mac address Press to complete the WI FI related setting SETUP page of setup interface Reserved for vali...

Page 89: ...eatherLive SETUP ADVANCED This section allow you to name the sensor s that connected to the channel WI FI firmware version Press SETUP icon to setup page The firmware update function only available in...

Page 90: ...THER DATA IN WEATHERCLOUD 1 To view your weather station live data in a web browser PC or mobile version please visit https weathercloud net and sign in your own account 2 Click the and sign in your o...

Page 91: ...ve to the USB port The screen will show as below I Press key to select Yes II Press key to confirm and start system firmware update 4 The firmware will start updating 5 Once the update is completed th...

Page 92: ...t do not operate the PC Mac and console until the update finished During firmware update the console will stop upload data to the cloud server It will reconnect to your WI FI router and upload the dat...

Page 93: ...ot let the sensors inside get wet 4 Clean the shield with water to remove any dirt or insects 5 Install all the parts back when they are clean and fully dried 12 TROUBLESHOOT Problems Solution 7 in 1...

Page 94: ...x H x D 190 x 140 x 19 5mm 7 4 x 5 5 x 0 77in Weight 325g with batteries Main power DC 5V 1A adaptor USB port USB type A port for data log and system firmware update Backup battery CR2032 Operating te...

Page 95: ...ing details are listed as they are displayed or operate on the console Temperature unit C and F Measuring range 40 60 C 40 140 F Resolution C F 1 decimal place Outdoor Humidity Display Function Specif...

Page 96: ...range 65 50 C Dew point display range 20 80 C Heat index display range 26 50 C Wind chill display range 65 18 C wind speed 4 8km h 13 2 WIRELESS 7 IN 1 MULTISENSOR Dimensions W x H x D 370 5 x 334 x...

Page 97: ...tes the Battery Directive Batteries that contain toxins are marked with a sign and a chemical symbol Cd cadmium Hg mercury Pb lead 15 EC DECLARATION OF CONFORMITY Hereby Bresser GmbH declares that the...

Page 98: ......

Page 99: ...mail e mail sav bresser fr T l phone 00 800 6343 7000 BRESSER France SARL P le d Activit s de Nicopolis 260 rue des Romarins 83170 Brignoles France Prix d un appel local depuis la France ou Belgique S...

Page 100: ...and technical changes reserved Manual_7003500_WIFI HD WC 7in1_de en_BRESSER_v052021a Bresser GmbH Gutenbergstra e 2 46414 Rhede Germany www bresser de BresserEurope Bresser UK Ltd Suite 3G Eden House...

Reviews: