background image

13

EN

How do I adjust my microscope correctly?

First, loosen the screw (Fig. 1, 7) and turn the 

microscope head (Fig. 1, 6) into a comfortable 

viewing position. 

Each observation starts with the lowest magni-

fication.

Adjust the microscope stage (Fig. 1, 11) so that 

it goes all the way down to the lowest position. 

Then, turn the objective nosepiece (Fig. 1, 8) un-

til it clicks into place at the lowest magnification 

(objective 4x).

Note:

Before you change the objective setting, always 

move the microscope stage (Fig. 1, 11) to its low-

est position. This way, you can avoid causing any 

damage!

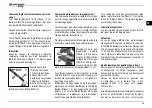
Now, insert the 10x 

eyepiece (Fig. 1, 1) into 

the Barlow lens (Fig. 1, 

3). Make sure that the 

Barlow lens is placed 

all the way into the eye-

piece supports (Fig. 1, 

5) and is not pulled out (Fig. 2).  

How do I observe the specimen?

After you have assembled the microscope with 

the adequate illumination and adjusted it cor-

rectly, the following basic rules are to be ob-

served:

Start with a simple observation at the lowest 

magnification. This way, it is easier to position 

the object in the middle (centering) and make 

the image sharp (focusing).

The higher the magnification, the more light you 

will require for a good image quality.

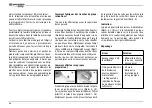
Now place the prepared 

specimen (Fig. 6, 20) 

directly under the objec-

tive on the microscope 

stage (Fig. 3). The object 

should be located di-

rectly over the illumination (Fig. 1, 12).

In the next step, take a look through the eyepiece 

(Fig. 1, 1) and carefully turn the focus knob (Fig. 

1, 16) until the image appears clear and sharp.

Now  you  can  select  a  higher  magnification 

by slowly removing the Barlow lens (Fig. 1, 3) 

from the eyepiece support (Fig. 1, 5). When the 

Barlow lens is almost completely pulled out, 

the  magnification  can  be  increased  to  almost 

double.

If you would like an even higher level of magni-

fication, insert the 16x eyepiece (Fig. 1, 2) and 

turn the objective nosepiece (Fig. 1, 8) to a high-

er setting (10x or 40x).

Important tip: 

The highest magnification is not always the best 

for every specimen!

Note:

Each time the magnification changes (eyepiece 

or objective change, pulling out the Barlow 

lens), the image sharpness must be readjusted 

with the focus knob (Fig. 1, 16). When doing 

this, make sure to be careful. If you move the 

microscope stage too quickly, the objective and 

the slide could come into contact and become 

damaged!

Which light for which specimen?

With this unit, a reflected light and transmitted 

light microscope, you can observe transparent, 

semi-transparent as well as non-transparent 

objects. The image of the given object of obser-

vation is “transported” through the light. As a 

result, only the correct light will allow you to see 

something! 

If you are observing non-transparent (opaque) 

objects (e.g. small animals, plant components, 

stones, coins, etc.) with this microscope, the 

light falls on the object that is being observed. 

Fig. 3

I

2)

Fig. 2

D

f

B

/

C

Summary of Contents for 8855002

Page 1: ...No 8855002 DE Bedienungsanleitung EN Operating Instructions FR Mode d emploi NL Handleiding IT Istruzioni per l uso ES Instrucciones de uso PT Manual de utiliza o Mikroskop Set Microscope Set 40x 102...

Page 2: ...g 22 IT Istruzioni per l uso 28 ES Instrucciones de uso 34 PT Manual de utiliza o 40 www bresser de warranty_terms SERVICE AND WARRANTY www bresser de guide MICROSCOPE GUIDE i www bresser de faq MICRO...

Page 3: ...B C D F G H I J 1 1 1 1 1 1 1 1 1 a b c d 2 2 1 2 2 E 2 2 2 2 1 Fig 1 Fig 6...

Page 4: ...eries ure mit Haut Augen und Schleimh uten Sp len Sie bei Kontakt mit der S ure die betroffenen Stellen sofort mit reichlich klarem Wasser und suchen Sie ei nen Arzt auf Benutzen Sie nur die empfohlen...

Page 5: ...r ord nungsgem en Entsorgung erhalten Sie beim kommunalen Entsorgungsdienstleister oder Umweltamt Werfen Sie Elektroger te nicht in den Hausm ll Gem der Europ ischen Richtlinie 2002 96 EG ber Elektro...

Page 6: ...tig Achte unbedingt auf die in den Halterungen vorgegebene Polung Am Mikroskop befinden sich zwei Lampen Sie leuchten nicht mit Gl hbirnen sondern mit mo dernen Leuchtdioden LED Die erste Lampe schei...

Page 7: ...htende Objekt soll hierbei genau ber der Beleuchtung Abb 1 12 liegen Im n chsten Schritt schaust Du durch das Okular Abb 1 1 und drehst vorsichtig am Scharfein stellungsrad Abb 1 16 bis das Bild schar...

Page 8: ...chst d nne Schnitte gemacht Um zu bes ten Ergebnissen zu kommen ben tigen wir et was Wachs oder Paraffin Nimm Dir am besten eine Kerze Das Wachs gibst Du in einen Topf um es ber einer Flamme kurz zu e...

Page 9: ...abgefallenes Smartphone bernimmt die Bresser GmbH keine Haftung Wie pflege ich mein Mikroskop und wie gehe ich damit um Dein Mikroskop ist ein hochwertiges optisches Ger t Deshalb solltest Du es verme...

Page 10: ...y Do not use batteries from different brands or with different capacities Remove the batteries from the unit if itis not to be used for a long period of time or if the batteries are empty Never rechar...

Page 11: ...tandards The full text of the EU dec laration of conformity is available at the follow ing internet address www bresser de download 8855002 CE 8855002_CE pdf UKCA Declaration of Conformity Bresser Gmb...

Page 12: ...x AA into the holder There are two lights on the microscope They do not use light bulbs but rather light emitting di odes LED The first lamp shines onto the speci men from below and the second from ab...

Page 13: ...di rectly over the illumination Fig 1 12 In the next step take a look through the eyepiece Fig 1 1 and carefully turn the focus knob Fig 1 16 until the image appears clear and sharp Now you can select...

Page 14: ...der to get the best results we need some wax or paraffin It is best if you get a candle Place the wax in a pot and heat it carefully over a low burner Now dip the object in the liquid wax a few times...

Page 15: ...se NOTE Make sure that the smartphone cannot slip off the cradle Bresser GmbH accepts no liability for damage caused by a dropped smartphone Make sure your microscope has a long service life Clean the...

Page 16: ...e l lectrolyte avec la peau les yeux et les muqueuses En cas de contact avec l acide rincez abondamment et imm diatement les parties du corps concern es en utilisant de l eau claire et consultez un m...

Page 17: ...les mat riaux d emballage selon le type de produit Pour plus d informa tions concernant l limination conforme contac tez le prestataire communal d limination des d chets ou bien l office de l environn...

Page 18: ...fermeture Ins rez ensuite la batterie 3x AA dans son support Attention Veillez imp rativement la bonne polarit de la batterie indiqu e sur le support Deux lampes se trouvent dans le microscope Elles...

Page 19: ...tement sur l clairage Illustr 1 12 Pour l tape suivante tu dois regarder travers l oculaire Illustr 1 1 puis tourner la roue de foca lisation avec pr caution illustr 1 16 jusqu ce que l image soit net...

Page 20: ...u de cire ou de paraffine Prends plut t une bougie Place la cire dans une casserole pour la faire chauffer un peu feux doux Maintenant plonge l objet plusieurs fois dans la cire liquide Puis laisse la...

Page 21: ...cline toute responsabilit pour les dommages caus s par un smartphone tomb Pour pouvoir profiter longtemps de ton mi croscope Nettoie les lentilles oculaires et ou objectifs uniquement avec le chiffon...

Page 22: ...het zuur onmiddellijk met ruim helder water af en raadpleeg een arts Gebruik alleen de aanbevolen batterijen Vervang zwakke of lege batterijen alleen door een set nieuwe batterijen met volledige capa...

Page 23: ...fvalverwerking kunt u van uw plaatse lijke afvalverwerkingsbedrijf of de milieudienst krijgen Gooi elektrische apparaten niet weg met het huisvuil Volgens de Europese Richtlijn 2002 96 EG over afgedan...

Page 24: ...netstekker daarna in het stopcontact De microscoop heeft twee lampen Er zitten geen gloeilampen in maar moderne lichtdiodes LED De eerste lamp schijnt van onder op het prepa raat en de tweede lamp van...

Page 25: ...arlow lens afb 1 3 langzaam uit de ocu lairbuis afb 1 5 te trekken Als de Barlow lens bijna helemaal is uitgetrokken wordt de vergro ting bijna dubbel zo groot Als je nu nog sterkere vergrotingen wilt...

Page 26: ...kaars Doe de was in een pan en verhit tot de was smelt Dompel het voorwerp nu meerdere malen in de vloeibare was Laat de was daarna hard worden Met de dunsnijder of microtoom afb 6 23 of een mes of s...

Page 27: ...sprakelijkheid in geval van beschadigingen door een vallend smartphone Om zo lang mogelijk plezier van je microscoop te hebben Reinig de lenzen oculairglazen en of objectief glazen uitsluitend met he...

Page 28: ...e In caso di contatto con l acido sciacquare immediatamente le parti interessate con abbondante acqua pulita e rivolgersi ad un medico Utilizzare esclusivamente le batterie consigliate Sostituire le b...

Page 29: ...imballaggio dopo averli suddivisi Per informazioni sul cor retto smaltimento si prega di rivolgersi all a zienda municipale che si occupa dello smalti mento dei rifiuti o all ufficio pubblico compete...

Page 30: ...lettrica fig 6 22 Collega prima il connettore piccolo del cavo alla presa elettrica situata sul retro del microscopio fig 1 15 Successivamente inseri sci la spina grande nella presa elettrica Il micro...

Page 31: ...uce ti serve per ottenere una buona qualit dell immagine Inserisci uno dei vetri ni preparati fig 6 20 direttamente sotto l obiettivo sul tavolino portaoggetti fig 3 L oggetto da osservare deve essere...

Page 32: ...a sorveglian za di un adulto Come abbiamo gi detto alcuni oggetti vanno preparati per poter essere osservati ed un me todo di preparazione consiste nel tagliare l og getto in fettine sottili Per raggi...

Page 33: ...esponsabilit per danni causati dalla caduta di uno smartphone Per poterti divertire a lungo con il tuo microscopio Pulisci le lenti oculare e o obiettivo solo con l apposito panno in dotazione oppure...

Page 34: ...enda das Recambie siempre las pilas agotadas o muy usadas por un juego completo de pilas nuevas con plena capacidad No utilice pilas de marcas o modelos distintos ni de distinto nivel de capacidad Hay...

Page 35: ...cos en la basura dom stica Con arreglo a la Directiva Europea 2002 96 CE sobre aparatos el ctricos y elec tr nicos usados y a su aplicaci n en las res pectivas legislaciones nacionales los aparatos el...

Page 36: ...vija que hay en el cable el ctrico en la conexi n de corrien te que hay en la parte trasera del microscopio Fig 1 15 A continuaci n introduces el enchufe grande en la toma de corriente En el microscop...

Page 37: ...o el objetivo Para ello el objeto a observar debe estar colocado exactamente sobre la ilumina ci n Fig 1 12 El siguiente paso es mirar por el ocular Fig 1 1 y girar con cuidado el tornillo microm tric...

Page 38: ...de cera o parafina Lo mejor es que cojas una vela Debes introducirla en una cacerola y calentarla brevemente con una llama Despu s sumerge el objeto varias veces en la cera l qui da Despu s deja que l...

Page 39: ...Bresser GmbH no asumir ninguna responsabilidad en caso de ca da de un smartphone Para que puedas disfrutar mucho tiempo con tu s microscopio Limpia las lentes del ocular y o del objetivo s lo con el p...

Page 40: ...O cido sa do das pilhas pode causar corros o Evite o contacto do cido das pilhas com a pele os olhos e as mucosas Em caso de contacto do cido com as reas mencionadas lavar imediatamente com muita gua...

Page 41: ...mais informa es sobre a recicla gem correcta nos servi os municipais ou na ag ncia do meio ambiente N o deposite os seus aparelhos electr nicos no lixo dom stico De acordo com a Directiva Europeia 200...

Page 42: ...e maior na tomada No microsc pio existem duas l mpadas A sua ilu mina o n o se faz da forma convencional mas sim com modernos d odos luminosos LED A primeira l mpada ilumina o preparado desde a parte...

Page 43: ...r se mesmo por baixo da ilumina o fig 1 12 No passo seguinte observas atrav s da ocular fig 1 1 e rodas cuidadosamente a roda de ajuste da nitidez fig 1 16 at a imagem fi car n tida Agora podes ajusta...

Page 44: ...obtermos melhores resultados ne cessitamos de alguma cera e parafina O melhor ser arranjares uma vela Colocas a cera num ta cho para a aqueceres brevemente numa chama Em seguida mergulhas o objecto v...

Page 45: ...queda de um smartphone a Bresser GmbH n o assume qualquer responsa bilidade Para que te divirtas com o teu microsc pio durante muito tempo Limpa as lentes oculares e ou objectivas ape nas com o pano...

Page 46: ...riserva di errori e modifiche tecniche Queda reservada la posibilidad de incluir modificaciones o de que el texto contenga errores Erros e altera es Manual_8855002_Microscope Set_de en fr es nl it pt...

Reviews: