background image

12   Operating Your Cleaner

Change the cleaning solution periodically.  Cleaning solutions can
become contaminated with soil particles which coat the tank bottom.
This coating dampens the ultrasonic action and reduces cleaning
efficiency.  Certain solutions will cavitate better than others.  Contact
your local distributor for further information.

Heat and cavitation

:  increase the chemical activity of cleaning

solutions.  Some materials may be damaged by this stronger chemical
action.  When in doubt, test run samples of items to be cleaned.

Chemistry Concentrations

Chemistry concentrations may vary.  The amount you use depends on
the detergent and the type of soil to be removed.  Follow instructions on
the chemistry container and refer to the table below for the effects of
chemistry on metals.

Chemicals Harmful to Your Tank

The following chemicals will harm your ultrasonic tank and the action of
ultrasonics and higher operating temperatures will increase their
chemical activity.  Do not use these or similar chemicals directly or in
dilution in your ultrasonic tank or you will void your warranty.

Acetophenone

Chloracetic Acid

Hydrocyanic Acid

Aluminum Chloride

Chloric Acid

Hydrofluoric Acid

Aluminum Fluoride

Chlorine, Anhydrous

Hydrofluosilicic Acid

Aluminum Sulphate

Chromic Acid

Iodoform

Ammonium Bifluoride

Copper Chloride

Mercuric Chloride

Ammonium Chloride

Copper Fluoborate

Muriatic Acid

Ammonium Hydroxide

Ethyl Chloride

Phosphoric (crude)

Amyl Chloride

Ferric Chloride

Sodium Hypochlorite

Antimony Trichloride

Ferrous Chloride

Potassium Chloride

Aqua Regia

Ferris Sulfate

Stannic Chloride

Bromine

Fluoboric Acid

Stannous Chloride

Calcium Bisulfate

Fluorine

Sulfur chloride

Calcium Bisulfite

Hydrobromic Acid

Sulfuric Acid

Calcium Hypochloride

Hydrochloric Acid

Zinc Chloride

Summary of Contents for PC-620-1

Page 1: ...Operator s Manual PC 620 1 PC 620 2 Tabletop Ultrasonic Cleaners...

Page 2: ...replacement of the defective equipment and such repair or replacement shall be the exclusive remedy of the purchaser and in no case will we be responsible for any and or all consequential or incident...

Page 3: ...ng Your Cleaner 4 Installing Your Cleaner 5 Equipment Specifications 6 How Ultrasonic Cleaning Works 7 Operating Your Cleaner 7 Before You Start 7 Explanation of Controls 8 Getting Ready 8 Cleaning It...

Page 4: ......

Page 5: ...disassemble your cleaner high voltage inside the cleaner is dangerous Do not immerse the cleaner in water To prevent personal and or property damage Do use water based solutions Do not ever use alcoho...

Page 6: ...bottom of the cleaning tank use a tray wire hook or other device to suspend items Failure to comply may cause transducer damage and will void your warranty Do not allow the cleaning solution level to...

Page 7: ...cted using durable industrial style 44 kHz transducers These provide increased cleaning power and ensure uniform cleaning activity throughout the bath Both models have drains and are supplied with tan...

Page 8: ...immediately before contacting your distributor Please retain your packaging for future use Installing Your Cleaner Check the label on the back of the cleaner for correct input power requirements Posit...

Page 9: ...75 gal 8 5 L L 19 5 W 5 8 D 6 L 20 3 W 6 3 H 10 5 24 lbs 10 9 Kg None 180 Watts 230 V 7A 230 V 1 6A PC 620J 1 PC 620J 2 2 75 gal 8 5 L L 19 5 W 5 8 D 6 L 20 3 W 6 3 H 10 5 24 lbs 10 9 Kg None 135 Watt...

Page 10: ...e transducer radiate through the solution in the tank they cause alternating high and low pressure areas in the solution During the low pressure stage millions of microscopic bubbles form and grow Thi...

Page 11: ...nk The heater power has been selected to provide the optimum temperature for most cleaning applications CAUTION Do not place parts or containers directly on the bottom of the cleaning tanks use a bask...

Page 12: ...nto a basket or perforated tray 2 If using a solid container add cleaning solution to the container to cover the items 3 Slowly lower the tray into the tank Do not allow items to contact the tank bott...

Page 13: ...tion and degas if necessary depending on the amount used Overload do not rest any items on the tank bottom Weight on the tank bottom dampens sound energy and will cause damage to the transducer Instea...

Page 14: ...rather than a few big loads Placing items Never allow items to sit on the bottom of the tank Always place them in a basket or suspend in the solution Rinsing items After cleaning use clean water to ri...

Page 15: ...ine water based solutions include carbonates silicates and caustics These cause emulsifying action which keeps soil from redepositing on the cleaned surface and improves cleaning action in hard water...

Page 16: ...icals Harmful to Your Tank The following chemicals will harm your ultrasonic tank and the action of ultrasonics and higher operating temperatures will increase their chemical activity Do not use these...

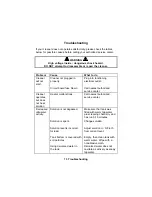
Page 17: ...ns Call nearest authorized service center Decreased ultrasonic activity Solution is not degassed Solution is spent Solution level is incorrect for load Tank bottom is covered with soil particles Using...

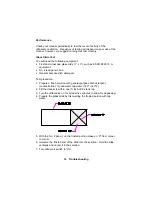
Page 18: ...l purpose dish detergent Test procedure 1 Prepare a fresh solution with general purpose dish detergent concentration 1 and warm tap water 120 140 F 2 Fill the cleaner to within one 1 inch of the tank...

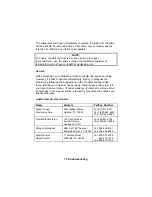
Page 19: ...roof of purchase Your cleaner will be returned by ground service unless you specify otherwise Authorized Service Centers Name Address Tel Fax Number Alpha Omega Electronics Corp 2821 National Drive Ga...

Page 20: ...CPN 214 159...

Reviews: