background image

8


Connections 


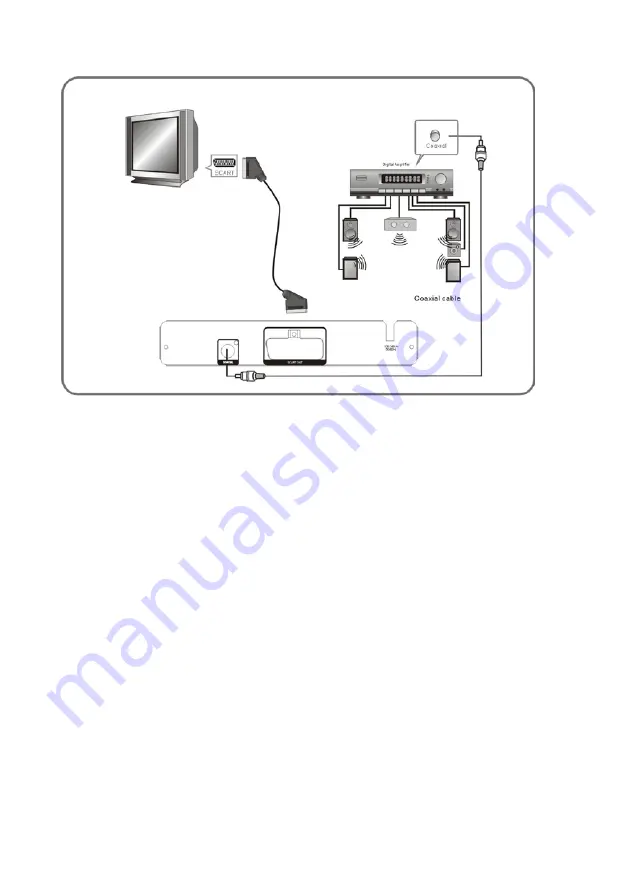
CONNECT DVD PLAYER TO TV SET WITH SCART SOCKET


Use a SCART cable (not supplied) to connect DVD player and your TV.  

Set the [Video Out] to [RGB] for most TVs (see ‘

1.2 System Display Setup’

). 


CONNECT DVD PLAYER  TO AV AMPLIFIER WITH DIGITAL AUDIO (COAXIAL) 

OUTPUT 

1. Connect the coaxial digital audio output to the AV amplifier with a coaxial audio cable. 

2. Set the DVD player's [Digital Output] to [Raw] or [PCM] (see 

3.2 Disc Audio Setup

).


3. Set the AV Amplifier to the digital input connected to the DVD player. 


BASIC OPERATION 

Playing discs 

1.  Switch on your TV and switch it to the correct video-in source. 

2.  Press the POWER button on the front panel of your DVD player to switch it on. The LED 

display will light; if it does not light up, make sure the player is not in stand-by mode by 

pressing the POWER button on the remote. 

3.  Press OPEN/CLOSE to open the disc tray and insert the disc with its label facing up. Press 

again to close the tray. The unit automatically reads the disc. 

4.  Navigate the disc menus by pressing the Left, Right, Up and Down buttons


and


confirm 

choices with the OK button. 

5.  Pause play by pressing the Play/Pause button and resume by pressing it again.  

6.  Stop play so you can resume from the same point by pressing the STOP button once.  

Stop play completely by pressing the STOP button twice. 

7.  Press OPEN/CLOSE to open the disc tray and remove the disc. 


Downloaded from www.vandenborre.be

Summary of Contents for BDVD1291

Page 1: ...BDVD1291 D o w n l o a d e d f r o m w w w v a n d e n b o r r e b e...

Page 2: ...ear Panel Illustration 6 Remote Control 7 Connections 8 Advanced Features Basic Operation 8 System setup 10 MP3 WMA JPEG MPEG4 playback 14 Program Play Operation 1 5 Others Troubleshooting 18 Specific...

Page 3: ...sion CAUTION RISK OF EXPLOSION IF BATTERY IS REPLACED BY AN INCORRECT TYPE DISPOSE OF USED BATTERIES ACCORDING TO THE INSTRUCTIONS Replace the battery only with the same type The battery used in the r...

Page 4: ...liquids such as vases shall be placed on the apparatus Ventilation Allow at least a 10 cm gap all around the product This apparatus is not suitable for use in a tropical climate Class 1 laser product...

Page 5: ...cloth Wipe the disc from the centre out Do not use strong solvents such as alcohol benzine thinner commercially available cleaners or anti static spray intended for older vinyl records This symbol in...

Page 6: ...an appropriate waste disposal centre This product incorporates copyright protection technology that is protected by U S patents and other intellectual property rights Use of this copyright protection...

Page 7: ...Front Panel 1 Power 2 Tray Door 3 Display 4 Remote sensor 5 Open Close button 6 Play Pause Button 7 USB port for USB device Back Panel 8 Digital Audio Coaxial Output 9 SCART Output D o w n l o a d e...

Page 8: ...apter track time 16 USB choose USB device or disc 17 AUDIO select sound track ANGLE press and hold to change camera angle 18 REPEAT chapter track etc PROGRAM press and hold for programming menu or pla...

Page 9: ...OWER button on the front panel of your DVD player to switch it on The LED display will light if it does not light up make sure the player is not in stand by mode by pressing the POWER button on the re...

Page 10: ...on a DVD video disc Commercial DVD movies typically will not allow this function press and hold MENU instead 2 Press Up Down or numeric buttons to select the desired title 3 Press OK to play the sele...

Page 11: ...you want to set Press Left Right and Up Down buttons to navigate in the setting menus Press OK to open setting lists and confirm your choices Press SETUP again to exit directly 1 System Menu 1 1 Syste...

Page 12: ...depending on the type of the television you have 4 3 PS is for older TVs and helps fill the screen when you are watching a wide screen movie 4 3 LB displays the full width of a wide screen movie on a...

Page 13: ...ithout re sizing it Color Tone You can choose normal colour black and white or classic sepia tint 3 Disc Menu 3 1 Disc Language Setup The disc may override these settings and the chosen language must...

Page 14: ...system Lt Rt suits analogue surround sound systems 3 3 Disc Custom Setup Parental Ctrl Set parental control level A few movies allow you to restrict viewing of scenes unsuitable for younger viewers t...

Page 15: ...old an image on screen Skip to the next file with PREV or NEXT Press the Stop button to return to the browser menu Press USB button to display a device selection menu then press Up or Down and confirm...

Page 16: ...g the right button and up or down buttons highlight the number of track title or chapter you want to add Press the OK button to confirm each entry Press OK with the highlight in Program list to start...

Page 17: ...s into the program list then the system will display the program menu In this menu press the right button to remove a highlighted file from the program list Press OK or Play Pause to start program pla...

Page 18: ...perations Commercial DVD video discs prevent certain functions from working at certain points during disc play for example in the main menu You will see a hand symbol on screen when the function is pr...

Page 19: ...nput for your TV Ensure the audio is not set to mute REMOTE NOT WORKING Make sure the main unit s POWER button is on Ensure the remote batteries are working Point the remote control directly at the pl...

Page 20: ...bject to change without notice Pirate Copy Warning Pirated copies of music and movies are recorded illegally using cameras or software to remove copy protection and may be recorded on sub standard dis...

Reviews: