background image

54

1

1  //  NOTICES TO THE USER

Warning

Installation should only be performed by installers and qualified technicians.

Warning

Remove the protective film from the cartridge filter before use.

ENVIRONMENTAL PROTECTION

— This appliance’s packaging material is recyclable. Help recycle it and protect the environment

by dropping it off in the municipal receptacles provided for this purpose. 

— Your appliance also contains a great amount of recyclable material. It is marked with this label

to indicate that in countries that are a members of the European Union the used appliances

should not be mixed with other waste. This way, the appliance recycling organised by
your manufacturer will be done under the best possible conditions, in compliance
with European Directive 2002/96/EC on Waste Electrical and Electronic Equipment.
Contact your town hall or your retailer for the used appliance collection points clos-
est to your home.
— We thank you doing your part to protect the environment.

EN

Summary of Contents for 99647831a

Page 1: ... GUIDE D UTILISATION DA BRUGERVEJLEDNING DE BETRIEBSANLEITUNG EN GUIDE TO INSTALLATION NL GEBRUIKSAANWIJZING Hotte décor Emhætte med dekorativt panel Dekor Dunstabzugshaube Decorative Hood Designafzuigkap ...

Page 2: ...od and we would like to thank you We have invested all our dedication and know how in this appliance so that it would best meet your needs With innovation and performance we designed it to be always easy to use In the B BR RA AN ND DT T product range you will also find a wide choice of ovens microwaves cooking hobs cookers dishwashers washing machines driers fridges and freezers that you can coord...

Page 3: ...g the ventilation shaft º Outdoor evacuation __________________________________ 59 º Recycling___________________________________________ 80 3 USING YOUR APPLIANCE Description of control panel _________________________________ 81 4 CARING FOR AND CLEANING YOUR APPLIANCE Cleaning the filter cartridges _________________________________ 83 Changing the carbon filter __________________________________...

Page 4: ...flames sucked up into the hood can dam age the appliance When frying food under the appliance you must carefully monitor the preparation at all times Oils and grease brought to very high tem peratures can catch fire Respect the recommended frequency of cleanings and filter replacements The accu mulation of grease deposits may cause a fire The hood should never be used over a com bustible fuel burn...

Page 5: ...ppliance also contains a great amount of recyclable material It is marked with this label to indicate that in countries that are a members of the European Union the used appliances should not be mixed with other waste This way the appliance recycling organised by your manufacturer will be done under the best possible conditions in compliance with European Directive 2002 96 EC on Waste Electrical a...

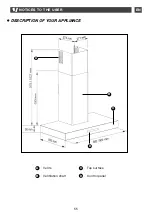
Page 6: ...55 1 1 NOTICES TO THE USER DESCRIPTION OF YOUR APPLIANCE Vents Ventilation shaft Top surface Control panel A B C D EN B A C D ...

Page 7: ...p in odours See Chapter 4 Changing the carbon filter The appliance must be unplugged during installation or when any repairs or maintenance work is being performed Ensure that the network voltage corresponds to the voltage noted on the identification plate located inside the hood If the electrical installation at your residence requires any changes in order to hook up your Appliance call upon a pr...

Page 8: ...ales serv ice department in order to avoid danger Warning If the electrical installation at your res idence requires any changes in order to hook up your appliance call upon a profes sional electrician Warning If the hood displays any malfunctions unplug the appliance or remove the fuse cor responding to the electrical socket where your appliance is plugged in ELECTRICAL CONNECTIONS During install...

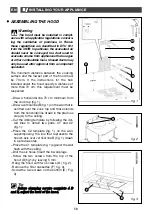
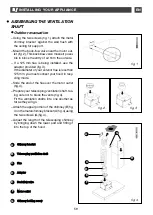
Page 9: ...top fig 1 Draw a vertical line B fig 1 on the wall that is centred over the cook top and that extends from the horizontal line drawn in the previous step A to the ceiling Cut the drilling template by following the dot ted lines to obtain two parts C1 and C2 fig 1 Place the C2 template fig 1 on the wall superimposing the line that represents the hood s axis over vertical line B fig 1 drawn in a pre...

Page 10: ...utlet fig 4 Prepare your telescoping ventilation shaft tak ing care not to block the vents fig 4 Fit the ventilation shafts into one another as far as they will go Attach the upper portion of the chimney B fig 4 on the metal chimney bracket A fig 4 using the two screws G fig 4 Adjust the length of the telescoping chimney by bringing down the lower part and fitting it into the top of the hood fig 1...

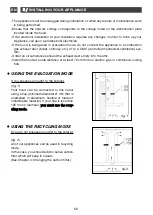
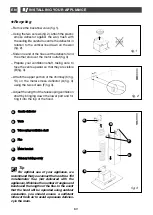
Page 11: ...t the length of the telescoping ventilation shaft by bringing down the lower part and fit ting it into the top of the hood Tip For optimal use of your appliance we recommend that you connect the hood to a 150 mm diameter flue not delivered with the appliance Minimise the number of angles and bends and the lengths of the flue In the event that the hood will be operated using outdoor evacuation you ...

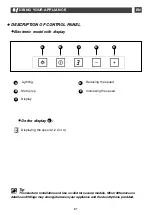
Page 12: ...r differences in details and fittings may emerge between your appliance and the descriptions provided 61 Lighting DESCRIPTION OF CONTROL PANEL Electronic model with display A B C D E Start stop Display Reducing the speed Increasing the speed On the display C Displaying the speed 1 2 3 or 4 E A C D B ...

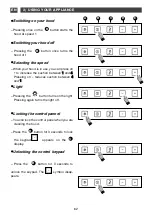
Page 13: ...ood at speed 1 B Switching your hood off Pressing the button once turns the hood off B Pressing the button turns on the light Pressing again turns the light off Light You can lock the control panel when you are cleaning the hood Locking the control pannel Press the button for 3 seconds to lock the keypad appears on the display C B Press the button for 3 seconds to unlock the keypad The symbol disa...

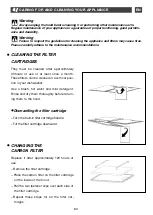
Page 14: ...eaned after approximately 30 hours of use or at least once a month These filters can be cleaned in a vertical posi tion in your dishwasher Use a brush hot water and mild detergent Rinse and dry them thoroughly before return ing them to the hood Dismantling the filter cartridge Turn the built in filter cartridge handle Tilt the filter cartridge downward CHANGING THE CARBON FILTER Replace it after a...

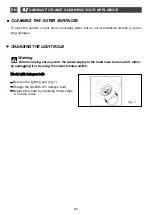
Page 15: ...ge the G4 20W 12V halogen bulb Replace the bulb by repeating these steps in reverse order Warning Before carrying out any work the power supply to the hood must be turned off either by unplugging it or by using the circuit breaker switch fig 1 CLEANING THE OUTER SURFACES To clean the outside of your hood use soapy water but do not use abrasive creams or scrub bing sponges ...

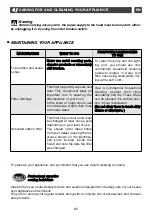
Page 16: ... l s sc co ou ur ri in ng g p pa ad ds s a ab br ra as si iv ve e p pr ro od du uc ct ts s o or r e ex xc ce es ss si iv ve el ly y s st ti if ff f b br ru us sh he es s This filter traps fatty vapours and dust This component plays an important role in ensuring the effectiveness of your hood In the event of tough stains use a non abrasive cream then rinse with clean water This filter traps odours ...

Page 17: ... quantity of smoke and vapours to be cleared The kitchen is sufficiently ventilated to allow for fresh air intake The carbon filter is not worn hood operating in recycling mode The hood is not working Ensure that The power is not cut off A speed has been selected The hood stopped work ing Ensure that The power is not cut off The single pole cut off device was not acti vated S SO OL LU UT TI IO ON ...

Reviews: