


59
2
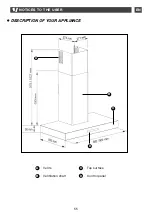
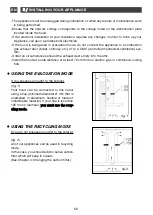
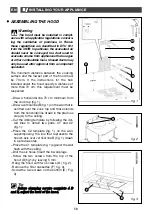
2 // INSTALLING YOUR APPLIANCE
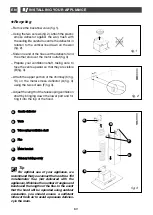
ASSEMBLING THE VENTILATION
SHAFT
•
•
Outdoor evacuation
— Using the two screws (fig. 1), attach the metal
chimney bracket against the wall, flush with
the ceiling for support.
— Mount the back-flow valve near the motor out-
let (fig. 2). This back-flow valve makes it possi-
ble to block the entry of air from the outside.
— If a 125 mm flue is being installed, use the
adapter provided (fig. 3).
If the diameter of your exterior flue is less than
125 mm, you must connect your hood in recy-
cling mode.
— Slide the end of the flue over the motor outlet
(fig. 4).
— Prepare your telescoping ventilation shaft, tak-
ing care not to block the vents (fig. 4).
Fit the ventilation shafts into one another as
far as they will go.
— Attach the upper portion of the chimney (B/fig.
4 on the metal chimney bracket (A/fig. 4) using
the two screws (G/fig. 4).
— Adjust the length of the telescoping chimney
by bringing down the lower part and fitting it
into the top of the hood.
•
•
fig. 1
fig. 2
fig. 3
A
B
C
D
E
C
Ch
hiim
mn
ne
ey
y b
brra
ac
ck
ke
ett
T
Te
elle
es
sc
co
op
piin
ng
g v
ve
en
nttiilla
attiio
on
n s
sh
ha
afftt
F
Fllu
ue
e
A
Ad
da
ap
ptte
err
B
Ba
ac
ck
k--ffllo
ow
w v
va
allv
ve
e
M
Mo
otto
orr o
ou
uttlle
ett
C
Ch
hiim
mn
ne
ey
y h
ho
olld
diin
ng
g s
sc
crre
ew
w
F
G
fig. 4
A
C
D
E
F
G
B
EN


