BrandMotion SummitView DISP-2003 Installation Instructions Download Page 3

b.

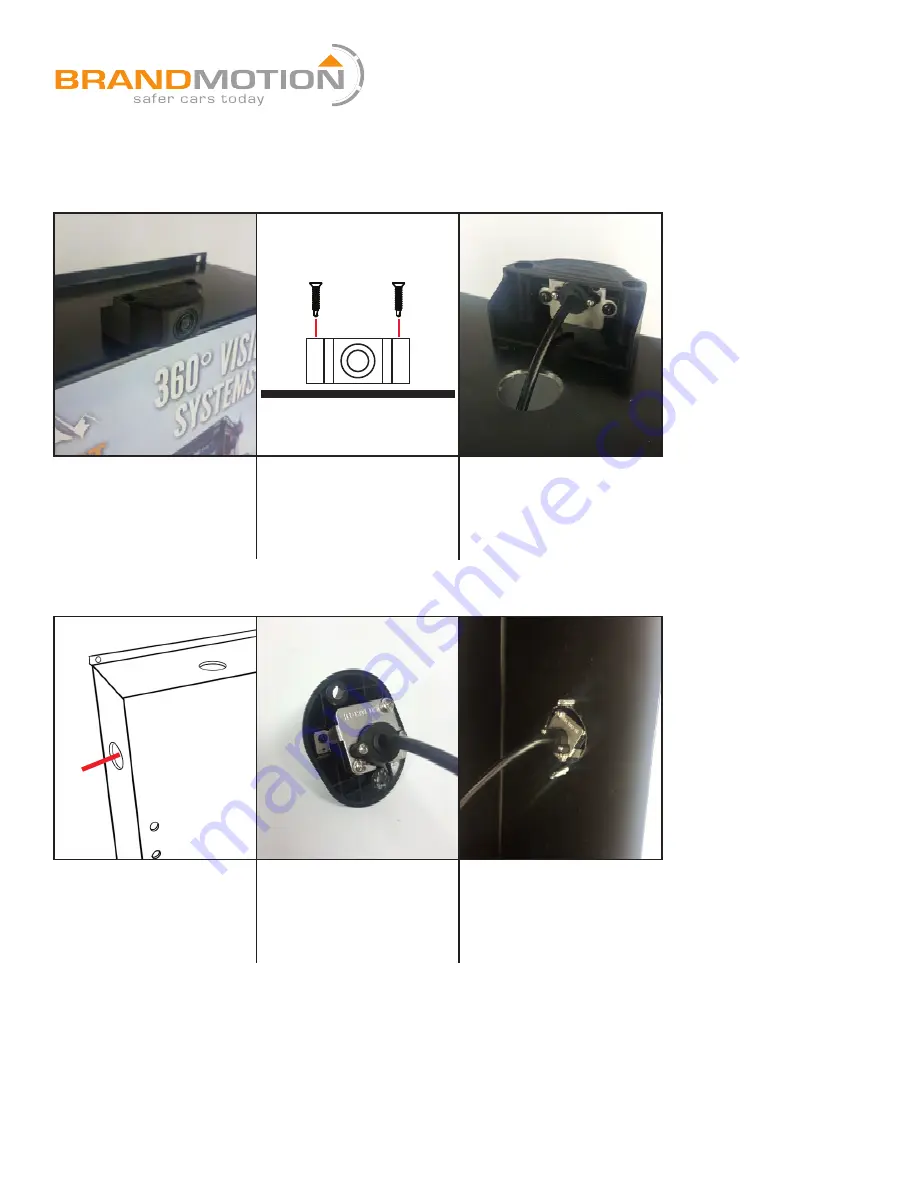
Step 4. Installation of Front Camera

INSTALLATION INSTRUCTIONS

4.1- Center the camera on 
the top of the display, 
allowing the front of the 
camera to slightly overhang.

4.2- Drill 2 self tapping 
screws into top of display.

4.3- Attach camera and 
retaining bracket to inside of 
housing. Feed video harness 
through top hole for storage.

Step 5. Installation of Side Cameras

5.1- Locate the two large 
mounting holes on either 
side of the display.

5.2- Attach bracket to 
camera housing.

5.3- Slide harness and 
camera through hole, then 
fix in place with 2 Tek 
screws.

Brandmotion Tech Support: (734)-619-1250

Page 3/5

Summary of Contents for SummitView DISP-2003

Page 1: ...rew 6 6 3 4 Pan Phillips Tek Screw 1 Plastic Spacer 30 SummitView Marketing Brochures Plastic Pamphlet Holder Tools Supplies Needed Phillips screw driver Adjustable wrench Wire strippers Straight Pick Tool Electrical Tape Soldering Iron optional Camera Kits Required AVMS 3700 AVMS 3701 The product system can be easily removed and mounted to a vehicle at any point in time Page 1 5 Brandmotion Tech ...

Page 2: ...S 7 Monitor AVMS 3700 AVMS 3701 Backup Camera Front Camera Side Cameras Power Supply a c b a inside outside Bracket a inside outside Page 2 5 Brandmotion Tech Support 734 619 1250 Monitor Foot Spacer 3 2 Feed bolts from inside display and tighten offset nuts from outside display 3 3 Feed camera harness through top hole Locate two holes in bracket and slide bracket onto bolts 3 4 Attach second nut ...

Page 3: ...s into top of display 4 3 Attach camera and retaining bracket to inside of housing Feed video harness through top hole for storage Step 5 Installation of Side Cameras 5 1 Locate the two large mounting holes on either side of the display 5 2 Attach bracket to camera housing 5 3 Slide harness and camera through hole then fix in place with 2 Tek screws Brandmotion Tech Support 734 619 1250 Page 3 5 ...

Page 4: ...and negative connections on power supply gray dashed line is negative 7 4 Secure waterproof connection of back up camera video input and 6 pin connector Page 4 5 Brandmotion Tech Support 734 619 1250 6 1 Locate the mounting and video harness hole 6 2 Remove the monitor video input power harness and stand from monitor box 6 3 Remove metal square retaining collar and bolt from stand Use pick to disl...

Page 5: ...llation of harness cover 8 1 Ensure that power supply and backup harnesses exit the top of the bracket Slide into place being careful not to pinch any wires 8 2 Screw bracket to display body c Page 5 5 Brandmotion Tech Support 734 619 1250 ...

Reviews: