


7
bossweld
.com.au
MACHINE SET UP - MIG WIRE FEEDER
WARNING!
Ensure the machine is turned off and disconnected from the power supply before
performing any of the following operations.
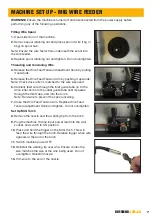
Fitting Wire Spool
1.
Open side door of the machine.
2.
Remove spool retaining nut and place spool of wire (1kg or
5kg) on spool hub.
Note: Ensure the wire feeds from underneath the spool into
the wire feeder.
3.
Replace spool retaining nut and tighten. Do not overtighten.
Threading and Tensioning Wire
4.
Release the Wire Feed Tension Adjustment Knob by pulling
it outwards.
5.
Release the Wire Feed Tension Arm by pushing it upwards.
Note: Check drive roller is matched to the wire size used.
6.
Carefully feed wire through the inlet guide tube on to the
drive roller and into the outlet guide tube until it passes
through the Inlet Tube, and into the torch.
Note: Hold wire to prevent the spool uncoiling.
7.
Close the Wire Feed Tension Arm. Replace Wire Feed
Tension Adjustment Knob and tighten. Do not overtighten.
Set Up MIG Torch
8.
Remove the nozzle and the welding tip from the torch.
9.
Plug the machine 10Amp input power lead into the wall
socket, and switch to ON position.
10.
Press and hold the trigger on the MIG Torch. This will
feed the wire through the torch. Release trigger when wire
appears at the end of the torch.
11.
Switch machine power OFF.
12.
Reinstall the welding tip over wire. Ensure contact tip
size matches the size of the wire being used. Do not
overtighten. Reinstall nozzle.
13.
Trim wire to the end of the nozzle.


