background image

3


010


• This unit, either alone or in combi-

nation with an amplifier and 
headphones or speakers, may be 
capable of producing sound levels that 
could cause permanent hearing loss. 
Do not operate for a long period of 
time at a high volume level, or at a 
level that is uncomfortable. If you 
experience any hearing loss or ringing 
in the ears, you should immediately 
stop using the unit, and consult an 
audiologist.


..................................................................................................


011


• Do not allow any objects (e.g., 

flammable material, coins, pins); or 
liquids of any kind (water, soft drinks, 
etc.) to penetrate the unit.


..................................................................................................


\012c


• Immediately turn the power off, 

remove the AC adaptor from the 
outlet, and request servicing by your 
retailer, the nearest Roland Service 
Center, or an authorized Roland 
distributor, as listed on the “Infor-
mation” page when:
• The AC adaptor or the power-

supply cord has been damaged; or

• Objects have fallen into, or liquid 

has been spilled onto the unit; or

• The unit has been exposed to rain 

(or otherwise has become wet); or

• The unit does not appear to operate 

normally or exhibits a marked 
change in performance.


..................................................................................................


013


• In households with small children, an 

adult should provide supervision until 
the child is capable of following all the 
rules essential for the safe operation of 
the unit.


..................................................................................................


014


• Protect the unit from strong impact.
  (Do not drop it!)


..................................................................................................


015


• Do not force the unit’s power-supply 

cord to share an outlet with an unrea-
sonable number of other devices. Be 
especially careful when using 
extension cords—the total power used 
by all devices you have connected to 
the extension cord’s outlet must never 
exceed the power rating (watts/
amperes) for the extension cord. 
Excessive loads can cause the 
insulation on the cord to heat up and 
eventually melt through.


..................................................................................................


016


• Before using the unit in a foreign 

country, consult with your retailer, the 
nearest Roland Service Center, or an 
authorized Roland distributor, as 
listed on the “Information” page.


..................................................................................................


019


• Batteries must never be recharged, 

heated, taken apart, or thrown into fire 
or water.


..................................................................................................

DR-670.e.book 3 ページ 2006年10月18日 水曜日 午後3時12分

Summary of Contents for Dr. Rhythm DR-670

Page 1: ...hat you have gained a good grasp of every feature provided by your new unit Owner s manual should be read in its entirety The manual should be saved and kept on hand as a convenient reference Printing...

Page 2: ...interference received including interference that may cause undesired operation Unauthorized changes or modification to this system can void the users authority to operate this equipment This equipme...

Page 3: ...nit or The unit has been exposed to rain or otherwise has become wet or The unit does not appear to operate normally or exhibits a marked change in performance 013 In households with small children an...

Page 4: ...Selection If used improperly batteries may explode or leak and cause damage or injury In the interest of safety please read and observe the following precautions p 16 1 Carefully follow the installati...

Page 5: ...l pattern that is perfectly matched to it these fills can be inserted in the pattern at the press of a single button Foot Switch Control You can connect two foot switches and use them for foot control...

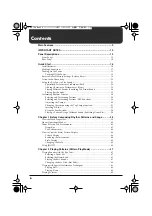
Page 6: ...Tempo 30 Changing the tempo using the Tap Tempo function 31 Inserting Fill Ins 32 Using the Foot Switches 34 Playing a Pattern Using a Different Sound Switching Drum Kits 36 Chapter 1 Before Composing...

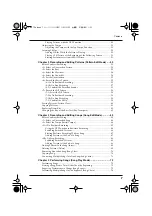
Page 7: ...ll In 59 Erasing Patterns Pattern Clear 60 Copying Patterns 61 Replacing Drum Kits 62 Changing the Key of the Bass Part Key Transpose 62 Chapter 4 Recording and Editing Songs Song Edit Mode 63 Before...

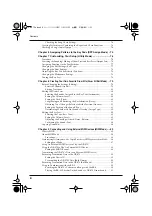
Page 8: ...eration Decay 81 Obtaining Tonal Changes Relative to Strike Position Nuance 81 Setting the Position of the Sound Pan 81 Determining Whether Or Not Sounds Overlap Assign Type 82 Editing the Bass Part 8...

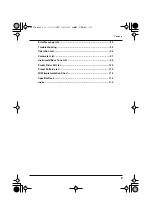
Page 9: ...sage List 92 Troubleshooting 94 Operation List 95 Parameter List 97 Instrument Bass Tone List 99 Preset Drum Kit List 102 Preset Pattern List 110 MIDI Implementation Chart 112 Specifications 114 Index...

Page 10: ...off the power to all units This will help prevent malfunctions and or damage to speakers or other devices Placement 351 Using the unit near power amplifiers or other equipment containing large power...

Page 11: ...be irretrievably lost as a result of a malfunction or the improper operation of the unit To protect yourself against the risk of loosing important data we recommend that you periodically save a backup...

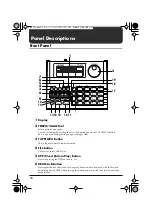
Page 12: ...TEMPO Button This is tapped in time to input the tempo 4 FILL Button You can use this to add fill ins 5 DPP Direct Pattern Play Button Press when using the DPP function p 28 6 DRUM A B Button Pressin...

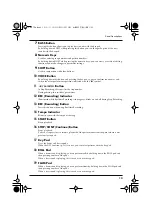
Page 13: ...cording Indicator Illuminated while Realtime Recording is in progress blinks on and off during Step Recording 13 REC Recording Button Press this button when using Realtime Recording 14 Tempo Indicator...

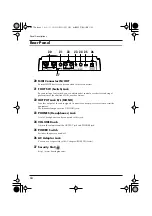
Page 14: ...Jack R L MONO Provides output of the audio signals Connect to your amp stereo system or similar equipment For monaural output use the L MONO jack 23 PHONES Headphones Jack A set of headphones can be c...

Page 15: ...15 Memo DR 670 e book 15...

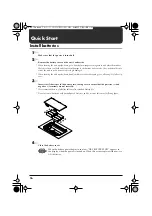
Page 16: ...it upside down handle with care to avoid dropping it or allowing it to fall or tip over 3 Insert six AA batteries in the battery case taking care to ensure that the positive and negative terminals are...

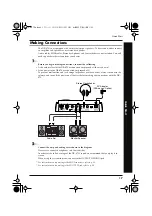
Page 17: ...d amp turned off To prevent malfunction and or damage to speakers or other devices always turn down the volume and turn off the power on all devices before making any connections with the DR 670 fig 0...

Page 18: ...ch located on the rear panel of the DR 670 fig 00 03 3 Turn on the power of the amp 4 While tapping the key pad rotate the VOLUME knob on the rear panel to adjust the DR 670 s volume level fig 00 04 A...

Page 19: ...ory If you already have important data saved in the DR 670 save the data to an external MIDI device such as a sequencer using the bulk dump procedure p 89 then carry out Factory Reset fig 00 05 1 Whil...

Page 20: ...pressed once more playback of the performance starts from the point where it was stopped this is referred to as continued play Press START to have playback start from the beginning of the performance...

Page 21: ...ment sounds by tapping the key pads fig 00 11 1 Hold down SHIFT and press Key Pad 5 PATTERN PLAY fig 00 12 2 Tapping the key pads now plays the instruments assigned to each of the pads The key pads fe...

Page 22: ...echniques Roll A roll is performed by playing the same sound consecutively at the same interval fig 00 13 1 While pressing ROLL hold down a key pad 1 You can change the roll interval Refer to Changing...

Page 23: ...striking the snare or other drum simultaneously with the two sticks held in the hands but with a slight difference in force used in playing each stick fig 00 14 1 While pressing FLAM press a key pad 1...

Page 24: ...le group to the sixteen key pads There are two drum banks Bank A and Bank B For more detailed information refer to Drum Kits and Pad Performances p 42 fig 00 15 1 Press DRUM A B Each time the button i...

Page 25: ...ad The bass sound stops playing when the key pad is released Pitches are assigned to the key pads in such a way as to simulate the frets of a bass guitar You cannot play two or more bass sounds simult...

Page 26: ...rent Preset Patterns and 200 User Patterns for you to use Use the following procedure to perform these patterns and listen to the sounds Pattern refers to a one to two measure rhythm performance patte...

Page 27: ...performance is in progress sets up the pattern number for the next pattern to be played When the current pattern finishes playing the next preselected pattern then begins to play fig 00 18d 4 When STO...

Page 28: ...that are assigned to the key pads With DPP you can instantly perform desired patterns by tapping the pads Here we suggest that you try using the DPP function to play the patterns that were assigned at...

Page 29: ...ern stops and the performance of the pattern assigned to the pad that was tapped then begins fig 00 22b 4 When STOP CONT is pressed playback of the performance stops When the key pad is pressed once m...

Page 30: ...changing the tempo used for performing the pattern fig 00 23 1 Hold down TAP TEMPO and rotate the TEMPO VALUE dial to change the tempo fig 00 24 The tempo can be changed with in the range from 20 to 2...

Page 31: ...by the timing with which you press TAP TEMPO fig 00 25 1 Press TAP TEMPO at least three or four times in a row at the desired timing the tempo will be set to the same timing you ve just used for your...

Page 32: ...32 Quick Start Inserting Fill Ins With the DR 670 you can add fill ins to a pattern being played at whatever timing you want fig 00 26 3 2 4 1 DR 670 e book 32...

Page 33: ...ll in pattern is played instantly after FILL is pressed fig 00 29 When the fill in pattern is played to the end the performance reverts to the original pattern fig 00 30 4 Press STOP CONT to stop the...

Page 34: ...with plugs that have a white stripe are used for starting and stopping performances foot switches connected with plugs that have a red stripe are used for fill ins To prevent malfunction and or damage...

Page 35: ...ile the performance is in progress inserts a fill in fig 00 35 When the fill in pattern is played to the end the performance reverts to the original pattern 4 When the foot switch connected with a plu...

Page 36: ...fferent instrument changing drum kits while the performance is in progress A drum kit is a collection of 32 drum instruments and one bass tone that is selected as a single set The DR 670 features 64 P...

Page 37: ...t fig 00 41 6 Press STOP CONT to stop the performance Current drum kit For more on the Preset Drum Kits refer to Preset Drum Kit List p 102 When you want to make changes to the drum kit settings refer...

Page 38: ...st as it is performed Even if there is a little unevenness in the timing used in tapping the key pads the Quantize function allows you to record with the timing corrected Refer to Set the Quantization...

Page 39: ...l Realtime Recording Here the song is recorded just by selecting and playing patterns This allows quick and easy recording of songs Step Recording With this method the individual patterns to be played...

Page 40: ...ch time it is powered up fig 01 03 Pattern Edit mode Refer to Chapter 3 Recording and Editing Patterns p 52 Used for recording and editing rhythm patterns To go into Pattern Edit mode hold down SHIFT...

Page 41: ...ig 01 08 Utility mode Used for setting the output part metronome foot switches rolls flams pad sensitivity and master tuning To go into Utility mode hold down SHIFT and press Key Pad 13 UTILITY while...

Page 42: ...he volume pitch and other settings of instruments assigned to the User Drum Kits thus enabling you to handle such sounds as new instruments distinct from the internal instruments On the DR 670 you can...

Page 43: ...3 14 15 16 Drum Bank A CY 1 CY 2 CY 9 PC12 Drum Kit A 1 A 2 A 3 A16 B 1 B16 Instrument of Pad number A1 A16 Instrument of Pad number B1 B16 Drum Bank A 1 2 3 4 5 6 7 8 9 10 11 12 13 14 15 16 G A A B D...

Page 44: ...es patterns that are composed of either one or two measures When a two measure pattern is selected it is indicated as shown below fig 01 21 Switching the Instrument When you want to display the inform...

Page 45: ...hanging the scale the length of individual steps a single square you can have patterns containing many notes be shown in their entirety as well as display the content of more complex patterns Example...

Page 46: ...ing another button or key pad you can switch modes and use a variety of convenient functions for editing songs and rhythm patterns The text or symbols printed above the buttons and key pads on the DR...

Page 47: ...a drum kit Preset 1 64 User 65 128 fig 02 03 3 Once the drum kit has been selected release your finger from SHIFT You re returned to the Pattern Play Mode screen Preset Drum Kit List p 102 Selecting...

Page 48: ...to the Pattern Play Mode screen The Fret Shift function is not enabled during pattern playback Playing with Special Performance Techniques You can play rolls and flams when using the key pads to play...

Page 49: ...ntly being played is finished fig 02 10 3 Pressing STOP CONT stops the performance When START is pressed again the performance starts from the beginning of the pattern Playing Patterns with the DPP Fu...

Page 50: ...fill in patterns at any point in a pattern while the performance is in progress Each pattern features a fill in prepared for use with that pattern These fill in patterns are called fill patterns wher...

Page 51: ...the Fill Pattern When you press FILL while performance of the pattern stopped the fill pattern plays at the moment you press START and the performance then goes on to the basic pattern once the fill...

Page 52: ...Recording or Step Recording to a pattern which has already been recorded the sounds are layered without the previously recorded sounds being erased With the drum part you cannot record multiple notes...

Page 53: ...ot record or edit the Preset patterns 1 200 PRESET appears in the display if you try to record or edit a Preset pattern If you want to record or edit a Preset pattern first copy the pattern to a User...

Page 54: ...t length Furthermore once beats or measures have been reduced you may not be able to restore the original data correctly even by adding beats or measures again Always be sure to confirm settings after...

Page 55: ...ing out Realtime Recording 1 Press START The metronome sound begins and the tempo indicator flashes in time with the count 2 Press DRUM A B or BASS to select the drum bank or bass part for the instrum...

Page 56: ...ttings Flam Interval Ratio p 78 are not recorded Changing these settings after recording also changes the way the flam sounds 4 Repeat Steps 2 and 3 as needed 5 Press STOP to stop recording The REC in...

Page 57: ...hen playing flams the flam settings Flam Interval Ratio p 78 are not recorded Changing these settings after recording also changes the way the flam sounds You cannot record multiple notes to the same...

Page 58: ...e the Quantize settings for recording p 55 6 Press STOP to stop Step Recording The REC indicator goes out To Record Long Notes in the Bass Part a Press to specify the steps to be recorded fig 03 14 b...

Page 59: ...fill pattern 7 1 Select the Fill Pattern 1 With the performance stopped press FILL If there is no data recorded to that fill pattern check whether or not the basic pattern has been copied fig 03 21 2...

Page 60: ...hen Selecting Basic Patterns FILL Not Pressed ALL All pattern data the beat measures drum kit recorded basic pattern data recorded fill pattern data BSC Basic pattern BSC DRUM Basic pattern drum part...

Page 61: ...only 4 When you have finished determining which data is to be copied then while still holding down SHIFT press The display switches to the copy destination User pattern selection screen fig 03 25 5 H...

Page 62: ...ing the Key of the Bass Part Key Transpose With the Key Transpose function you can change transpose the key of the bass part during playback Key Transpose settings are disregarded when recording and p...

Page 63: ...d down SHIFT 2 Hold down SHIFT and rotate the TEMPO VALUE dial to select the song You can also select the song by inputting the number with the numerical keys and pressing fig 04 01A 3 Release SHIFT f...

Page 64: ...lease SHIFT You can also remove previously recorded songs and use them for recording new songs Refer to Removing Unneeded Songs Song Clear p 70 2 Select the Tempo Initial Tempo This sets the initial t...

Page 65: ...to select the pattern number You can also select the pattern by inputting the pattern number with the numeric keys and pressing You can record fill patterns by pressing FILL during recording The fill...

Page 66: ...n you reach the measure before the one you want to substitute select the next pattern to be recorded Turn the TEMPO VALUE dial to select the pattern number You can also select the pattern by inputting...

Page 67: ...the replacement pattern then the pattern already recorded is played Adding Patterns at the End of a Song You can start Realtime Recording at the end of a recorded song to add more patterns to the song...

Page 68: ...th the pattern to be switched 3 Select the pattern to be switched Rotate the TEMPO VALUE dial to select the pattern When you press the pattern is recorded and the measure number advances automatically...

Page 69: ...The pattern is inserted and when it is finished the display will indicate DONE 4 When the insertion is finished release SHIFT To cancel the operation release SHIFT Deleting Patterns Delete This delete...

Page 70: ...to other Song Note that when a song is recorded to a copy destination the data that was in the copy destination is discarded 1 Hold down SHIFT and press 4 COPY Continue to hold down SHIFT fig 04 13 2...

Page 71: ...nd select the song by pressing Set to OFF at the last song to be played in the sequence 3 When you have finished making the settings release SHIFT 4 Switch the currently selected song to continue addi...

Page 72: ...ng fig 05 02 The following appears in the display if the selected song contains no data fig 05 03 2 Press START The song is played from the beginning The tempo indicator flashes with each beat and the...

Page 73: ...he next song 2 Press STOP CONT The song is played from the specified measure Repeating Performances of Songs Song Repeat You can have songs be played repeatedly This function is called Song Repeat fig...

Page 74: ...Song Chain function fig 05 11 Checking a Song s Initial Tempo You can check the Initial Tempo p 64 setting for a song in Song Play mode 1 Hold down SHIFT and press VOICE INIT TEMPO As you continue to...

Page 75: ...is entered press to set the number You cannot assign the fill pattern 4 Repeat Steps 2 and 3 as needed 5 Hold down SHIFT and press Key Pad 5 PATTERN PLAY The DR 670 switches to Pattern Play mode The D...

Page 76: ...you want to change fig 07 03 3 Rotate the TEMPO VALUE dial to change the value of the setting 4 Repeat Steps 2 and 3 as needed Switching the Sounding Muting of Drum Parts and Bass Parts Output Part fi...

Page 77: ...dit mode and Song Edit mode CHAS When the DPP function is off this function selects the pattern with the number one greater than the currently selected pattern number If Pattern Number 400 is currentl...

Page 78: ...pads are hit with a considerable amount of force it does make it easier to produce subtle changes Sensitivity increases as the settings value is raised Although this lets you add strong accents even i...

Page 79: ...User drum kits 65 128 contained the same settings as the Preset drum kits 1 64 Select the Drum Kit to Edit 1 Hold down SHIFT and press DRUM A B DRUM KIT Continue to hold down SHIFT 2 While holding do...

Page 80: ...s Instrument This selects the instruments to be assigned to the key pads For more on the instruments that can be selected refer to the Instrument Bass Tone List p 99 fig 08 05 You cannot select bass t...

Page 81: ...he Nuance settings which allow you to obtain tonal changes relative to the position the instrument is struck Settings Values 7 7 fig 08 10 Instruments Appended with an Asterisk Positive Values As the...

Page 82: ...ut the sound of another instrument sharing the same number EX M EX P is not allowed to overlap This is effective with sounds that normally are not heard at the same time such as the open and closed hi...

Page 83: ...0 15 fig 08 21 Adjusting the Envelope Attack Decay Release This adjusts the envelope of the bass sound fig 08 22 Sharpness in the Rise of the Sound Attack Valid Settings 0 15 fig 08 23 0 Original nua...

Page 84: ...lected drum kit to one of the User drum kits 65 128 If the drum kit you want to copy is not the one that is currently selected first select the drum kit that you do want to copy before continuing 1 Ho...

Page 85: ...ly to the own MIDI OUT connector When making a looped connection with other MIDI devices do not set the connected devices to THRU SOFT THRU Otherwise malfunction could result MIDI OUT Connector MIDI I...

Page 86: ...gs screens by rotating the TEMPO VALUE dial SynchronizingPerformances with a Digital Recorder or MIDI Sequencer Sync Mode You can synchronize the DR 670 s performances with digital recorders MIDI sequ...

Page 87: ...r Operating the DR 670 starts and stops performances and performances play at the tempo set in the DR 670 MIDI The DR 670 functions as a slave device The DR 670 starts and stops according to the messa...

Page 88: ...DR 670 s key pads to Note Number as shown below fig 09 08b When you tap one of the DR 670 s key pads the Note Number for that key pad is transmitted When a Note Number is received from an external MI...

Page 89: ...following procedure in MIDI mode when carrying out Bulk Dump 1 Press to select TX BULK fig 09 12 2 Rotate the TEMPO VALUE dial to select the data to be transmitted ALL All of the DR 670 s data SEQ Da...

Page 90: ...DR 670 in combination with the BR 8 Connecting fig 09 15 Synching the DR 670 s Patterns and Songs with the BR 8 This synchronizes the performances of the DR 670 s songs and patterns to songs recorded...

Page 91: ...o Rhythm MIDI ch then rotate the TIME VALUE dial to select the MIDI channel 1 16 Set this to 10 here 4 Press EXIT enough times to return to the Level Meter screen Making the DR 670 Settings Use the fo...

Page 92: ...esetting the data is necessary this message appears when the power is turned on Press to restore the factory settings fig 10 04 Memory is full No more patterns or songs can be recorded Press STOP CONT...

Page 93: ...ulk Load again fig 10 07a The system attempted to concurrently process abnormally large amounts of data but was unable to succeed Press STOP CONT Make sure that the unit is not being forced to handle...

Page 94: ...le in a pattern where a lengthy cymbal sound is triggered on every beat Could there be a mistake in the Assign Type settings p 82 Can t Play Rolls Flams Could there be a mistake in the Flam Interval o...

Page 95: ...he key pads SHIFT DRUM A B DRUM KIT Switch Drum Kit SHIFT BASS FRET SHIFT Fret Shift Settings VOICE Confirm Instrument Bass Tone SHIFT 8 SCALE Scale Quantize Settings Move Select Parameter Move Select...

Page 96: ...ance Pattern Play Mode Operation Purpose TEMPO VALUE Select Pattern Numeric Keys Select Pattern SHIFT 5 KEY TRANS Confirm Key Transpose Settings SHIFT 9 BEAT Confirm Beat SHIFT 0 MEASURE Confirm Measu...

Page 97: ...riplets 8 16 Quantize QNTZ OFF 32 16 triplets 16 8 triplets 8 16 Fred Shift FRET 5 16 0 Song Song Chain CHN OFF 1 100 OFF Initial Tempo INIT OFF 20 260 OFF Pattern Beat BEAT 2 4 8 4 4 8 16 8 4 4 Measu...

Page 98: ...A PDE FILL Roll Type ROL TYPE 32 16 triplets 16 8 triplets 8 32 Flam Interval FLM INT 0 31 16 Flam Ratio FLM RATI 0 10 5 Pad Sensitivity PAD SENS 0 10 5 Clock Level CLK LVL 0 15 15 Click Beat CLK BEAT...

Page 99: ...k 2 2 KC43 plastic kick 1 KC44 gubba kick 2 KC45 jungle kick 1 KC46 TR 808 kick 1 2 KC47 TR 808 kick 2 2 KC48 808 electronic kick 2 KC49 808 boom kick 2 KC50 TR 909 kick 1 2 KC51 TR 909 kick 2 1 KC52...

Page 100: ...6 brush slap tom 2 2 TM17 double head tom 1 2 TM18 double head tom 2 2 TM19 light tom 1 2 TM20 light tom 2 2 TM21 real tom 1 2 TM22 real tom 2 2 TM23 ring tom1 2 TM24 ring tom2 2 TM25 room tom 1 2 TM2...

Page 101: ...1 PC43 TR 808 hand clap 1 PC44 TR 808 cowbell 1 FX1 scratch 1 2 FX2 scratch 2 2 FX3 scratch snare 2 FX4 jungle hat 1 FX5 high Q 2 FX6 tape rewind 1 FX7 philly hit 1 FX8 dance shaker 1 FX9 beam high Q...

Page 102: ...trument CY1 CY17 CY11 CY9 TM29 TM29 TM29 TM29 STK6 PC43 SN58 HH14 KC37 SN57 HH14 HH15 PC22 PC16 PC20 PC17 PC25 PC25 PC18 PC19 PC7 PC8 PC14 PC13 PC2 PC9 PC11 PC12 OBB No 5 TR808 1 Instrument CY16 CY17...

Page 103: ...trument CY1 CY3 CY11 CY7 TM27 TM27 TM28 TM28 STK2 SN12 PC1 HH3 KC1 SN20 HH1 HH2 PC22 PC16 PC20 PC17 PC25 PC25 PC18 PC19 PC7 PC8 PC14 PC13 PC2 PC9 PC11 PC12 PIC1 No 13 Studio Instrument CY1 CY2 CY12 CY...

Page 104: ...ment CY2 CY5 CY11 CY8 TM21 TM21 TM21 TM22 STK1 SN38 PC1 HH3 KC22 SN18 HH10 HH11 PC22 CY6 PC20 CY7 PC25 PC25 PC5 PC5 KC25 PC8 PC14 PC13 PC2 PC9 PC11 PC12 STCK No 21 HipHop Instrument CY1 CY2 CY12 CY8 T...

Page 105: ...No 28 Room 3 Instrument CY2 CY5 CY11 CY8 TM27 TM27 TM28 TM28 STK1 PC43 PC1 HH3 KC31 SN14 HH10 HH11 PC22 PC16 PC20 PC17 PC25 PC25 PC18 PC19 PC7 PC8 PC14 PC13 PC2 PC9 PC11 PC12 PIC2 No 29 Fusion Instru...

Page 106: ...MTB No 36 HvyFunk Instrument CY1 CY2 CY11 CY9 TM21 TM21 TM21 TM22 STK3 SN5 PC1 HH3 KC18 SN6 HH1 HH2 PC22 PC16 PC20 PC17 PC25 PC25 PC18 PC19 PC7 PC8 PC14 PC13 PC2 PC9 PC11 PC12 STCK No 37 Folk Instrume...

Page 107: ...S No 44 Reggae Instrument CY6 CY3 CY12 CY9 TM23 TM23 TM23 TM24 STK3 PC33 PC1 HH3 KC25 SN49 HH1 HH2 PC22 PC16 PC20 PC17 PC25 PC25 PC26 PC27 PC7 PC8 PC14 PC13 PC2 PC9 PC11 PC12 MTB No 45 Salsa Instrumen...

Page 108: ...Dance 2 Instrument CY1 CY17 CY12 CY9 TM31 TM31 TM31 TM31 STK5 SN55 PC44 FX4 KC51 SN56 HH16 HH17 FX8 PC41 PC42 FX11 PC25 PC25 PC37 PC1 FX7 FX9 KC49 SN61 PC2 FX15 PC3 PC38 SINE No 53 Delay Instrument CY...

Page 109: ...S2 BS2 FNG2 No 60 RockBas Instrument CY2 CY7 CY11 CY9 TM13 TM13 TM13 TM14 STK1 SN11 PC1 HH7 KC18 SN14 HH5 HH6 BS3 BS3 BS3 BS3 BS3 BS3 BS3 BS3 BS3 BS3 BS3 BS3 BS3 BS3 BS3 BS3 PIC1 No 61 FunkBas Instrum...

Page 110: ...6th Note Feel 1 1 052 120 16th Note Feel 1 2 053 120 16th Note Feel 2 1 054 120 16th Note Feel 2 2 055 130 Shuffle 1 056 130 Shuffle 2 057 120 6 8 Feel 1 058 120 6 8 Feel 2 059 104 Ballade 1 1 060 104...

Page 111: ...Disco 2 153 130 Bossa Nova 1 1 154 130 Bossa Nova 1 2 155 130 Bossa Nova 2 1 156 130 Bossa Nova 2 2 157 120 Samba 1 1 158 120 Samba 1 2 159 120 Samba 2 1 160 120 Samba 2 2 161 140 Samba 3 1 162 140 Sa...

Page 112: ...arks Default Changed Default Messages Altered True Voice Note On Note Off Key s Channel s 1 16 1 16 Mode 3 X O X 23 87 X X X X X 1 16 1 16 Storable in Memory Mode 3 X O X 9n v 1 127 23 87 X X X Dr Rhy...

Page 113: ...nsing Reset X X X O O O SYNC INT 1 O SYNC INT 1 X O SYNC INT 1 O SYNC INT 1 X X O X X O O O SYNC MIDI 2 O SYNC MIDI 2 X 0 99 O SYNC MIDI 2 O SYNC MIDI 2 X X O X 1 Transmitted when Sync Mode is INT or...

Page 114: ...onnectors IN OUT AC Adaptor Jack DC 9 V Power Supply DC 9V Dry Battery x 6 AC Adaptor PSA series Power Consumption 200 mA or less Expected battery life under continuous use Carbon approx 2 5 hours Alk...

Page 115: ...Drum Part 56 57 76 E Edit 79 Envelope 83 Erase 56 58 60 70 EX1M 82 EX1P 82 F Factory Reset 19 Fill Pattern 50 51 59 Fill In 32 50 Flam 23 48 78 Flam Interval 78 Flam Ratio 78 Foot Switch 51 55 65 74 7...

Page 116: ...3 84 REPEAT 73 Roll 22 48 77 Roll Type 77 S SCALE 45 Scale Display 45 Slave 86 Song 39 72 Song Chain 71 74 Song Clear 70 SONG EDIT 40 63 Song Edit mode 40 63 SONG PLAY 40 72 Song Play mode 40 72 Song...

Page 117: ...117 Memo DR 670 e book 117...

Page 118: ...118 Memo DR 670 e book 118...

Page 119: ...interference received including interference that may cause undesired operation Unauthorized changes or modification to this system can void the users authority to operate this equipment This equipme...

Page 120: ...hat you have gained a good grasp of every feature provided by your new unit Owner s manual should be read in its entirety The manual should be saved and kept on hand as a convenient reference Printing...

Reviews: