background image

E - 1

INSTALLATION

Before final installation, connect the wiring temporarily and make sure it is all working 
properly.
Use only the parts included with the unit to ensure proper installation. The use of 
unauthorized parts can cause malfunctions.
This item must be installed by an authorized dealer in order to keep the warranty vaild.
Install the unit where it does not get in the driver's way and cannot injure the passenger if 
there is a sudden stop, like an emergency stop.
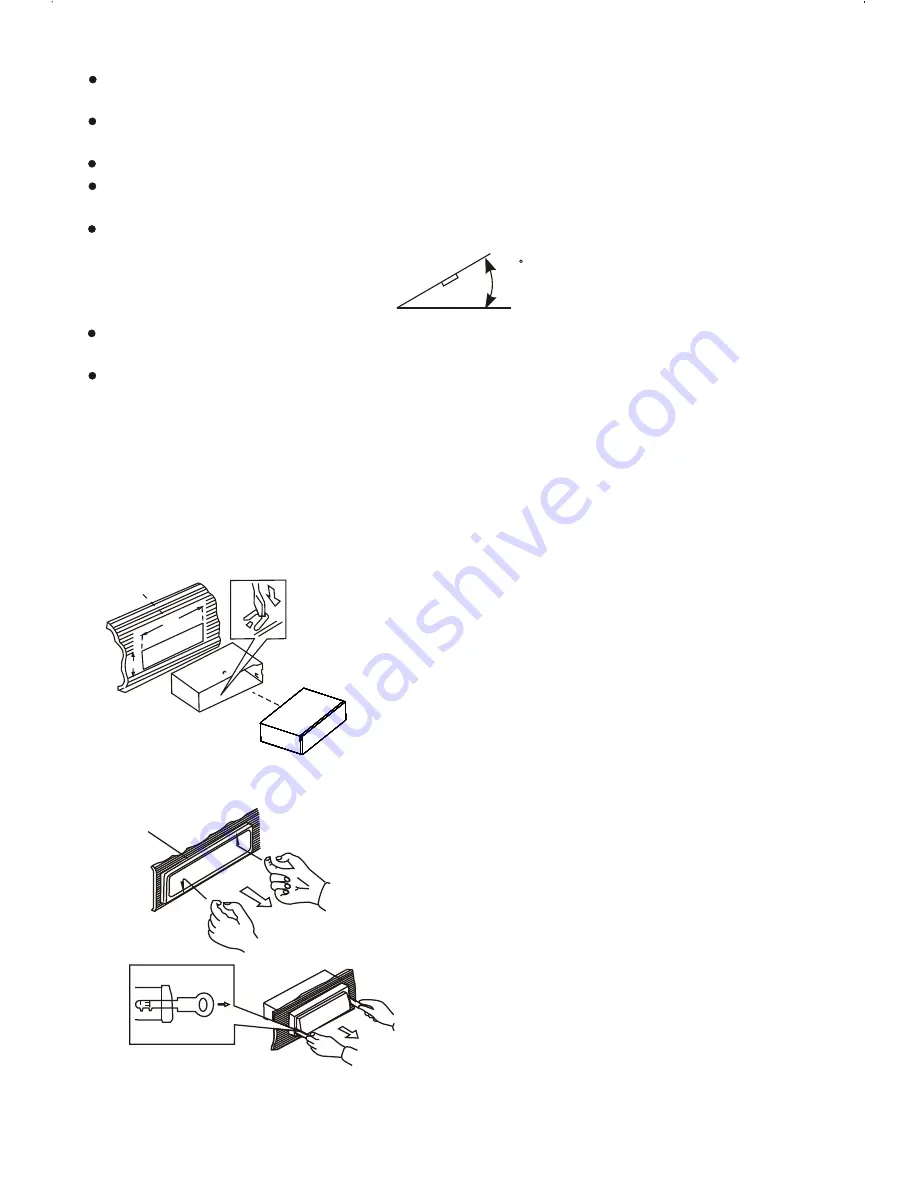
If installation angle exceeds 30 degrees, the unit might not give its optimum performance.

Avoid installing the unit where it would be subject to high temperature, such as direct 
sunlight, or hot air, heater or where it would be subject to dust dirt or excessive vibration.
Be sure to remove the front panel before installing the unit.

DIN FRONT/REAR-MOUNT

This unit can be property installed either from Front (conventional DIN Front-mount) or Rear
(DIN Rear-mount installation, utilizing threaded screw holes at the sides of the unit chassis). 
For details, refer to the following illustrated installation methods A and B.

-  DIN FRONT-MOUNT (Method A)

Installation the unit

1.  Dashboard
2.  Holder

After inserting the half sleeve into the 

dashboard, select the appropriate tab 
according to the thickness of the 
dashboard material and bend them 
inwards to secure the holder in place.

182

53

1

2

a.  Frame
b.  Insert fingers into the groove in the 

front of frame and pull out to remove 
the frame. (When re-attaching the 
frame, point the side with a groove 
down wards and attach it.)

c. Insert the levers supplied with the 

unit into the grooves at both sides of 
the unit as shown in figure until they 
click. Pulling the levers makes it 
possible to remove the unit from the 
dashboard.

Removing the unit

a

b

c

30

Summary of Contents for 624B

Page 1: ...4...

Page 2: ...NU BUTTON INFO BUTTON BAND BUTTON LCD DISPLAY PLAY PAUSE BUTTON INTRO SCAN BUTTON REPEAT BUTTON RANDOM BUTTON ENCODER VOLUME KNOB MUTE BUTTON EQ BUTTON POWER BUTTON PRESET MEMORY STATION BUTTONS M1 M6...

Page 3: ...before installing the unit DIN FRONT REAR MOUNT This unit can be property installed either from Front conventional DIN Front mount or Rear DIN Rear mount installation utilizing threaded screw holes at...

Page 4: ...st with point B on the main unit touching point A on the D C P As shown on the diagram 2 Then press the left side of D C P onto the main unit until a click sound is heard DO NOT insert the D C P from...

Page 5: ...he rear connector that connects the main unit and the D C P is an extremely important part Be careful not to damage it by pressing on it with fingernails pens screwdrivers etc Attaching the Detachable...

Page 6: ...t of the radio to turn the unit on Press POWER button again to turn the unit off MUTE BUTTON Press the mute button momentarily to mute the audio volume and Mute will in the display Press the mute butt...

Page 7: ...utomatically switch to radio mode FRONT AUX INPUT INFO BUTTON At Radio mode Press this button to view frequency of the station in listening and clock time At DSP off mode preset equalizer will be cont...

Page 8: ...tton 3 hold a preset button which you want store the station for at least 2 seconds The preset number will appear on the display accompanied by a beeps sound TO RECALL A STATION 1 select a band if nee...

Page 9: ...s the Track Up Button for less than 1 second to skip the playback to the next track or press the Track Down Button for less than 1 seconds to return to the beginning of the current track press this bu...

Page 10: ...witch to other mode 2 User can use the SRC button to choose USB mode only if USB drive device is inserted in the unit or any other modes when they are in any mode CAUTION COMPATIBILITY Due to the fast...

Page 11: ...SD MMC mode 5 All the SD MMC files playback function is same as normal MP3 files playback 2 Please make sure to insert the SD or MMC card in the correct direction orientation as indicated in picture...

Page 12: ...3 Artist Name ARTIST E 10 2 10 Track Up Down Button 3 Folder UP Down Press Folder up M6 F or Folder down Button M5 F for more than 1seconds skip10 tracks Press Folder up M6 F or Folder down Button M5...

Page 13: ...AIRING Before you use your Car HANDSFREE System you need to pair it with your mobile phone 1 The Bluetooth set system on the head unit will automatically go into pairing mode when the POWER turned on...

Page 14: ...he connected symbol on the mobile phone will be different from one to another Please refer lo the corresponding specification When you hang up the phone the main unit will return to previous mode radi...

Page 15: ...ecifications even with phones of which the actual Bluetooth specifications and used profiles apply to our Bluetooth Handsfree System specifications Please check the compatibility list or try it out in...

Page 16: ...utput REMARK Specifications subject to change without notice Frequency Range Usable Sensitivity Stereo Separation S N Ratio RADIO SECTION FM 522 1620 KHz EURO 530 1710 KHz USA Better than 45dB 40 dB D...

Reviews: