background image

1 0

 |


Installation Instructions

Bosch IDS BOVB20 Split System Heat Pump - BTC 761701316 C (02.2022)

4     Unit Preparation

4.1     Prepare the Unit for Installation


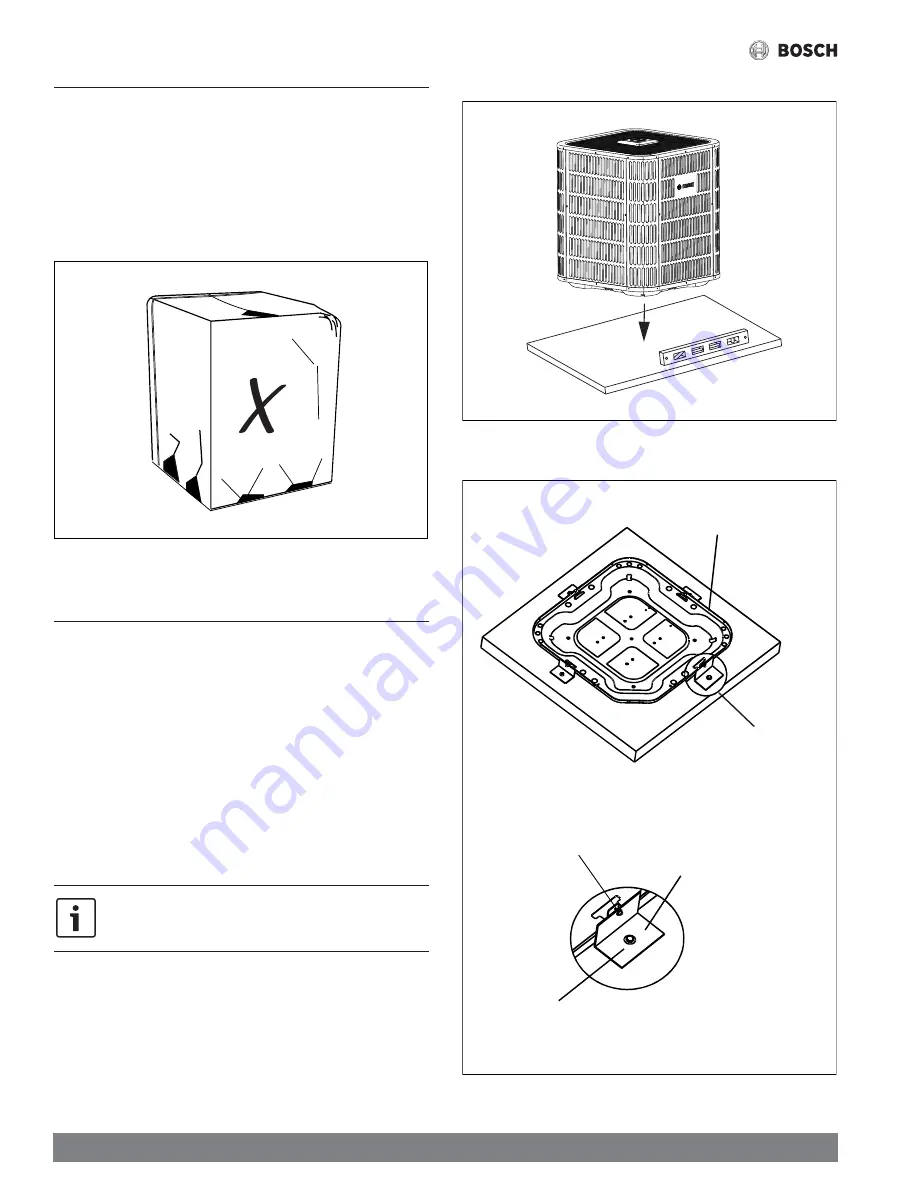
Check for damage and report promptly to the carrier any damage found to 
the unit (Fig. 6).


The charge port can be used to ensure the refrigerant charge has been 
retained during shipment.

Figure 7

5     Setting the Unit

5.1     Pad Installation

When installing the unit on a support pad, such as a  concrete slab, consider the 
following: 


The pad must be at least 1-2” larger than the unit on all sides. 


The pad must be separated from any structure. 


The pad must be level.


The pad must be high enough above grade to allow for drainage. 


The pad location must comply with National, State, and local codes.


   These instructions are intended to provide a method to tie-down system 

to cement slab as a securing procedure for high wind areas. Check local 
codes for tie-down methods and protocols. 

Figure 8

Figure 9

 #7 X 3/8" Self-tapping screws 
(Do not exceed 3/8" length screws!)

Detail A

See Section 2.1 
for unit dimensions

See Detail A

Field-supplied brackets:
2" width, 1/16" thickness,
height as required.

 1/4” Χ 1-1/2” Hex washer head concrete screws 
(3/16” pilot hole needed. Pilot hole should be 1/4” deeper 
than the fastener embedment)

Summary of Contents for IDS BOVB20

Page 1: ...Installation Instructions Split System Heat Pump Bosch IDS BOVB20 IDS Connected Premium Condensing Units 2 3 4 5 Ton Capacity R410A BTC 761701316 C 02 2022 ...

Page 2: ...2 Installation Instructions Bosch IDS BOVB20 Split System Heat Pump BTC 761701316 C 02 2022 ...

Page 3: ...lves 17 12 Electrical Low Voltage 18 12 1 Low Voltage Maximum Wire Length 18 12 2 Low Voltage Hook Up Diagrams 18 12 3 Thermostat Wiring Diagrams 18 13 Electrical High Voltage 22 13 1 High Voltage Power Supply 22 13 2 High Voltage Disconnect Switch 22 13 3 High Voltage Ground 22 14 Start Up 23 14 1 System Start Up 23 15 System Charge Adjustment 24 15 1 Charging Weigh In Method 24 15 2 Subcooling C...

Page 4: ...nents as they may hold a dangerous charge of 380 VDC then verify DC Voltage is less than 42VDC at inverter TEST POINTS P N NOTICE This document is customer property and is to remain with this unit Please return to service information pack upon completion of work These instructions do not cover all variations in systems or provide for every possible contingency to be met in connection with the inst...

Page 5: ...result in personal illness or injury or severe equipment damage System contains oil and refrigerant under high pressure Recover refrigerant to relieve pressure before opening system WARNING This product can expose you to chemicals including Lead and Lead components which are known to the State of California to cause cancer and birth defects or other reproductive harm For more information go to www...

Page 6: ...erent from that to which the receiver is connected Consult the dealer or an experienced radio TV technician for help This device complies with part 15 of the FCC Rules Operation is subject to the following two conditions 1 This device may not cause harmful interference and 2 this device must accept any interference received including interference that may cause undesired operation Changes or modifi...

Page 7: ...ernatively you can scan this QR code with your phone s camera Figure 1 Scan QR Code 2 Open the Bosch EasyAir app and create a profile You can now use the Bosch EasyAir app when starting up the system in Section 14 Figure 2 3 Unit Location Considerations 3 1 Unit Dimensions Models H x W x L Inches BOVB36 20 24 15 16 x 29 1 8 x 29 1 8 BOVB60 20 33 3 16 x 29 1 8 x 29 1 8 Table 1 The unit s weight valu...

Page 8: ... 4 Ton 3 8 7 8 Std 25 50 50 40 30 25 3 4 Opt 25 50 50 40 30 25 5 Ton 3 8 7 8 Std 25 50 50 40 30 25 3 4 Opt 25 50 50 40 30 25 1 1 8 Opt 25 40 N A N A N A N A Table 2 Standard line size is recommended N A Application not recommended Refrigerant charge refer to Sec 14 Maximum line equivalent length 150 feet Maximum vertical equivalent length 50 feet Use only the line diameters indicated in Table 2 If...

Page 9: ...inage of snow and ice melted during defrost cycle prior to its refreezing Ensure that drain holes in unit base pan are not obstructed which could prevent the drainage of defrost water Fig 5 If possible avoid locations that are prone to snow drifts If not possible a snow drift barrier should be installed around the unit to prevent a build up of snow on the sides of the unit Figure 6 Min 12 Snow bar...

Page 10: ...t on all sides The pad must be separated from any structure The pad must be level The pad must be high enough above grade to allow for drainage The pad location must comply with National State and local codes These instructions are intended to provide a method to tie down system to cement slab as a securing procedure for high wind areas Check local codes for tie down methods and protocols Figure 8...

Page 11: ...er 3 Refer to figure 10 on the left or right side of the unit depending on which is furthest from a wall Slide the antenna downwards to mount the antenna and secure the cable using the 2 movable clips on the cable Refer to figure 11 Figure 10 3 3 2 2 1 1 IDS 2 1 ODU 5T Antenna Mounting IDS 2 1 ODU 3T Antenna Mounting Mount antenna away from wall Mount antenna away from wall Figure 11 Clip antenna by...

Page 12: ... contact Figure 13 Liquid Line Suction Line Insulation 6 4 Reuse Existing Refrigerant Lines CAUTION MINORTOMODERATEBURNS If using existing refrigerant lines make certain that all joints are brazed not soldered For retrofit applications where the existing refrigerant lines will be used the following precautions should be taken Ensure that the refrigerant lines are the correct size Refer to Section 2...

Page 13: ...ll or sill they should be insulated and isolated Isolate the lines from all ductwork Minimize the number of 90º turns Figure 14 Side View 8 Feet Maximum 8 Feet Maximum Joist Rafter Isolator Lineset Secure Suction Line from joists using isolators every 8 ft Secure Liquid Line directly to Suction Line using tape wire or other appropriate method every 8 ft Isolation From Joist Rafter Figure 15 Side V...

Page 14: ...t Ductwork Suction Line Sealant Insulation Wall Isolation Through Wall DO NOT hang linesets from ductwork 8 Refrigerant Line Brazing 8 1 Braze The Refrigerant Lines 1 Remove caps or plugs Use a deburring tool to deburr the pipe ends Clean both internal and external surfaces of the tubing using an emery cloth Figure 17 ...

Page 15: ...refrigerant lines to the service valves Braze the filter drier to the Liquid Line All units come standard with a bi flow filter drier Braze the filter drier to the liquid line using caution not to push the refrigerant line too hard past the stop within the filter drier this could damage the drier Continue the dry nitrogen purge Do not remove the wet rag until all brazing is completed Remove the wet rag...

Page 16: ...10 1 Evacuate the Refrigerant Lines and Indoor Coil Do not open the service valves until the refrigerant lines and indoor coil leak check and evacuation are complete 1 Evacuate until the micron gauge reads no higher than 350 microns then close the valve to the vacuum pump Figure 24 0350 Microns ON OFF 2 Observe the micron gauge Evacuation is complete if the micron gauge does not rise above 500 mic...

Page 17: ...valves The brazed lineset valves should be used for leak checking and vacuuming Using the separate suction port for this process will result in loss of charge The Suction Service Valve must be opened first BEFORE opening the Liquid Service Valve 1 Remove Service Valve Cap Fig 23 2 Fully insert hex wrench into the stem and back out counterclockwise until valve stem just touches the rolled edge appro...

Page 18: ...ower supply agrees with equipment nameplate Power wiring and grounding of equipment must comply with local codes Low voltage wiring to be No 18 AWG minimum conductor Field installed electric auxiliary heat connection Single stage auxiliary heating supported by 2H thermostat Twin stage auxiliary heating supported by 3H thermostat W1 The first stage of field installed electric auxiliary heat W2 The ...

Page 19: ...y time the electric heat elements are active the indoor fan will run in high stage Thermostat Wiring Diagram for BOVB20 BVA20 Matched System Figure 29 Wiring for 4H and 2C thermostat This is the configuration of the BCC100 Y2 W E C Y C G T H E R M O S T A T INDOOR UNIT OUTDOOR UNIT G R O B H DH W2 W1 C Y B W B Dh Y1 R W2 GRAY PURPLE BROWN BLUE GREEN RED YELLOW WHITE WHITE BLACK BROWN YELLOW BLUE W...

Page 20: ...e jumped the indoor fan will only run in high stage Note Any time the electric heat elements are active the indoor fan will run in high stage Thermostat Wiring Diagram for BOVB20 BVA20 Matched System Figure 31 Wiring for 2H and 2C thermostat Note Any time the electric heat elements are active the indoor fan will run in high stage Y2 C Y C G THERMOSTAT INDOOR UNIT OUTDOOR UNIT G R O B H DH W2 W1 C ...

Page 21: ...ndoor fan will only run in high stage Thermostat Wiring Diagram for BOVB20 BVA20 Matched System Figure 33 Wiring for 2H and 1C thermostat Y2 C Y C G THERMOSTAT INDOOR UNIT OUTDOOR UNIT G R O B H DH W2 W1 C Y B W B Dh Y1 R GRAY PURPLE BROWN BLUE GREEN RED YELLOW BROWN YELLOW BLUE W E WHITE BLACK WHITE WHITE Note Because Y1 and Y2 are jumped the indoor fan will only run in high stage Note W1 and W2 ...

Page 22: ...nts could result in death or serious injury The high voltage power supply must match the equipment nameplate 208 230V 1PH 60Hz Power wiring must comply with national state and local codes Follow instructions on unit wiring diagram located on the inside of the control box access panel and refer to wiring diagram in this IOM 13 2 High Voltage Disconnect Switch Install a separate disconnect switch at...

Page 23: ... is supplied to the outdoor unit LEDS on the Gateway will turn on Figure 38 A LED sequence may flash on gateway for up to 6 minutes if there is a firmware update 5 Open up the Bosch EasyAir app and Add a New Unit The app will prompt you to scan the outdoor unit Serial Number and Gateway QR code Figure 39 6 Upon initial unit installation wait one 1 hour before starting the unit if compressor crankcas...

Page 24: ...stem Repairs Calculating total system charge 1 Total Line Length ft _________ a 2 Standard Lineset ft 15 b 3 a minus b _________ c 4 Refrigerant Multiplier 0 6 oz ft d 5 Refrigerant Adder c d _________ e 6 Factory Charge namplate _________ f 7 Total System Charge e f ________ _ If lineset is less than 15 ft e 0 The only mode approved for validating system charge is while in Cooling Force Mode Outd...

Page 25: ...subcooling value Table 9 please add refrigerant Repeat steps 3 through 5 If the superheat is out of range refer to Troubleshooting section of this IOM Suction Temp F FinalSuperheat F 6 8 10 12 14 16 18 20 22 Suction Gauge Pressure PSI 40 105 101 97 93 89 86 82 78 75 42 109 105 101 97 93 89 86 82 78 44 114 109 105 101 97 93 89 86 82 46 118 114 109 105 101 97 93 89 86 48 123 118 114 109 105 101 97 9...

Page 26: ...hes the design value Table 9 Recover refrigerant if the subcooling reading from Table 8 is higher than the design value Table 9 Figure 50 7 Stabilize the system Wait 5 minutes for the system condition to stabilize between adjustments When the subcooling matches the design value Table 9 the system is properly charged Remove gauges Replace service port caps to prevent leaks Tighten finger tight plus...

Page 27: ...or fan control cooling mode Defrost control heating mode T4 Ambient Temperature Table 15 Operating condition permission Defrosting condition permission Outdoor fan control heating mode T5 Compressor Discharge Temperature Table 16 High Low temperature protection Electronic Expansion Valve EEV ODU heating mode only Th Compressor Return Temperature Table 15 T3L Liquid Line Temperature Table 15 TF IPM...

Page 28: ...or stops running for 3 hours outdoor ambient temperature T4 41 F OR compressor discharge temperature T5 53 6 F CCH operation de energizes 1 Compressor discharge temperature T5 60 8 F 2 Compressor start running 16 6 Reversing Valve Operation Reversing valve energizes during heat mode and de energizes in cool mode During a heat call on first time operation the unit will run about 1 minute in cooling ...

Page 29: ...tor hurricane typhoon protection PH Low discharge superheat protection F1 High pressure switch protection HPS L0 L9 The IPM module protection AtL Ambient Temperature Limited System Protection Status Codes Forced operation mode L Running indication under T3 limited condition D Running indication under T5 limited condition P Running indication under compressor ratio limited condition F Running indic...

Page 30: ...ve first digit will display status code No Pointcheckcontent Example Remark 0 Outdoor unit capacity H3 H3 Heat Pump 3 ton 1 Outdoor unit mode 2 0 standby 2 cooling 3 heating 2 Outdoor unit set compressor speed Hz 66 3 T3 outdoor coil temp F 4 T4 outdoor ambient temp F 5 T5 compressor discharge temp F 6 Th compressor suction temp F 7 T3L liquid line temp F 8 Tf module temp F 9 Pe evaporating pressu...

Page 31: ... port 3 Reversing valve port 4 Thermostat wire connections 5 Th sensor port 6 TF sensor port 7 T3 T4 T3L sensor port 8 Pressure transducer port 9 T5 sensor port 10 Gateway connector 11 EEV port 12 Reserve 13 Reserve 14 High pressure switch port 15 SW2 FORCE BUTTON 16 SW3 CHECK BUTTON 17 Reserve 18 USB 19 J2 Dip SWITCH Select capacity 20 SW5 Dip SWITCH Defrost logic settings 21 SW4 Dip SWITCH Contr...

Page 32: ...tat wire connections 5 EEV port 6 Th sensor port 7 TF sensor port 8 T3 T4 T3L sensor port 9 Pressure transducer port 10 T5 sensor port 11 Gateway connector 12 Reserve 13 Reserve 14 High pressure switch port 15 USB port 16 SW2 FORCE BUTTON 17 SW3 CHECK BUTTON 18 J2 Dip SWITCH Select capacity 19 SW5 Dip SWITCH Defrost logic settings 20 SW4 Dip SWITCH Control logic settings 21 Reserve 22 IC20 EEPROM ...

Page 33: ...of T3 sensor in the range of Table 15 Yes Replace T3 sensor Is the T4 sensor wired correctly Refer to wiring diagramfor correct wiring Is the resistanceof T4 sensor in the range of Table 15 Yes No Yes Replace T4 sensor WARNING HAZARDOUSVOLTAGE When measuring resistance make sure the unit is powered off and wait 3 min before taking measurement Figure 57 E4 Temperature sensor fault T3 T4 T5 Th T3L T...

Page 34: ...ower supply 172V Is the voltage betweenP N CN3 310V Figure 59 E6 Outdoor DC fan motor fault Is ODU fanmotor wire CN3 connectiontocontrol boardsecure Secure connection Power off and remove blockage or replace fan blade Restart system Yes No Yes No Yes No Yes No Yes No Is the fanblade damaged orisforeignmatterblocking thefan Are outdoor weather conditions preventingthefan fromoperating normally Powe...

Page 35: ...correct wiring Yes No No Yes Yes No Is the location of the T5 sensor wrong Are the T5 and Tf sensors wired correctly Replace T5 Sensor Figure 61 E9 EEPROM IC20 fault Is EEPROM IC20 chip properly installed Power off and correct the connection Yes No Yes No Does EEPROM IC20 have poor contact Power off and correct the contact Replace control board Figure 62 H0 Communication fault in EEPROM IC14 chip ...

Page 36: ...o 10 heating WARNING HAZARDOUSVOLTAGE When measuring resistance make sure the unit is powered off and wait 3 min before taking measurement Figure 64 P0 Control board is over heated Did the outdoor fanmotorfail Refer to control board replacement instructions to ensure there is good contact between the heat sink and control board Replace motor Replace Tf sensor Replace controlboard Restart system Is...

Page 37: ...wired correctly and resistance 1Ω Replace high pressure switch Yes No No Yes Is the ambient temperature 120 F No Yes Yes Is there abnormal pressure in the system No Yes Is the system overcharged Yes No No Figure 66 P2 Low pressure protection H5 System lockout P2 occurs 5 times in 100 minutes Restart system Are the service valves open Open the service valves Is the system undercharged Adjust refrig...

Page 38: ...emperature 120 F Clear any blockage in the refrigerant Correct poor heat exchange airflow restriction motor failure Is the high pressure switch wired correctly and resistance 1Ω WARNING HAZARDOUSVOLTAGE When measuring resistance make sure the unit is powered off and wait 3 min before taking measurement Figure 68 P4 High compressor discharge temperature T5 protection Restart System Is the resistanc...

Page 39: ...nning in force mode Quit force mode Is there abnormal pressureinthe system Are the service valves open Open the service valves Yes No Yes Yes No No Yes No Is the ambient temperature 120 F Clear any blockage in the refrigerant Correct poor heat exchange airflow restriction motor failure Is the system overcharged Adjust refrigerant No Yes Yes No Figure 70 P8 DC outdoor fan motor protection Areoutdoo...

Page 40: ... Clear any blockage in the refrigerant Correct poor heat exchange airflow restriction motor failure Is the system undercharged Adjust refrigerant No Yes Yes No Is the resistance of T3 in range of Table 15 Replace T3 sensor No Yes Figure 72 L0 L9 IPM module protection Is the power supply stable Does the unit run normally for at least 1 hour Check for blockage in EEV TXV or Filter Drier Is the compr...

Page 41: ...mperature Limited Condition Is the ambient temperature beyond operating range Cooling mode 15 125 F Heating mode 4 86 F Is the thermostat set to energize O B in heating mode Is the resistance of T4 in the range of Table 15 No service required Wait for temperature to be within range Correct thermostat setting Replace T4 sensor Restart system Is the T4 sensor seated correctly Refer to wiring diagram...

Page 42: ... 5 057 1 93 15 9 4 57 948 4 39 110 43 3 4 509 1 79 20 6 7 49 652 4 30 115 46 1 4 028 1 67 25 3 9 42 645 4 21 120 48 9 3 606 1 55 30 1 1 36 710 4 10 125 51 7 3 233 1 43 40 4 4 27 386 3 86 130 54 4 2 902 1 32 45 7 2 23 732 3 73 135 57 2 2 610 1 22 50 10 0 20 610 3 59 140 60 0 2 350 1 13 55 12 8 17 939 3 45 145 62 8 2 119 1 04 60 15 6 15 648 3 30 150 65 6 1 914 0 96 65 18 3 13 681 3 15 155 68 3 1 731...

Page 43: ...185 85 0 5 963 2 13 45 7 2 127 258 4 70 190 87 8 5 474 2 02 50 10 0 110 707 4 66 195 90 6 5 032 1 92 55 12 8 96 572 4 61 200 93 3 4 645 1 83 60 15 6 84 465 4 56 205 96 1 4 28 1 73 65 18 3 74 411 4 51 210 98 9 3 949 1 64 70 21 1 65 408 4 45 215 101 7 3 648 1 56 75 23 9 57 634 4 39 220 104 4 3 383 1 48 80 26 7 50 904 4 32 225 107 2 3 133 1 40 85 29 4 45 258 4 24 230 110 2 904 1 32 90 32 2 40 152 4 1...

Page 44: ...fault code 24 Software version 25 Remark HPS High pressure switch T5 Comp discharge temp sensor PT Pressure transducer T3 Condensor temp sensor T4 Ambient temp sensor T3L Condensor outlet temp sensor TF Radiator temp sensor Th Comp return temp sensor EEV Electric expansive valve RV Reversing valve PEV Pressure equalizer valve CCH Crankcase heater COMP Compressor TEMP Temprature ON LED1 GREEN LED2 ...

Page 45: ...2 2022 18 IDS2 1 Gateway Functionality Figure 75 1 4 2 3 7 6 5 1 Power LED 2 Cellular LED 3 Bluetooth LED 4 Fault LED 5 Factory Diagnostic Button 6 Connect Bluetooth Button 7 Reset Button The Gateway Assembly includes the Gateway and Antenna along with associated wiring harness and clips ...

Page 46: ...sconnect the power supply before cleaning or maintenance NOTICE Do not use chemicals or chemically treated cloths to clean the unit Do not use benzene paint thinner polishing powder or other solvents to clean the unit CAUTION When removing filter do not touch metal parts in the unit The sharp metal edges can cut you 19 2 Maintenance Pre Season Inspection At the beginning of each heating or cooling...

Page 47: ... 47 Installation Instructions Bosch IDS BOVB20 Split System Heat Pump BTC 761701316 C 02 2022 Notes ...

Page 48: ... 65 Grove St Watertown MA 02472 Tel 866 642 3198 Fax 954 776 5529 www bosch thermotechnology us BTC 761701316 C 02 2022 Bosch Thermotechnology Corp reserves the right to make changes without notice due to continuing engineering and technological advances ...

Reviews: