English |
23
Bosch Power Tools
1 609 929 S09 | (15.10.08)
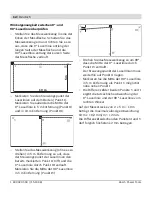
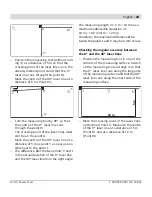
– Position the measuring tool (without turn-
ing it) at a distance of 5 m so that the
crossing point of the laser lines is on the
already marked point
II
and that the 0°
laser line runs through the point
III
.
Mark the centre of the 90° laser line at a
distance of 5 m (Point
IV
).
– Turn the measuring tool by 90° so that
the centre of the 0° laser line runs
through the point
IV
.
The crossing point of the laser lines must
still be on the point
II
.
– Mark the centre of the 90° laser line at a
distance of 5 m as point
V
as near as pos-
sible next to the point
I
.
– The difference
d
of the two points
V
and
I
is the actual deviation of the 0° laser line
and the 90° laser line from the right angle.
The measuring length 2 x 5 m = 10 m has a
maximum admissible deviation of:
10 m x
±
0.2 mm/m =
±
2 mm.
Therefore, the maximum difference
d
be-
tween the points
I
and
V
may be 2 mm or less.
Checking the angular accuracy between
the 0° and the 45° laser lines
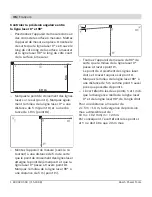
– Position the measuring tool in one of the
corners of the measuring surface. Switch
on the measuring tool and align it so that
the 0° laser line runs along the long side
of the measuring surface and that the 90°
laser line runs along the short side of the
measuring surface.
– Mark the crossing point of the laser lines
on the floor (Point
I
). Mark also the centre
of the 0° laser line at a distance of 5 m
(Point
II
) and at a distance of 10 m
(Point
III
).
d
10 m
5 m
OBJ_BUCH-828-001.book Page 23 Wednesday, October 15, 2008 3:12 PM

