6720220330 Revised 05-12
10
No unit should be connected to the supply or return piping
until the water system has been completely cleaned and
flushed to remove any dirt, piping chips or other foreign
material. Supply and return hoses should be connected
together during this process to ensure the entire system is
properly flushed. After the cleaning and flushing has taken
place the unit may be connected to the water loop and
should have all valves wide open.
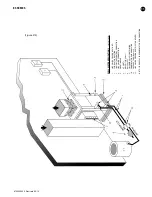
EARTH COUPLED SYSTEMS:
(Figure #12)
Closed loop and pond applications require specialized
design knowledge.No attempt at these installations should
be made unless the dealer has received specialized
training. Utilizing FHP’s Ground Loop Pumping Package
(GLP), makes the installation easy. Anti-freeze solutions are
utilized when low evaporating conditions are expected to
occur. Refer to the GLP installation manuals for more
specific instructions.
SYSTEM CHECKOUT:
•
After completing the installation, and before
energizing the unit, the following system checks
should be made:
•
Verify that the supply voltage to the heat pump is in
accordance with the nameplate ratings.
•
Make sure that all electrical connections are tight and
secure.
•
Check the electrical fusing and wiring for the correct
size.
•
Verify that the low voltage wiring between the
thermostat and the unit is correct.
•
Verify that the water piping is complete and correct.
•
Check that the water flow is correct, and adjust if
necessary.
•
Check the blower for free rotation, and that it is
secured to the shaft.
•
Verify that vibration isolation has been provided.
•
Unit is serviceable. Be certain that all access panels are
secured in place.
UNIT START-UP:
1.
Set the thermostat to the highest setting.
2.
Set the thermostat system switch to "COOL", and the
fan switch to the "AUTO" position. The reversing valve
solenoid should energize. The compressor and fan
should not run.
3.
Reduce the thermostat setting approximately 5
degrees below the room temperature.
4.
Verify the heat pump is operating in the cooling mode.
5.
Turn the thermostat system switch to the "OFF"
position. The unit should stop running and the
reversing valve should deenergize.
6.
Leave the unit off for approximately (5) minutes to
allow for system equalization.
7.
Turn the thermostat to the lowest setting.
8.
Set the thermostat switch to "HEAT".
9.
Increase the thermostat setting approximately 5
degrees above the room temperature.
10. Verify the heat pump is operating in the heating mode.
11. Set the thermostat to maintain the desired space
temperature.
12. Check for vibrations, leaks, etc...
MAINTENANCE:
1.
Filter changes or cleanings are required at regular
intervals. The time period between filter changes will
depend upon type of environment the equipment is
used in. In a single family home, that is not under
construction, changing or cleaning the filter every 60
days is sufficient. In other applications such as motels,
where daily vacuuming produces a large amount of
lint, filter changes may be need to be as frequent as
biweekly.
WARNING:
Equipment should never be used during
construction due to likelihood of wall board dust
accumulation in the air coil of the equipment which
permanently affects the performance and may shorten the
life of the equipment.
2.
An annual “checkup” is recommended by a licensed
refrigeration mechanic. Recording the performance
measurements of volts, amps, and water temperature
differences
(both
heating
and
cooling)
is
recommended. This data should be compared to the
information on the unit’s data plate and the data taken
at the original startup of the equipment.
3.
Lubrication of the blower motor is not required,
however may be performed on some motors to extend
motor life. Use SAE-20 non-detergent electric motor
oil.
4.
The condensate drain should be checked annually by
cleaning and flushing to insure proper drainage.
5.
Periodic lockouts almost always are caused by air or
water flow problems. The lockout (shutdown) of the
unit is a normal protective measure in the design of the
equipment. If continual lockouts occur call a mechanic
immediately and have them check for: water flow
problems, water temperature problems, air flow
problems or air temperature problems. Use of the
pressure and temperature charts for the unit may be
required to properly determine the cause.
ES SERIES


