background image

52

en | Alarm

AUTODOME IP starlight 5000i IR

2019.11 | 1.2 |

User Manual

Bosch Security Systems

SMTP user name

Enter a registered user name for the chosen mailserver here.

SMTP password

Enter the required password for the registered user name here.

Format

You can select the data format of the alarm message.

Standard (with JPEG)

 E-mail with attached JPEG image file.

SMS

 E-mail in SMS format to an e-mail-to-SMS gateway (for example to send an alarm by

cellphone) without an image attachment.

!

Caution!

When a cellphone is used as the receiver, make sure to activate the e-mail or SMS function,
depending on the format, so that these messages can be received.
You can obtain information on operating your cellphone from your cellphone provider.

Image size

Select the appropriate image size: Small, Medium, Large, 720p, 1080p, 

Best possible

.

Attach JPEG from camera

Click the checkbox to specify that JPEG images are sent from the camera. An enabled video
input is indicated by a check mark.

VCA overlays

Select the 

VCA overlays

 check box, to place the outline of the object that triggered an alarm

into the camera image sent as snapshot via e-mail.

Destination address

Enter the e-mail address for alarm e-mails here. The maximum address length is 49 characters.

Sender address

Enter a unique name for the e-mail sender, for example the location of the device. This will
make it easier to identify the origin of the e-mail.

Note

: The name must include at least two character groups separated by a blank (for example,

Parking Garage) in order for the system to generate an email from that name, as in “From
Parking Garage”. Text with only one group of characters (for example, Lobby) will not
generate an email.

Test e-mail

You can test the e-mail function by clicking the 

Send Now

 button. An alarm e-mail is

immediately created and sent.

8.5

Alarm Task Editor

Editing scripts on this page overwrites all settings and entries on the other alarm pages. This
procedure cannot be reversed.
To edit this page, you should have programming knowledge and be familiar with the
information in the Alarm Task Script Language document and the English language.

As an alternative to the alarm settings on the various alarm pages, enter the desired alarm
functions in script form here. This will overwrite all settings and entries on the other alarm
pages.
1.

Click 

Examples

 under the Alarm Task Editor field to see some script examples. A new

window opens.

Summary of Contents for AUTODOME IP starlight 5000i IR

Page 1: ...AUTODOME IP starlight 5000i IR NDP 5512 Z30L en User Manual ...

Page 2: ......

Page 3: ...2 3 1 8 Saving snapshots 12 3 1 9 Recording live video 12 3 1 10 Full screen display 12 3 1 11 Audio communication 12 3 1 12 Storage CPU and network status 12 3 1 13 Status icons 13 3 2 Playback via browser 13 3 2 1 Selecting the recording stream 14 3 2 2 Searching for recorded video 14 3 2 3 Exporting recorded video 14 3 2 4 Controlling playback 14 4 General 15 4 1 Identification 15 4 2 User Mana...

Page 4: ... 2 1 Device manager 41 7 2 2 Recording media 41 7 2 3 Activating and configuring storage media 42 7 2 4 Formatting storage media 42 7 2 5 Deactivating storage media 42 7 3 Recording Profiles 42 7 4 Maximum Retention Time 44 7 5 Recording Scheduler 44 7 6 Recording Status 45 7 7 Recording Statistics 45 7 8 Image Posting 45 7 9 SD Card Status 46 8 Alarm 47 8 1 Alarm Connections 47 8 2 Video Content ...

Page 5: ... User Manual 2019 11 1 2 10 1 Maintenance 62 10 2 Licenses 62 10 3 Certificates 63 10 4 Logging 63 10 5 Diagnostics 63 10 6 System Overview 63 11 AUX Commands 64 12 Troubleshooting 65 12 1 Rebooting the unit 66 12 2 Physical reset button 67 12 3 Customer Service and Support 68 ...

Page 6: ...y to On plus Link Local so a DHCP server assigns an IP address or if no DHCP server is available a link local address auto IP is assigned within the range 169 254 1 0 to 169 254 254 255 You can use IP Helper or Configuration Manager to find the IP address Download the software from http downloadstore boschsecurity com 1 Start the Web browser 2 Enter the IP address of the unit as the URL 3 During i...

Page 7: ...Access Users displays the message Before you can use this device you have to secure it with an initial password Note After you set the initial password a lock icon appears next to the device name in the Devices list in Configuration Manager You can also launch the device webpage directly In the device webpage an initial password page appears displaying input fields and a password strength gauge En...

Page 8: ...igure the unit and the application interface Making Changes Each configuration screen shows the current settings You can change the settings by entering new values or by selecting a predefined value from a list field Not every page has a Set button Changes to pages without a Set button are set immediately If a page does show a Set button you must click the Set button for a change to take effect No...

Page 9: ...er Manual 2019 11 1 2 2 4 Dashboard The Dashboard page is used to display detailed information about the device The Dashboard is only visible in the application bar if the Show Dashboard option is enabled by a service level user in the Configuration Web Interface Appearance page ...

Page 10: ... around the PTZ control in the direction that you want to move the camera Zoom Click the button to zoom in Click the button to zoom out Iris Click Iris close to close the iris Click Iris open to open the iris Focus Click to focus near Click to focus far 3 1 3 Pre positions The camera displays Pre position 1 through Pre position 6 Select the appropriate pre position to view the video image for that...

Page 11: ... of an alarm input The symbol lights when the input alarm is active The alarm output allows the operation of an external device for example a light or a door opener To activate the output click the checkmark symbol The symbol lights when the output is activated Input 1 This parameter identifies the first alarm input Input 2 This parameter identifies the second alarm input Output 1 Click the checkm...

Page 12: ...e recorded at the resolution specified in the encoder configuration The storage location depends on the configuration of the camera 1 Click the recording icon to record video sequences Saving begins immediately The red dot on the icon indicates that a recording is in progress 2 Click the recording icon again to stop recording 3 1 10 Full screen display Click the full screen icon to view the select...

Page 13: ...ng errors Alarm flag Indicates that an alarm has occurred Communication error A communication error such as a connection failure to the storage medium a protocol violation or a timeout is indicated by this icon Gap Indicates a gap in the recorded video Watermark valid The watermark set on the media item is valid The color of the check mark changes according to the video authentication method that ...

Page 14: ...track If required change the times 3 In the Time lapse drop down box select the original or a condensed speed 4 In the Location drop down box select a target 5 Click Export to save the video track Note The target server address is set on the Network Accounts page 3 2 4 Controlling playback The time bar below the video image allows quick orientation The time interval associated with the sequence is...

Page 15: ...eld indicates if a password is set for the camera Certificate A check mark in this check box indicates that at least one certificate is loaded onto the camera If no certificates are loaded then No certificate installed appears to the right of the text The Escrypt certificate is a root certificate for Bosch Security Systems that proves that the device meets the following criteria It originates from...

Page 16: ...word 4 3 Date Time Date format Select the required date format from the dropdown menu Device date Device time Notice Make sure that recording is stopped before synching to the PC If there are multiple devices operating in your system or network it is important to synchronize their internal clocks For example it is only possible to identify and correctly evaluate simultaneous recordings when all un...

Page 17: ...erwrite by DHCP option Time server type Select the protocol that is supported by the selected time server Select Time protocol if the server uses the protocol RFC 868 The SNTP protocol supports a high level of accuracy and is required for special applications and subsequent function extensions Select TLS protocol if the server uses the RFC 5246 protocol Select Off to disable the time server Click ...

Page 18: ... in the image in the event of an alarm It can be displayed at a position of your choice that you can then specify using the Custom option Or it can be set to Off for no overlay information 1 Select the desired option from the list 2 If you select the Custom option additional fields are displayed where you can specify the exact position Position XY 3 In the Position XY fields enter the values for t...

Page 19: ...55 enter the position range The default is 176 Select Off to hide the region from view Transparent background Check this box to make transparent the stamp background on the image Stamping size Select the desired font size of the overlays on the OSD Normal or Large Text color Select the color for the alarm message to be displayed in Background color Select the background color for the alarm message...

Page 20: ... Registration timeout Enter a value in milliseconds for the registration timeout The default is 3600 Heartbeat timeout Enter the value in seconds for the heartbeat timeout The default is 15 Server ID Enter the ID of the server Server IP address Enter the server IP address Server port Enter the number of the server port The default is 0 Device ID Enter the ID of the device Device port Enter the num...

Page 21: ...e image file must be stored on a web server Notice If you want to use the original image again delete the entries in the fields Company logo and Device logo Show VCA metadata When video content analysis VCA is activated additional information is displayed in the live video stream With the MOTION analysis type for example the sensor fields in which motion is recorded are marked with yellow rectangl...

Page 22: ...e interval at which the individual images should be generated for the M JPEG image on the Live page JPEG quality You can specify the quality at which the JPEG images appear on the Live page 5 2 LIVE Functions On this page you can adapt the functions on the LIVE page to your requirements You can choose from a variety of different options for displaying information and controls 1 Check the box for t...

Page 23: ...ze the picture after a reset Note Clicking this button also clears the service level password Operators must reset the password before doing anything else 6 2 Scene Mode A scene mode is a collection of image parameters that are set in the camera when that particular mode is selected installer menu settings are excluded Several pre defined modes are available for typical scenarios After a mode has ...

Page 24: ...ducing red introduces more cyan Blue Gain The blue gain adjustment offsets the factory white point alignment reducing blue introduces more yellow It is only necessary to change the white point offset for special scene conditions Sodium red level Adjust the level of red for sodium vapor lighting with the slider from 0 to 255 Sodium blue level Adjust the level of blue for sodium vapor lighting with ...

Page 25: ... The range of options is from 1 60 to 1 10000 The default value is 1 120 for all modes except Motion default 1 500 5 2 1 3 Day Night Backlight compensation Select Off to switch off backlight compensation Select On to capture details in high contrast and extremely bright dark conditions Night mode Selects night mode B W to enhance lighting in low light scenes Select from the following options Monoc...

Page 26: ... levels 6 2 3 Scene Mode Scheduler The scene mode scheduler is used to determine which scene mode should be used during the day and which scene mode should be used during the night 1 Select the mode you wish to use during the day from Marked range drop down box 2 Select the mode you wish to use during the night from Unmarked range drop down box 3 Use the two slider buttons to set the Time ranges 6...

Page 27: ...ominant color auto RGB weighted white balance R weight G weight B weight Manual R gain G gain B gain RGB weighted white balance In an auto mode RGB weighted white balance can be switched On or Off When On additional fine tuning of the automatic color reproduction can be made with the R G and B weight sliders R weight When White balance is in an auto mode and RGB weight white balance is On this fie...

Page 28: ...speed Min frame rate Select the minimum frame rate Default shutter Select a default shutter speed The default shutter improves the motion performance in auto exposure mode Shutter time Select the amount of time for the shutter to remain open Auto the camera switches the IR cut off filter on and off depending on the scene illumination level Monochrome the IR cut off filter is removed giving full IR...

Page 29: ...s On Noise reduction On enables temporal noise reduction which reduces random video noise in the picture by averaging pixels across time if the difference between them is below a threshold Off disables temporal noise reduction Intelligent Dynamic Noise Reduction Select On to activate intelligent Dynamic Noise Reduction DNR which reduces noise based on motion and light levels 6 6 Scene Mode Schedul...

Page 30: ...ply minimum bit rate reduction Maximum quality This will also greatly increase the file size If maximum bit rate reduction is applied the image will have less quality but the file size decreases significantly Minimum bit rate Select the necessary bit rate optimization setting Off bit rate optimization is disabled Maximum quality High quality Medium Low bit rate Minimum bit rate Averaging period Se...

Page 31: ... in low image quality and lower network load Typical QP values are between 18 and 30 The basic setting Auto automatically adjusts the quality to the settings for the P frame video quality I P frame delta QP This parameter sets the ratio of the I frame quantization QP to the P frame quantization QP For example you can set a lower value for I frames by moving the slide control to a negative value Th...

Page 32: ...me rates to be the maximum Picture quality This setting allows you to adjust the quality of the M JPEG image Use the slide bar to choose a quality between Low and High Note The M JPEG frame rate can vary depending on system loading 6 9 Encoder Regions User can configure encoding regions for every configured preset preposition scene to increase or decrease the encoding quality for selectable areas ...

Page 33: ... fields in the GUI may not match the sequence of the fields in this section of the User Manual In this section of the User Manual fields appear in a more logical functional sequence identifying the sequence to create a new privacy mask and then to update a privacy mask Privacy Masks block specific areas of a scene from being seen in the camera s field of view This can be useful when public spaces ...

Page 34: ...utomatically while the camera is in motion Zoom threshold Click this check box to select the current zoom position at which the mask will appear as the camera zooms in or be hidden as the camera zooms out 6 12 Picture Settings 5 2 1 1 Color White Balance Adjusts the color settings to maintain the quality of the white areas of the image Red Gain The red gain adjustment offsets the factory white poi...

Page 35: ...ed by the collecting device The default setting is 1x 60 Hz 1 30 50 Hz 1 25 Maximum automatic exposure Use this field to limit the integration time when Frame Integration is active The range of options is from 1 4 to 1 30 default Default shutter limit The camera tries to hold this shutter value as long as sufficient ambient light is available in the scene The range of options is from 1 60 to 1 100...

Page 36: ...finitely Pre position 1 camera returns to Pre position 1 Previous AUX camera returns to the previous AUX activity Inactivity period Determines the behavior of the dome when the control for dome is inactive Select a time period from the pull down list 3 sec 10 min The default setting is 2 minutes Auto pivot The Auto pivot tilts the camera through the vertical position as the camera is rotated to ma...

Page 37: ...56 preset scenes You can define the individual scenes that comprise a Pre position Tour You define individual pre position scenes then use these scenes to define the Pre position Tour The tour starts from the lowest scene number in the tour and progresses sequentially to the highest scene number in the tour The tour displays each scene for a specified dwell time before advancing to the next scene ...

Page 38: ...pre position in the list and uncheck the box Include in standard tour marked with 3 Select a dwell time from the drop down list Standard pre position tour 4 To start the Pre position Tour Return to the Live page Click AUX Control Type 8 in the input box and click AUX on 5 To stop the tour type 8 and click AUX off 6 16 Pre position mapping Pre position mapping allows you to map a function to a pre ...

Page 39: ...characters long 3 To blank the sector click the check box to the right of the sector title 6 18 Miscellaneous Fast address This parameter allows the appropriate camera to be operated via the numerical address in the control system Enter a number between 0000 and 9999 inclusive to identify the camera 6 19 Illuminator Note This menu page is valid for AUTODOME IP 5000i IR and AUTODOME IP starlight 50...

Page 40: ...signals are sent in a separate data stream parallel to the video data and so increase the network load The audio data is encoded according to the selected format and requires additional bandwidth If you do not want any audio data to be transmitted select Off Input volume Set the input volume using the slide Values range from 0 to 119 Line Out Set the line output gain using the slider Values range ...

Page 41: ... Managed by Video Recording Manager software box is only an indicator it cannot be changed here If the Managed by Video Recording Manager software box is checked you are not able to configure any further recording settings on this page 7 2 2 Recording media Select a media tab to connect to the available storage media iSCSI Media To use an iSCSI system as the storage medium a connection to the desi...

Page 42: ...et selected 7 2 4 Formatting storage media All recordings on a storage medium can be deleted at any time Check the recordings before deleting and back up important sequences on the computer s hard drive 1 Click a storage medium in the Managed storage media list to select it 2 Click Edit below the list 3 Click Format in the new window to delete all recordings in the storage medium 4 Click OK to clo...

Page 43: ...s Continuous the recording proceeds continuously If the maximum recording capacity is reached older recordings are overwritten automatically Pre alarm recording takes place in the pre alarm time during the alarm and during the post alarm time only Off no automatic recording takes place Stream Select the stream to be used for standard recordings Stream 1 Stream 2 I frames only Alarm recording Selec...

Page 44: ...assigned to the selected profile 3 Use the right mouse button to deselect any of the intervals 4 Click the Select All button to link all time intervals to the selected profile 5 Click the Clear All button to deselect all of the intervals 6 When you are finished click the Set button to save the settings in the unit Holidays You can define holidays that are not in the standard weekly schedule on whi...

Page 45: ...riod Select the appropriate averaging period as a means of stabilizing the long term bit rate 7 8 Image Posting Image size Select the appropriate image size Small Medium Large 720p 1080p Best possible File name You can select how file names will be created for the individual images that are transmitted Overwrite The same file name is always used and any existing file will be overwritten with the c...

Page 46: ...heck the box to enable best face posting File format Select the type of image to be sent Target Select the target account for best face posting Timeout Fill in the timeout in seconds Leave at 0 for no timeout Maximum image width px Fill in the maximum image width in pixels Leave at 0 for automatic width selection 7 9 SD Card Status This section identifies the following details about the SD card in...

Page 47: ...ch number enter the corresponding IP address for the desired remote station Destination password If the remote station is password protected enter the password here Only ten passwords can be defined here Define a general password if more than ten connections are required The unit connects to all remote stations protected by the same general password To define a general password 1 Select 10 in the ...

Page 48: ...image is set for the selected video output select a decoder to display the alarm image The decoder selected determines the position in the split image SSL encryption SSL encryption protects data used for establishing a connection such as the password By selecting On only encrypted ports are available for the Remote port parameter SSL encryption must be activated and configured on both sides of a c...

Page 49: ...ings window 4 Press F1 VCA configuration Select one of the profiles here to activate it or edit it You can rename the profile 1 To rename the file click the icon to the right of the list field and enter the new profile name in the field 2 Click the icon again The new profile name is saved Do not use any special characters for example in the name Special characters are not supported by the system s...

Page 50: ...lay s Set delayed alarm triggering here The alarm is only triggered after a set time interval in seconds has elapsed and then only if the triggering condition still exists If the original condition has been restored before this time interval elapses the alarm is not triggered This avoids false alarms triggered by short term changes for example cleaning activities in the direct field of vision of t...

Page 51: ...ular signal ranges in order to avoid false alarms For this reason the total signal is divided into 13 tonal ranges mel scale Check or uncheck the boxes below the graphic to include or exclude individual ranges Threshold Set up the threshold on the basis of the signal visible in the graphic You can set the threshold using the slide control or alternately you can move the white line directly in the ...

Page 52: ...ent as snapshot via e mail Destination address Enter the e mail address for alarm e mails here The maximum address length is 49 characters Sender address Enter a unique name for the e mail sender for example the location of the device This will make it easier to identify the origin of the e mail Note The name must include at least two character groups separated by a blank for example Parking Garag...

Page 53: ...on trigger or from a connection to the camera s LIVE page The physical input connection can be activated by dry contact devices such as pressure pads door contacts and similar devices Next specify up to two 2 rule outputs or the camera s response to the input Outputs include a physical alarm output an AUX command or a preposition scene Select one of the following output commands for both Output 1 ...

Page 54: ...The settings on this page are used to integrate the camera into an existing network Automatic IPv4 assignment If the network has a DHCP server for the dynamic assignment of IP addresses select On or On plus Link Local to automatically accept the DHCP assigned IP address If no DHCP server is available select On plus Link Local to automatically assign a Link Local Auto IP address For certain applica...

Page 55: ...n If the unit is operated behind a firewall select TCP HTTP port as the transfer protocol For use in a local network select UDP Notice Multicast operation is only possible with the UDP protocol The TCP protocol does not support multicast connections The MTU value in UDP mode is 1 514 bytes HTTP browser port Select a different HTTP browser port from the list if required The default HTTP port is 80 ...

Page 56: ...he network environment and to optimize data transmission Please comply with the MTU value of 1 514 bytes in UDP mode iSCSI MSS Byte You can specify a higher MSS value for a connection to the iSCSI system than for the other data traffic via the network The potential value depends on the network structure A higher value is only useful if the iSCSI system is located in the same subnet as the camera N...

Page 57: ... if no contact is made it stops polling Select On to constantly poll the server Select Off to block polling Cloud state This field identifies any cloud based services with which the camera communicates If you have registered the device on a cloud based service such as Bosch Remote Portal then this field identifies this fact Registered on Bosch Remote Portal Note The button Connect to Bosch Remote ...

Page 58: ...ted power The value in this field is the number of watts of allocated power to the camera 9 5 Network Management SNMP The camera supports the SNMP V1 Simple Network Management Protocol for managing and monitoring network components and can send SNMP messages traps to IP addresses The unit supports SNMP MIB II in the unified code If you wish to send SNMP traps enter the IP addresses of one or two r...

Page 59: ...up Multicast You can enter a dedicated multicast address and port for each stream You can switch between the streams by clicking the appropriate tabs Notice Multicast operation requires a multicast enabled network that uses the UDP and the Internet Group Management IGMP protocols Other group management protocols are not supported The TCP protocol does not support multicast connections A special IP...

Page 60: ... be overwritten with the current file Increment A number from 000 to 255 is added to the file name and automatically incremented by 1 When it reaches 255 it starts again from 000 Date time suffix The date and time are automatically added to the file name When setting this parameter ensure that the unit s date and time are always correctly set Example the file snap011005_114530 jpg was stored on Oc...

Page 61: ...save the JPEG images Login Enter the login ID for the server Password Enter the password that gives you access to the server To verify the password click the Check button to the right Path Enter the exact path on which you wish to post the images on the server To browse for the correct path click the Browse button to the right Maximum bit rate Enter the maximum bit rate for the JPEG images in kbps...

Page 62: ...r to the unit during a factory default or a firmware update Wait at least two minutes for the default process to complete If the unit appears to be frozen after two minutes then reboot the unit Refer to Troubleshooting page 65 for more details Progress The progress bar displays the progress of the firmware upload Note Once the progress bar reaches 100 a reset page may appear If this page appears a...

Page 63: ...el Select the level of event for which to display log entries or to log Number of displayed entries Select the number of entries to display Enable software sealing Select this check box to enable software protection that prevents users from adjusting camera settings This function also protects the camera from unauthorized access 10 5 Diagnostics Accesses the Built in Self Test BIST The BIST displa...

Page 64: ...AUX OFF sets IR to OFF Available for AUTODOME IP 5000i IR only 57 On Off Night mode IR Filter In Out 60 On Off On Screen Display OSD 67 On Off Focus adjust for external IR Illuminators 80 On Off Digital Zoom lock 88 On Off Proportional Speed 94 On Recalibrate Azimuth Compass 95 On Off Azimuth Elevation Display 96 On Off Compass Points Display 100 On Off Record Tour A 101 On Off Record Tour B 149 O...

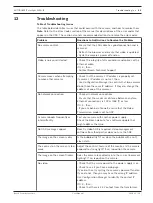
Page 65: ...f one of the cameras No network connection Check all network connections Ensure that the maximum distance between any two Ethernet connections is 100 m 328 ft or less If O K then If you are behind a firewall ensure that the Video Transmission mode is set to UDP Camera reboots frequently or intermittently Test your camera with another power supply Check the Bosch website for a software update that ...

Page 66: ... ID may be corrupt Complete the steps in the section Rebooting the unit page 66 12 1 Rebooting the unit Reboot the unit After a Factory Default or firmware update reboot the unit if You cannot connect to the unit in the Web browser OR Configuration Manager or BVMS or similar software identifies the unit as Videojet Generic 4 Reboot the unit using one of the following methods In the web browser typ...

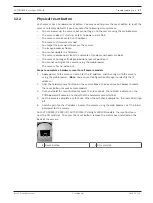
Page 67: ...web browser The camera has no video out Steps to complete a hardware reset for all camera models 1 Apply power to the camera Search for the IP address and then log on to the camera using the web browser Note You can use Configuration Manager to identify the IP address 2 Find the hardware reset button on the camera block See each section below to locate the reset button for your camera model 3 Push...

Page 68: ...one 800 366 2283 Fax 800 366 1329 Email cctv repair us bosch com Customer Service Telephone 888 289 0096 Fax 585 223 9180 Email security sales us bosch com Technical Support Telephone 800 326 1450 Fax 717 735 6560 Email technical support us bosch com Canada Telephone 514 738 2434 Fax 514 738 8480 Europe Middle East Africa and Asia Pacific Regions Please contact your local distributor or Bosch sale...

Page 69: ...AUTODOME IP starlight 5000i IR Troubleshooting 69 Bosch Security Systems User Manual 2019 11 1 2 ...

Page 70: ...70 Troubleshooting AUTODOME IP starlight 5000i IR 2019 11 1 2 User Manual Bosch Security Systems ...

Page 71: ......

Page 72: ...Bosch Security Systems B V Torenallee 49 5617 BA Eindhoven Netherlands www boschsecurity com Bosch Security Systems B V 2019 ...

Reviews: