English |
13
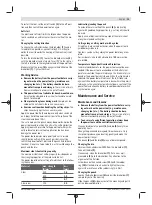
To restart the tool, set the on/off switch
(3)
to the off posi-
tion and then switch the power tool on again.
Soft start
The electronic soft start limits the torque when the power
tool is switched on and increases the service life of the mo-
tor.
Changing the cutting direction
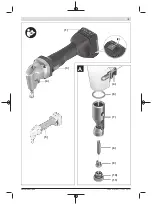
To change the cutting direction, the die holder
(7)
can be
turned to three positions, each offset by 90°. Cutting to-
wards the rear (towards the housing of the machine) is not
possible.
To turn the die holder
(7)
, loosen the die holder screw
(4)
until the die holder can be turned. Turn it 90° to the right or
the left in relation to the longitudinal axle of the power tool.
Make sure that the screw
(4)
engages in the drill hole of the
die holder
(7)
. Tighten the screw.
Working Advice
u
Remove the battery from the power tool before carry-
ing out work on the power tool (e.g. maintenance,
changing tool, etc.). The battery should also be re-
moved for transport and storage.
There is risk of injury
from unintentionally pressing the on/off switch.
u
This power tool is not suitable for bench-mounted use.
It must not be clamped into a vice or fastened to a work-
bench, for example.
u
Wear protective gloves during work.
Sharp burrs de-
velop on the cut sheets; these can cause injury.
u
Exercise caution when handling the cutting chips.
The
chips have sharp tips that can cause injuries.
Apply the power tool to the workpiece only when switched
on. Always hold the power tool vertical to the surface of the
steel sheet and do not tilt it.
The cut is made as the punch moves downwards. Guide the
power tool evenly, pushing it gently in the cutting direction.
Applying too much pressure to the power tool will signific-
antly reduce the service life of application tools and can
damage the power tool.
The power tool operates more quietly when it is raised
slightly during cutting. If the punch jams during cutting,
switch the power tool off, lubricate the punch and release
the sheet. Do not use force to do this, as this will damage the
punch and the die.
Maximum steel sheet cutting capacity
The maximum steel sheet cutting capacity d
max
depends on
the strength properties of the material to be cut.
The power tool allows for cutting of metal sheet to the follow-
ing thicknesses:
Material
max. strength
(N/mm
2
)
d
max
(mm)
Steel
400
1.6
600
1.0
800
0.7
Aluminium
200
2.0
Lubricating/cooling the punch
To extend the service life of the punch
(8)
, a lubricating
agent with good cooling properties (e.g. cutting oil) should
be used.
Apply a line of lubricant to the top side of the metal sheet
along the intended cutting line.
Cutting along a cutting mark or with a guide
Straight cuts are carried out easier when the power tool is
guided alongside a rule.
Contours can be cut by guiding the power tool along a tem-
plate.
For inside cuts, a hole with a diameter of
22
mm must be
pre-drilled.
Temperature Dependent Overload Protection
In normal conditions of use, the power tool cannot be over-
loaded. If the power tool is overloaded or the battery tem-
perature is outside the permitted range, the stroke rate is re-
duced or the power tool shuts down. When the stroke rate is
reduced, the power tool will not run at the full stroke rate
again until the battery temperature is back within the permit-
ted range. In the event of automatic shutdown, switch off the
power tool and allow the battery to cool down before switch-
ing the tool on again.
Maintenance and Service
Maintenance and Cleaning
u
Remove the battery from the power tool before carry-
ing out work on the power tool (e.g. maintenance,
changing tool, etc.). The battery should also be re-
moved for transport and storage.
There is risk of injury
from unintentionally pressing the on/off switch.
u
To ensure safe and efficient operation, always keep
the power tool and the ventilation slots clean.
Clean and lubricate the punch
(8)
and die
(9)
every three
operating hours.
Change the punch and die in good time when worn. Only
sharp tools produce a good cutting quality and make the
power tool last longer.
The punch
(8)
and the die
(9)
may not be resharpened.
Changing the die
Unscrew the knurled screw
(11)
from the die holder
(7)
.
Take out the die
(9)
.
If necessary, clean the die holder
(7)
. Put a new, well
greased die
(9)
into the die holder. Pay attention to the
alignment of the flat side.
Screw back on the knurled screw
(11)
with the rubber
ring
(10)
attached. Use a hex key to tighten the screw
against the resistance of the rubber ring (3–4 Nm).
Changing the punch
Loosen the die holder screw
(4)
and pull the die holder
(7)
completely out of the housing.
Slide the punch
(8)
sideways out of the mounting and pull it
out in a downward motion.
Bosch Power Tools
1 609 92A 7AW | (25.02.2022)

