background image

60

General instructions for self-measurement

1. Fluctuations in blood pressure are quite

normal. Even when measurements are
repeated, there can be marked differ-
ences. Single or irregular measure-
ments do not provide reliable informa-
tion about the actual blood pressure. A
reliable evaluation is only possible if reg-
ular measurements are taken under
comparable conditions and the measure-
ment values entered in the blood pres-
sure record card.

2.

Self-testing does not mean self-

treatment. Do not on

any

account

change the dose of medicine prescribed
by your doctor of your own accord.

3. Irregular heartbeats can affect the accu-

racy of the monitor or result in incorrect
measurements (see page 75).

4. Incorrect measurements can also occur

in patients with a weak pulse (possibly
in patients wearing a pacemaker, for ex-
ample). The blood pressure monitor it-
self has no effect on the pacemaker.

5. The device has not been validated for

use on pregnant women.

6. Always take the measurement in a calm

and relaxed state.
You are recommended to check your
blood pressure twice a day – in the morn-
ing on getting up and in the evening
once you have relaxed after work.

7. Always measure your blood pressure

from the arm with the higher blood
pressure values (where not required
otherwise (see page 64)).

EN

medicus_exclusive_5spr_1712sd.qxd:Layout 1  07.12.2017  14:01 Uhr  Seite 60

Summary of Contents for Boso-medicus exclusive

Page 1: ...roduction 52 Purpose 53 Blood pressure values 54 Systolic and diastolic blood pressure value 54 WHO blood pressure cut off values 54 Starting up 56 Inserting batteries 56 Battery status 57 Settings 58...

Page 2: ...rage and classification scale 70 Displaying stored individual readings and emptying the memory 72 Mains operation 73 Error messages 74 Cleaning and Disinfection 76 Warranty Conditions 77 Customer serv...

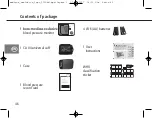
Page 3: ...START SYS mmHg DIA mmHg AVG PUL min Mains connector M button START STOP button LCD display WHO classification Cuff connector SET button Product features medicus_exclusive_5spr_1712sd qxd Layout 1 07 1...

Page 4: ...UL min 46 4 LR 6 AA batteries 1 User instructions WHO classification sticker EN medicus exclusive Gebrauchs anweisung User Instructions Mode d emploi Manuale di istruzioni Manual del Usuario 166 125 8...

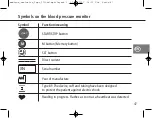
Page 5: ...button SET button Direct current Serial number Year of manufacture Type BF The device cuff and tubing have been designed to protect the patient against electric shock Reading in progress Flashes as so...

Page 6: ...consecutive measurements Stored value Display average value Inflation pressure Battery fully charged Battery partly discharged Replace battery as soon as possible Flashing No further reading possible...

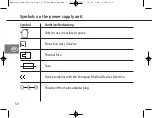
Page 7: ...lse per minute Device complies with the European Medical Devices Directive Device must not be discarded with household waste Manufacturer Read instructions for use Polarity of power supply port SYS DI...

Page 8: ...II device Thermal fuse Fuse Device complies with the European Medical Devices Directive Polarity of the mains adapter plug Symbol Funktion Bedeutung Symbols on the power supply unit medicus_exclusive_...

Page 9: ...switched off The first figure displayed is the average of all measurements stored ALL with WHO classification The number of measurements stored is shown under ALL This is followed by displays of the...

Page 10: ...d pressure values Please read these user instructions before using the instrument for the first time as correct blood pressure readings can only be obtained if the instrument is operated correctly In...

Page 11: ...mobile phones cordless phones and their base stations walkie talkies can affect this blood pres sure monitor Therefore a minimum distance of 11 feet should be kept from such devices Purpose Non invasi...

Page 12: ...again Blood pressure measurement values are expressed in mmHg mm of mercury systolic diastolic High blood pressure hypertension over 140 mmHg over 90 mmHg Borderline normal blood pressure 130 to 139...

Page 13: ...nsistently exceeds the cut off point for high blood pressure Self measurement of blood pressure often produces somewhat lower values at home than at the doctor s The German Hypertension League has the...

Page 14: ...or Inserting the batteries The battery compartment is located on the underside of the monitor Insert bat teries in the battery compartment as shown in illustration 1 Remove the batteries if the monito...

Page 15: ...hing No further measurements possible Replace battery Care for the environment Do not dispose of used batteries and charger units in domestic waste You can take these to collection sites for used batt...

Page 16: ...yed and the automatic switch off period of the device will be extended to 60 minutes N B this significantly increases battery consumption and so is recommen ded only when running the device on mains p...

Page 17: ...completed the average of the three readings is displayed both vi sually and by audio output and stored 9 Press the SET button nine times select audio output volume or set to off to turn off audio outp...

Page 18: ...rd 3 Irregular heartbeats can affect the accu racy of the monitor or result in incorrect measurements see page 75 4 Incorrect measurements can also occur in patients with a weak pulse possibly in pati...

Page 19: ...ions for self measurement To do this measure the blood pressure first in both arms and thereafter always from the arm with the higher blood pressure medicus_exclusive_5spr_1712sd qxd Layout 1 07 12 20...

Page 20: ...ndard Type Arm Order number circumference CA01 22 32 cm 143 4 764 CA02 32 48 cm 143 4 756 CA03 16 22 cm 141 4 771 CA04 22 42 cm 143 4 765 Preparing to measure your blood pressure Attach the cuff to th...

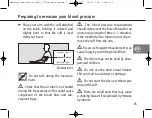
Page 21: ...ng the measure ment Attaching the cuff The measurement should be taken from the bare upper arm In the case of tightly fitting outer clothing ensure that the blood supply to the arm is not cut off when...

Page 22: ...devices being used on the same arm at the same time may mal function during measurement The cuff must not be too tight There should be enough space to fit roughly two fingers between arm and cuff The...

Page 23: ...4 The blood pressure measurement should not prevent the flow of blood for an unnecessary length of time 2 minutes If the monitor fails to function correctly re move the cuff from the arm Excessive fre...

Page 24: ...ady for use see illustration 5 Illustration 5 START SYS mmHg DIA mmHg AVG AUTO 180 210 240 AM PM 3 PUL min EN If the ambient temperature changes significantly leave the device about an hour to adapt t...

Page 25: ...inflate the cuff to the re quired pressure Increasing cuff pressure is displayed When the required pressure is reached the pump switches off and the air is re leased slowly from the cuff Interrupting...

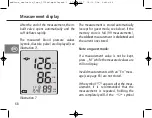
Page 26: ...Invalid measurements with an Err mess age see page 65 are not stored If the symbol appears after the meas urement it is recommended that the measurement is repeated holding the arm completely still I...

Page 27: ...l con dition stress disease etc If the measurement result is obviously wrong repeat the measurement The unit switches itself off automatically after about 1 min To repeat a measure ment press the STAR...

Page 28: ...u press the M but ton repeatedly the screen will show the average of all measurements taken between midnight and 11 59 AM and then those taken between noon and 23 59 PM The number of measure ments fro...

Page 29: ...ale see illustra tion 9 to identify the range within which your blood pressure falls under the WHO classification see page 54 For your information attach the sticker WHO classification supplied to the...

Page 30: ...memory Repeated pressing of M will now successively dis play all measurements con tained in the memory as described above Pressing the START button switches off the device If no button is pressed the...

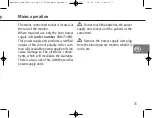
Page 31: ...er com mercially available power supply units can cause damage to the electronic compo nents which will invalidate the warranty There is also a risk of fire with these other power supply units Do not...

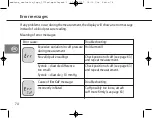
Page 32: ...during measurement No valid pulse readings Check position of cuff see page 63 and repeat measurement Systole diastole difference Check position of cuff see page 63 too small and repeat measurement Sys...

Page 33: ...n with the arm being kept completely still Error cause The symbol indicates that the arm moved during measurement If the symbol appears again even with the arm gheld still this may be an indication of...

Page 34: ...Cuff For disinfectant wipes at least 5 minutes exposure time of the device and the cuff we recommend the disinfectant antifect li quid Sch lke Mayr To disinfect the cuff we recommend spray disinfectio...

Page 35: ...sub ject to normal wear and tear e g cuff transport damages and any damage cau sedbyimproperhandling e g non compli ance with the instructions for use Dama ges due to disassembly by unauthorized pers...

Page 36: ...d 6 times a day Useful life cuff 2 years when used 6 times a day 78 Customer service Customer service Warranty and repair work must be under taken by trained and authorised personnel Do not modify thi...

Page 37: ...store 90 measurements Display LCD Operating conditions environmental temperature 10 C to 40 C Relative humidity 15 to 85 Air pressure 800 hPa to 1060 hPa Transport environmental temperature 20 C to 6...

Page 38: ...frequency of use and switch off time setting Battery check symbol display in LCD window Weight 300 g without batteries Dimensions WxHxD 140 mm x 65 mm x 105 mm Classification Medical device with inter...

Page 39: ...s not protected against water Clinical test Accuracy complies with the requirements DIN 58130 of EN 1060 Part 3 Maximum deviation of cuff 3 mmHg or 2 of the reading pressure measurement whichever is t...

Page 40: ...circuit integrity and deviation of pressure display Calibration checks Testing instructions for trained specialist staff only Note a When the pressure in measurement mode increases above 299 mmHg the...

Page 41: ...ing time for cuff at least 30 seconds in the usual manner 5 Press the START button again to switch off the device C Safety seal As a safeguard the upper and lower parts of the housing can be joined wi...

Reviews: