background image

4.4.5 IMPORTING THE FACE LIBRARY IN BINARY 
FORMAT 

The device supports the import of one or more faces in binary format. Select "Import single bin file" or 
"Import multiple bin file" respectively to select your .bin file and import it to the device: 


4.4.6 EXPORT FACE LIBRARY 

In the list management screen: 


Click "Export all groups"; 


Set the save path of the library to export 


Based on group name, automatically export all groups, save format as binary file (.bin) 


Once finished, click "Ok" 

Summary of Contents for BS-DET2000BT

Page 1: ...BS DET2000BT RF MANUAL VERSION 1 4 FACE RECOGNITION AND TEMPERATURE DETECTION DEVICE BS DET2000BT ...

Page 2: ...All aspects and functions of the product are subject to the actual product and may be subject to change Do not expose the lens and sensor to strong light sources doing so will affect the acquisition or could damage the lens Configure all passwords and other product security settings and remember your credentials Biometric products may not be 100 suitable for any security environment or high securi...

Page 3: ... external temperature will not be detected and therefore an acclimatization time will be required before taking the measurement the same principle applies to excessively high skin temperatures due to various external factors such as heat sun etc which will require an acclimatization time Readings with skin temperature altered by external factors would not be reliable For correct operation the cove...

Page 4: ...mperatures The 0 3 C margin of error of the DET2000BT device is confirmed and tested by various series of measurements performed on different days on different subjects with the device installed in an environment with a temperature of around 20 C respecting the acclimatization time and performing cycles and 100 measurements on acclimatized subjects the average margin of difference between one meas...

Page 5: ...NTERFACE PREVIEW 14 4 4 CREATION AND MANAGEMENT OF LISTS 15 4 4 1 IMAGE REQUIREMENTS OF FACES 15 4 4 2 IMPORTING A SINGLE FACE IMAGE 16 4 4 3 MULTIPLE FACES IMPORT 17 4 4 4 REAL TIME FACES IMPORT 18 4 4 5 IMPORTING THE FACE LIBRARY IN BINARY FORMAT 19 4 4 6 EXPORT FACE LIBRARY 19 4 5 PERIPHERAL CONTROL 20 4 5 1 BASIC SETTINGS 20 4 5 2 CONTROL OF ALARM OUTPUTS DOOR AND TURN CONTROL 20 4 5 3 INPUT O...

Page 6: ...TEMPERATURE CONFIGURATION 32 4 7 3 MINIMUM DIMENSION DETECTION 32 4 7 4 SCHEDULING MANAGEMENT 33 4 7 5 AUDIO 33 4 7 6 OSD SETTINGS 34 4 7 7 VIDEO PARAMETER SETTINGS 34 4 7 8 FACTORY CALIBRATION 35 4 8 DATA UPLOAD 35 4 9 INFORMATION 35 4 9 1 SYSTEM INFORMATION 35 4 9 2 FIRMWARE UPDATE 36 4 9 3 SYSTEM DIAGNOSTICS 36 4 9 4 MAINTENANCE 37 4 9 5 SEARCH LOG 37 4 10 ACCESS LOG 38 5 READ ID CARD 41 MODEL ...

Page 7: ...h external sound and light alarms Integrated identity card dual IC card identification module on BS DET2000BTRF model can achieve 1 1 1 N comparison mode Face recognition within a distance of 0 3 1 5 meters the face can be recognized and registered Facial recognition technology based on an improved multi task cascade convolutional neural network adopted to reduce the image quality requirement and ...

Page 8: ...g homes Municipal offices And in any other place where it may be necessary to check the body temperature at the entrance The device can be used both standalone and integrated in existing access control systems thanks to the communication ports it is equipped with LAN 485 Wiegand and the possibility of providing SDK and API 2 PRODUCT INSTALLATION ...

Page 9: ...talled on access turnstiles Before installation it is necessary to make sure that the top cover plate has been perforated with the size of the hole corresponding to the diameter of the device support 2 2 INSTALLATION ON DETPAV110 PEDESTAL 3 1 2 ...

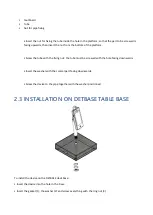
Page 10: ...the tube with the fixing nut the tube must be screwed with the hole facing downwards Insert the washer with the conical part facing downwards Screw the device to the pipe together with the washer positioned 2 3 INSTALLATION ON DETBASE TABLE BASE To install the device on the DETBASE desk base Insert the device into the hole in the b ase Insert the gasket 1 the washer 2 and screw everything with the...

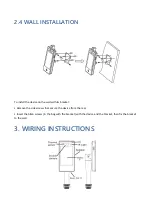
Page 11: ...e device on the wall with its bracket Remove the side screws that secure the device from the rear Insert the Allen screws in the bag with the bracket with the device and the bracket then fix the bracket to the wall 3 WIRING INSTRUCTIONS ...

Page 12: ...ress in the URL bar The default address is 192 168 1 189 or check the IP in the lower left corner of the device screen after switching on make sure you are in the same network class as the device and in the same network After login download and install the ipc demo according to the instructions Note if you are unable to download go to the tools section in the options menu and remove the protected ...

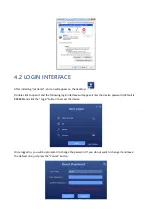
Page 13: ... to open it and the following login interface will appear Enter the device password default is 888888 and click the Login button to access the device Once logged in you will be prompted to change the password If you do not want to change it and leave the default one just press the Cancel button ...

Page 14: ...ve the option of being able to change its IP address username password and at the bottom right in Batch update you can do the firmware update 4 3 INTERFACE PREVIEW 1 Live preview window 2 Comparison results similarity name description group temperature type of list 3 Instantaneous results in real time instant time and time image quality score and detected temperature 1 2 3 ...

Page 15: ...n the various lists whitelist blacklist and visit 4 4 1 IMAGE REQUIREMENTS OF FACES To ensure recognition accuracy use a recent photo the image must contain only one face and must have a width of no less than 260 pixels We recommend acquiring the face from the Preview screen in Face in real time Note the image must not be larger than 1 MB to avoid import errors in the library ...

Page 16: ...er the list management interface Steps 1 Add group set the group name and group type whitelist blacklist or visitor 2 Select Add face Click Browse to check where the photo is located and select it Add name ID information etc Click Confirm to confirm and conclude ...

Page 17: ... set the group name and type whitelist blacklist or visitors 2 Select Add more faces Click to set the image import format Note the image naming format must match to avoid import errors Click Browse and select the folder corresponding to the face library Click confirm and wait for the import to complete ...

Page 18: ...l continue to capture faces Click the icon on the right side of the face to see the photo captured in real time In the history of faces select the image as in the model below to import it into the device Note for this import mode the groups need to be configured in advance in the list management ...

Page 19: ...ingle bin file or Import multiple bin file respectively to select your bin file and import it to the device 4 4 6 EXPORT FACE LIBRARY In the list management screen Click Export all groups Set the save path of the library to export Based on group name automatically export all groups save format as binary file bin Once finished click Ok ...

Page 20: ...privacy mode thanks to this last parameter you can decide whether to set a Total privacy so no image will be saved inside the device or set a partial privacy and then save the images only of those who will be detected with an abnormal temperature 4 5 2 CONTROL OF ALARM OUTPUTS DOOR AND TURN CONTROL The DET2000BT device can be used to control automatic doors turnstiles or electric locks thanks to t...

Page 21: ...ce 4 Face or ID Card the captured face or ID card to open the gate 5 Person access open to any person at each passage Only the DET2000BTRF model supports the reading of cards and ID tags the reader is compatible with the 13 56 MHz and 125 KHz frequency 4 5 3 INPUT OUTPUT CONFIGURATION click Peripherals IO Configuration to enter the alarm control interface Alarm output Status set the port and the t...

Page 22: ... the wiegand configuration interface Wiegand protocol output wiegand 26 36 66 bit Wiegand Number Tests to verify that wiegand is working Wiegand protocol incoming wiegand 26 36 66 bit 4 5 5 DISPLAY SETTINGS Click Peripherals Display settings to enter the display settings interface Choose the device in which to view the device Adjust the brightness Choose which items to display on the device ...

Page 23: ...equired for detection Click Peripherals Light to enter the light interface Test to see if the fill light is working properly 4 5 7 SERIAL PORTS The DET2000BT is equipped with an RS485 serial port To access the configuration parameters click Peripherals Serial ports Type of bidirectional serial port Send Receive ...

Page 24: ...ize with the time of the NTP server server network To allow the DET2000BT to keep the history of the readings correctly it is essential that the date and time are set correctly 4 6 2 DST SETTINGS The device also has the function of setting the DST daylight saving time To access the settings Click System DST Select the DST mode week or date and depending on the chosen setting set the start and end ...

Page 25: ...f the device IP address DNS and choose whether to keep a static IP or set it in DHCP For easier use and easy availability of the DET2000BT on the network the use of static IP is recommended N B Make sure that the address you want to assign to the device is not used by other devices in the same network 4 6 4 PORT Click System Port to enter the port settings interface In this section you can change ...

Page 26: ...load the app 3 You can skip the first two steps by directly downloading the app from the Play Store or Apple Store by searching for Face Eye 4 Once the app has been downloaded use it to scan the QRCode ID 5 Once the device is found enter your credentials to terminate the connection Note The device must be connected to the network and ALL network parameters set correctly Here s how to enable notifi...

Page 27: ... 3 After registering add the device as indicated above once added click on the left menu Remote Settings select the device with which you want to activate notifications go to Notification Setting and enable Custom Notification and System Notification 4 Make sure the notification for abnormal temperature is enabled in Push Setting Temperature Anomaly ...

Page 28: ...4 6 6 TF CARD The DET2000BT device is equipped with a slot for housing a TF Card for memory expansion with a maximum capacity of 128 GB To insert the TF Card ...

Page 29: ...ace the default device password Click System User to enter the user management settings interface In the following interface it will be possible to change the password for the Admin user or create other users advanced user or common user The advanced user will have access to the list of faces to change the password in System and to the device info and will also be able to access the access log The...

Page 30: ...e previously entered address SMTP Server according to the provider of the sender mail set search on Google SMTP Port this also depends on the sender provider set search on Google SSL Enable if using port 465 Address enter the recipient s e mail address up to 4 4 6 9 STORAGE MANAGE In this interface you can free the access log and the recorded videos to enter the settings Click System Storage manag...

Page 31: ...he value the more difficult it will be to detect the face Detection function that allows you to detect a person with respect to a photo placed in front of the device Tolerance level set the tolerance level of the detection with respect to the Detection function Access interval set a delay between one detection and another Decuplicate INVL set a delay between detection of a face and the same detect...

Page 32: ... in case of high temperature detection make sure you have set the correct network values Email Temp Type set to show the status or the value of the temperature on the email Low temperature set a minimum temperature If the temperature detected will be lower than the set one the device will say Please retest No traffic with low temp enable to block the traffic in case of low temperature detected 4 7...

Page 33: ...stem Parameter Face programming to enter the settings interface Click Add to enter the schedule time setting interface a total of 6 time periods can be set 4 7 5 AUDIO The DET2000BT incorporates audio speakers thanks to the latter the device provides voice messages To configure the audio click System Parameter Audio to enter the settings interface ...

Page 34: ...meter OSD Settings to enter the On Screen Display settings interface View the name in the preview display Name of the channel View date and time Time format Date format On Screen Display Size 4 7 7 VIDEO PARAMETER SETTINGS Click System Parameter Video Settings to enter the settings interface In this screen you can change any parameters concerning the video stream ...

Page 35: ...ility to save the captured images both in http and in FTP you can configure it clicking System Upload Upload Data to enter the settings interface Upload data save images via FTP and http of the faces in the list 4 9 INFORMATION 4 9 1 SYSTEM INFORMATION Click System System Info Device Info to view all device information ...

Page 36: ...ight there will be a Batch update section from where you can update the device Select the device to update Enter the device password Click on Browse to search for the update file on your computer Once found and selected click on Update Wait for the device to update and restart 4 9 3 SYSTEM DIAGNOSTICS Click System System Info Diagnostics to enter the system diagnostic interface and view all the re...

Page 37: ...rface This function allows you to set an auto restart of the device once every day or once a week by setting a time 4 9 5 SEARCH LOG Click System System info Search log to enter the device log interface This function allows you to search for logs operations carried out within the software ...

Page 38: ...iew all the detections made by the device Set start and end date and time and a filt ro once set press Search Set period start and end Select search type 1 No conditions all accesses 2 According to the type of access face list pass ID card stranger ...

Page 39: ...3 According to the list query whitelist blacklist visitors 4 According to the information Enter the name and ID 5 Second image compare the uploaded image among those in the register ...

Page 40: ...6 Temperature overheat The query result is shown like this ...

Page 41: ...n read your card Place the card in the reader the card must have a frequency range from 13 56 MHz to 125 KHz Hold the card against the reader and press Reload in the Card ID line Once you have found the card ID select it and copy it Next create a new face to be included in a list or edit an existing face Choose the Manual Entry option in Wiegand Type Paste the code in Wiegand N Once confirmed go t...

Page 42: ...BORINATO SECURITY SRL Via Chiesa 22 36044 Val Liona VI Tel 39 0444868678 Fax 39 04441491650 info bositaly it www bositaly it ...

Reviews: