background image


30

MACHINE PREPARATION


3.


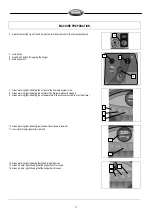
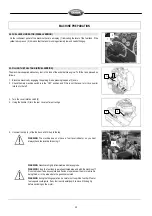
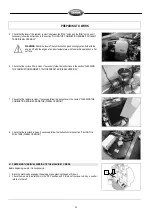
Turn the main machine switch to the “ON” position, turn it by a quarter rotation to the right 

4.


Make sure that the hopper hatch is closed, if this is not the case not pull the lever (3) upwards 

5.


Raise the hopper to its maximum height, pulling the lever (4) up, engage the safety catches supplied 
with the machine 


WARNING!

 The safety catches, supplied with the machine, should be inserted into 

the shafts of the pistons controlling the raising of the hopper. 


6.


Check the main machine switch is in the “OFF” position, and if this is not the case, turn it by a quarter 
rotation to the left  

7.


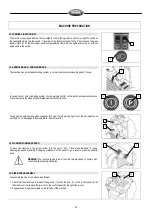
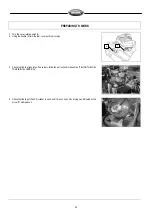
With the proper equipment, remove the screws (5) in the side brush hub 

8.


Insert the side brush into the brush hub (6) 

9.


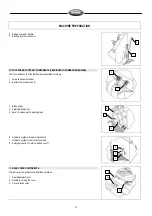
With the proper equipment, fix the side brush to the brush hub (6) using the screws (5) 


10.


Remove the safety catches 

11.


Turn the main machine switch to the “ON” position, turn it by a quarter rotation to the right 

12.


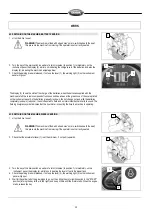
Lower the hopper until it is in the work position, pulling the lever (4) downwards, while at the same 
time pushing the dead man's button (7) on the instrument panel 


36.


CHECKING THE HYDRAULIC SYSTEM OIL 

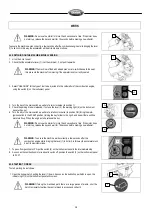
This machine is equipped with a hydraulic system. To ensure optimum machine performance, check the oil 
level in the following way: 

1.


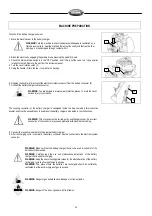
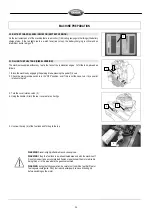
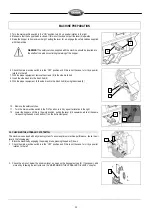
Block the machine by engaging the parking brake, pressing the pedal (1) down 

2.


Check the main machine switch is in the “OFF” position, and if this is not the case, turn it by a quarter 

rotation to the left 


3.


Check the oil is not below the minimum level, as seen on the transparent cap (2). If necessary, add 

more oil by following the instructions in the “MAINTAINING THE HYDRAULIC OIL LEVEL” chapter. 


Summary of Contents for hammerhead 1100srx

Page 1: ...USE AND MAINTENANCE MANUAL CONTACT US 800 6 Bortek 717 737 7591 Orders BortekIndustries com BortekIndustries com 1100SRX ...

Page 2: ...ook symbol with an i Indicates the need to consult the instruction manual Open book symbol Used to tell the operator to read the manual before using the machine Warning symbol Carefully read the sections marked with this symbol and observe the indications for the safety of the operator and the machine Warning symbol Indicates danger of gas exhalation and leakage of corrosive liquids Warning symbol...

Page 3: ...POSAL OF THE COMBUSTION ENGINE 21 18 MAINTENANCE AND DISPOSAL OF THE LPG CYLINDER 21 19 HANDLING AND INSERTING THE BATTERIES BATTERY VERSION 21 20 CONNECTING THE BATTERIES AND BATTERY CONNECTOR BATTERY VERSION 22 21 CONNECTING THE BATTERY CHARGER BATTERY VERSION 22 22 BATTERY CHARGE LEVEL INDICATOR BATTERY VERSION 24 23 FILLING THE FUEL TANK DIESEL VERSION 24 24 FUEL LEVEL INDICATOR DIESEL VERSION...

Page 4: ...SIDE FLAPS 56 62 MAINTENANCE OF THE COMBUSTION ENGINE 57 EMERGENCY MAINTENANCE 58 63 CENTRAL BRUSH REPLACEMENT 58 64 SIDE BRUSH REPLACEMENT 59 65 COOLANT MAINTENANCE DIESEL VERSION 59 66 MAINTENANCE OF THE BRAKING SYSTEM FLUID 60 67 MAINTENANCE OF THE HYDRAULIC FLUID 61 68 REPLACING THE HYDRAULIC SYSTEM FILTER 61 69 REPLACING THE STARTER BATTERY VERSIONS WITH COMBUSTION ENGINES 63 70 REPLACEMENT O...

Page 5: ...version and serial number written on the serial number plate Technical description The TITAN are ride on sweeping machines powered electrically with traction batteries or with an internal combustion endothermic engine for the cleaning of both internal and external surfaces with tiled concrete or asphalt floors The machine must operate on dry surfaces and if necessary can also work on wet surfaces ...

Page 6: ...30 Machine height with optional roof mm 2210 Battery compartment size l x L x h mm 595x295x485 Number Size of battery box l x w x h No mm 2 620x420x450 Rated battery voltage V 36 Battery weight max kg 340 Starter battery V Ah 55 12 Starter battery weight max kg 12 5 Size of LPG cylinder D x h mm 270 x 580 LPG cylinder weight tare LPG kg 10 12 Combustion engine oil sump capacity l 1 1 Combustion en...

Page 7: ...hours graphic display battery version Used on the instrument panel to indicate the graphic display that allows the hours and partial hours of work to be displayed Amperage draw graphic display battery version Used on the instrument panel to indicate the graphic display that allows the machine s amperage draw to be displayed Graphic display of the charge level of the batteries battery version Used ...

Page 8: ...light bifuel version showing that the oil level in the hydraulic system has reached a critical level for the correct functioning of the machine Hydraulic system clogged filter symbol Used on the instrument panel to indicate the red warning light battery version and green warning light bifuel version showing that the oil level in the hydraulic system is clogged and is compromising the correct funct...

Page 9: ...instrument panel to indicate the direction to push the lever that controls the movement of the hopper hatch to open it Debris hopper lifting symbol Used on the instrument panel to indicate the direction to push the lever that controls the movement of the hopper hatch to bring it to the height for emptying Debris hopper lowering symbol Used on the instrument panel to indicate the direction to push ...

Page 10: ...ate the direction to push the lever that controls the central brush to put it in an idle position Right side brush in work position symbol Used on the instrument panel to indicate the direction to push the lever that controls the right side brush to put it in a work position Right side brush in idle position symbol Used on the instrument panel to indicate the direction to push the lever that contr...

Page 11: ...The operator must always be equipped with the appropriate safety devices gloves shoes helmet goggles etc If the machine does not work properly check this is not caused by failure to carry out routine maintenance Otherwise ask for intervention of the authorised technical assistance centre If you need to replace any components request the ORIGINAL spare parts from an Authorised dealer and or Retaile...

Page 12: ... A 1650 mm B 1860 mm C 2350 mm A C B 2 HOW TO UNPACK THE MACHINE 1 Remove the outer packaging 2 The machine is secured to the pallet with wedges that lock the wheels remove these wedges 1 3 Disengage the parking brake by turning the lever 2 upwards 4 Check the main machine switch is in the OFF position and if this is not the case turn it by a quarter rotation to the left 5 Turn the knob 3 anticloc...

Page 13: ... by pass valve until it is horizontal this will start the hydraulic system working 17 Lower the rear cover as far as the working position 18 Turn the knob 3 clockwise to block the rotation of the rear cover WARNING if the product is delivered in cardboard containers handle the packed product with suitable lifting means that comply with the legal requirements 3 HOW TO MOVE THE MACHINE 1 Make sure t...

Page 14: ... to reserve 9 Red warning light indicating that the parking brake is on 10 Green warning light indicating that the machine headlights are on 11 Indicator light for the charge level of the batteries 12 Hour meter display absolute or partial 13 Red warning light indicating the oil level of the hydraulic system is low 14 Red warning light indicating the oil filter of the hydraulic system is clogged 1...

Page 15: ... 4 Horn button 5 Dead man s button for lowering the hopper 6 Main key switch 7 Yellow warning light indicating that the fuel level is low 8 Green warning light indicating that the machine headlights are on 9 Red warning light indicating low brake oil level down to reserve 10 Red warning light indicating that the parking brake is on 11 Red indicator light indicating that the alternator is not recha...

Page 16: ...low plugs are in the heating phase 18 Red warning light indicating the combustion engine s oil pressure is low 19 Red warning light indicating the air filter of combustion engine is clogged 20 Red warning light indicating the temperature of the combustion engine s coolant is at a critical level 21 Fuel level display 22 Hour meter display absolute or partial 23 Rev counter for the combustion engine...

Page 17: ...ht indicating the oil filter of the hydraulic system is clogged 9 Green warning light indicating the oil temperature of the hydraulic system is at a critical level 10 Green warning light indicating low brake oil level down to reserve 11 Hour meter display absolute or partial 12 Green warning light indicating that the parking brake is on 13 Green indicator light showing that the hopper hatch is clo...

Page 18: ...el version are identified as follows 1 Central brush control lever 2 Right side brush control lever 3 Left side brush control lever optional 4 Control lever for activating and deactivating the vacuum turbine 5 Lever for adjusting the number of revs of the combustion engine 6 Control lever for the hopper hatch 7 Control lever for raising the hopper 9 FOOTBOARD FOOTREST COMPONENTS BATTERY VERSION Th...

Page 19: ...ment pedal 2 Backward movement pedal 3 Brake pedal 4 Parking brake pedal 5 Lever for releasing the parking brake 6 Hydraulic system minimum oil level bulb 7 Hydraulic system maximum oil level bulb 8 Emergency button for starter battery cut off 11 REAR COVER COMPONENTS The rear cover components are identified as follows 1 Seat adjustment lever 2 Handle for raising the cover 3 Cover rotation catch 2...

Page 20: ... battery boxes with nine 2V 480 Ah 5h liquid electrolyte components are needed To perform well OTHER TYPES SHOULD NOT BE USED The batteries must meet the requirements laid out in the norms CEI EN 60254 1 2005 12 CEI 21 5 CEI EN 60254 2 2008 06 CEI 21 7 15 TYPE OF STARTER BATTERY VERSION WITH COMBUSTION ENGINE As a starter battery you are advised to use a 12V 55 Ah C5 battery To perform well OTHER ...

Page 21: ...structions given by the engine manufacturer for maintenance and current environmental hygiene norms for disposal 18 MAINTENANCE AND DISPOSAL OF THE LPG CYLINDER WARNING For the maintenance and disposal of the LPG cylinder observe the instructions given by the cylinder manufacturer for maintenance and current environmental hygiene norms for disposal 19 HANDLING AND INSERTING THE BATTERIES BATTERY V...

Page 22: ... series 1 using the jumper cables supplied to the and poles 2 Connect the battery connector cable to the and poles to obtain a voltage of 36V on the terminals 2 3 Connect the battery connector cable 2 to the machine connector 3 4 Connect the 14 V line battery connector cable to the 4 pole to obtain a voltage of 14V on the terminals WARNING All installation and maintenance operations must be carrie...

Page 23: ...connector of the battery charger is consigned inside the bag containing this instruction booklet and must be assembled on the cables of the battery charger as indicated in the instructions WARNING This process must be carried out by qualified personnel An incorrect connection of the connector may cause problems with machine functioning 8 Connect the recently wired cable to the external battery cha...

Page 24: ...the main machine switch is in the OFF position and if this is not the case turn it by a quarter rotation to the left 3 Turn the cover rotation catch 2 4 Using the handle 3 turn the rear cover as far as it will go 5 Unscrew the cap 4 of the fuel tank and fill it up to the top WARNING Diesel is highly inflammable and can explode WARNING Fill up the fuel tank in a well ventilated area and with the ma...

Page 25: ...by a quarter rotation to the left 3 Turn the cover rotation catch 2 4 Using the handle 3 turn the rear cover as far as it will go 5 Unscrew the cap 4 of the fuel tank and fill it up to the top WARNING The machine does not have a fuel level indicator so you must always check the level before using it WARNING Gasoline is highly inflammable and may explode WARNING Fill up the fuel tank in a well vent...

Page 26: ...the relevant use and maintenance manual In this way you will avoid any accidents or damage to the motor 27 CHECKING THE COMBUSTION ENGINE S AIR FILTER Before checking the condition of the combustion engine s air filter do as follows 1 Block the machine by engaging the parking brake pressing the pedal 1 down 2 Check the main machine switch is in the OFF position and if this is not the case turn it ...

Page 27: ...he case turn it by a quarter rotation to the left 3 Turn the cover rotation catch 2 4 Using the handle 3 turn the rear cover as far as it will go 5 Loosen the tie rod 4 with the right equipment 6 Position the cylinder as shown in the figure If it is in the right place the tap 5 will be on the rear of the machine WARNING Use only 15kg LPG cylinders with dimensions of 315x655 Ømax x height in millim...

Page 28: ...0 HOUR METER DIESEL VERSION On the instrument panel of the machine there is a display 1 indicating the total number of working hours or by pressing the button 2 the partial hours are displayed The total number of hours display is divided into three pairs of numbers that identify the effective work hours that have passed The partial number of hours display is divided into three pairs of numbers the...

Page 29: ... behind the vehicle nose To engage the parking brake press the pedal 3 down the red warning light 4 on the instrument panel will come on To disengage the parking brake use the lever 5 34 WORKING FORWARD SPEED To move the machine in the work direction turn the key to ON I then press the pedal 1 down adjusting the speed by altering the degree of pressure on the pedal To go in reverse press the pedal...

Page 30: ...oper equipment fix the side brush to the brush hub 6 using the screws 5 10 Remove the safety catches 11 Turn the main machine switch to the ON position turn it by a quarter rotation to the right 12 Lower the hopper until it is in the work position pulling the lever 4 downwards while at the same time pushing the dead man s button 7 on the instrument panel 36 CHECKING THE HYDRAULIC SYSTEM OIL This m...

Page 31: ...roceed as follows 1 position yourself on the driving seat 2 take hold of the mobile part 1 of the safety belt 3 wrap it around the abdominal area 4 insert the mobile part 1 into the slot on the fixed part 2 5 release the belt to allow the seatbelt tensioner to roll the belt back up To uncouple the safety belt press the button 3 and remove the mobile part 1 or push the rapid uncoupling button 4 1 3...

Page 32: ...the parking brake pressing the pedal 1 down 2 Check the main machine switch is in the OFF position and if this is not the case turn it by a quarter rotation to the left 3 Connect the battery connector 1 to the electric system connector 2 40 PREPARING THE DIESEL VERSION OF THE MACHINE TO WORK Before beginning to work it is necessary to 1 Block the machine by engaging the parking brake pressing the ...

Page 33: ... instructions in the section CLEANING THE COMBUSTION ENGINE S CYCLONE PREFILTER DIESEL VERSION 7 Check that the radiator is clean if necessary follow the instructions in the section CLEANING THE COMBUSTION ENGINE S RADIATOR DIESEL VERSION 8 Check that the fuel tank is clean if necessary follow the instructions in the section FILLING THE FUEL TANK DIESEL VERSION 41 PREPARING THE BIFUEL VERSION OF T...

Page 34: ...ear cover as far as it will go 5 Check that the fuel tank is full if necessary follow the instructions in the section FILLING THE FUEL TANK BIFUEL VERSION 6 Check that the tap of the LPG cylinder is open and if it is not open it by turning it as indicated by the arrow A stamped on it 2 3 ...

Page 35: ...and with the batteries completely run down red zone the notches start to flash and an intermittent buzzer starts to sound The flashing hourglass symbol indicates that the hour meter is counting the time the machine is operating 43 SWITCHING ON THE MACHINE DIESEL VERSION 1 sit on the driver s seat WARNING The machine is fitted with a dead man s micro switch beneath the seat this prevents the machin...

Page 36: ... go out 6 Turn the key of the main switch a quarter of a rotation clockwise to position ON Bring the motor ignition switch to the START position turning the key further to the right and keep it there until the motor starts up When the engine starts release the key WARNING Do not use the starter for more than 5 seconds at a time If the motor does not start up release the key and wait for 10 seconds...

Page 37: ...e forward speed to comply with current health and safety standards If the dirt level requires it lower the right side brush 1SL versions using the lever 7 on the control panel If you want to lower the optional left brush 2SL versions use the lever 8 WARNING Use the side brush or brushes according to machine version only on edges as it is not assisted by the vacuum action WARNING Both the central b...

Page 38: ...es on it indicates that the level of oil in the braking system is poor you need to stop the work you are doing and take the machine to a suitable place for its maintenance and call for assistance If during the work the red warning light battery version diesel version and the green one Bifuel version shown here on the side on the instrument panel come on this indicates that the level of oil in the ...

Page 39: ...p the work you are doing and take the machine to a suitable place for its maintenance and call for assistance If during the work the fuel level displayed on the instrument panel reaches a critical zone the yellow indicator light comes on indicating that the diesel fuel is running on reserves diesel version you need to stop the work you are doing and take the machine to a suitable place for its mai...

Page 40: ...ect GASOLINE for the fuel to be injected into the carburettor of the combustion engine using the switch 6 on the instrument panel 10 Carry out the standard procedure for starting the machine WARNING To replace the LPG cylinder carefully read the section REPLACING THE LPG CYLINDER AND COMBUSTION MOTOR BIFUEL VERSION 5 6 ...

Page 41: ...t side brush from the ground if present as an optional using the lever 4 5 Close the hopper hatch pulling the lever 5 upwards As soon as the debris hopper hatch is closed the indicator light 6 on the instrument panel will go out 6 Switch off the vacuum turn the lever 7 to the right 7 Activate the filter shaker on the filter by pressing the switch 8 on the control panel WARNING Do not keep the swit...

Page 42: ...ate the filter shaker while the debris hopper is lifted off the ground 13 Engage the parking brake 14 Slowly open the hopper hatch pulling the lever 5 upwards As soon as the debris hopper is open the refuse will start to come out 15 Once the refuse has come out close the hopper hatch pulling the lever 5 downwards 16 Disengage the parking brake 17 Remove the machine from the waste unloading zone st...

Page 43: ...ition the accelerator lever 1 at the minimum pulling it up 2 Bring the main machine switch to OFF 0 by turning the key a quarter rotation to the left For the Bifuel version proceed as follows 1 Position the switch 1 on the instrument panel to the intermediate step 2 As soon as the combustion motor is about to switch off position the switch 1 on the instrument panel to GASOLINE 3 Keep the motor on ...

Page 44: ...the hinge 4 fixing the articulated arm 5 of the central brush 5 Withdraw the articulated arm 5 of the central brush from the central brush control arm 6 WARNING This operation must be carried out using gloves to protect against contact with dangerous substances 6 Withdraw the articulated arm 5 of the central brush from the central brush 7 7 Remove the central brush 7 from the machine 8 Clean it un...

Page 45: ... the raising of the hopper 6 Turn the main machine switch to OFF 0 by turning the key a quarter rotation to the left 7 With the proper equipment remove the screws 5 in the side brush hub 8 Remove the side brush from the machine WARNING This operation must be carried out using gloves to protect against contact with dangerous solutions 9 Clean it under a jet of running water and remove any residue 5...

Page 46: ...hine switch is in the OFF 0 position If this is not the case turn the key by a quarter rotation to the left 3 Turn the cover rotation catch 2 4 Using the handle 3 rotate the rear cover as far as it will go WARNING This operation must be carried out using gloves to protect against contact with dangerous solutions 5 Using the right tools remove the screw fixing the cable 4 stopping the rear cover ro...

Page 47: ...tion engine 1 Engage the parking brake pressing the pedal 1 2 Check the main machine switch is in the OFF 0 position If this is not the case turn the key by a quarter rotation to the left 3 Turn the cover rotation catch 2 4 Using the handle 3 rotate the rear cover as far as it will go WARNING Read the combustion engine s use and maintenance manual supplied with the machine carry out the daily main...

Page 48: ...ried out using gloves to protect against contact with dangerous solutions 5 Block the rotation of the front cover insert the pin 3 into the slot 4 6 Remove the vacuum cover releasing it from its catches 5 7 Place it on the ground move it using its handles 6 8 Remove the fabric filter make sure to disconnect it from the machine s electrical system 9 Place it on something that is suitable for its we...

Page 49: ...ING The safety catches supplied with the machine should be inserted into the shafts of the pistons controlling the raising of the hopper 5 Remove the rotation catch of the front cover 6 Using the slot 3 turn the front cover as far as it will go WARNING This operation must be carried out using gloves to protect against contact with dangerous solutions 7 Block the rotation of the front cover insert ...

Page 50: ...l connection operations be carried out by personnel trained by the service centre 55 CENTRAL BRUSH ADJUSTMENT If the side brush does not channel the dirt effectively towards the debris hopper you must adjust its height in relation to the ground Proceed as follows 1 Engage the parking brake pressing the pedal 1 2 Check the main machine switch is in the OFF 0 position If this is not the case turn th...

Page 51: ...for a few seconds 5 Raise the central brush from the ground using the lever 2 6 Release the parking brake with the lever using the lever 3 7 Move the machine the distance needed for showing the footprint of the work track WARNING If the footprint does not meet the desired characteristics repeat the adjustment 56 SIDE BRUSH ADJUSTMENT If the side brush does not channel the dirt effectively towards ...

Page 52: ...f of the side brush rests on the ground when operating 57 CLEANING THE DIESEL ENGINE S AIR FILTER Proceed as follows in order to clean the cyclone filter 1 Engage the parking brake pressing the pedal 1 2 Check the main machine switch is in the OFF 0 position If this is not the case turn the key by a quarter rotation to the left 3 Turn the cover rotation catch 2 4 Using the handle 3 turn the rear c...

Page 53: ...ceed as follows in order to carry out maintenance of the combustion engine 1 Engage the parking brake pressing the pedal 1 2 Check the main machine switch is in the OFF 0 position If this is not the case turn the key by a quarter rotation to the left 3 Check the oil is not below the minimum level as seen on the transparent cap 2 If necessary add more oil by following the instructions in the MAINTA...

Page 54: ...er WARNING Check the level of the combustion engine s coolant with the engine off with the engine at ambient temperature with the machine parked on a flat surface 60 ADJUSTMENT OF THE CENTRAL BRUSH S REAR FLAP If during working you notice that the machine leaves a trail of dust or dirt in its wake this means that the rear flap of the central brush needs adjusting Proceed as follows to replace it 1...

Page 55: ... be carried out using gloves to protect against contact with dangerous substances 11 Using the proper equipment tighten the screws 10 that fix the rear flap support 11 to the frame of the machine 12 Adjust the rear flap support 11 so that there are three millimetres between the work surface and the rubber 13 Using the proper equipment tighten the screws 10 that fix the rear flap support 11 to the ...

Page 56: ...frame of the machine 10 Reassemble all the elements WARNING It is recommended that the above mentioned operations be carried out by personnel trained by the service centre 61 ADJUSTMENT OF THE SIDE FLAPS If during working you notice that dust comes out from the side parts of the machine this means that the side flap of the central brush needs adjusting Proceed as follows to replace it 1 Engage the...

Page 57: ...d that the above mentioned operations be carried out by personnel trained by the service centre 62 MAINTENANCE OF THE COMBUSTION ENGINE Proceed as follows in order to carry out maintenance of the combustion engine 1 Engage the parking brake pressing the pedal 1 2 Check the main machine switch is in the OFF 0 position If this is not the case turn the key by a quarter rotation to the left 3 Turn the...

Page 58: ...t side brush from the ground if present as an optional using the lever 4 6 Turn the knob 5 anticlockwise and open the right hatch 7 Release the hinge 6 fixing the articulated arm 7 of the central brush 8 Remove the articulated arm 7 of the central brush from the arm 8 controlling the central brush WARNING This operation must be carried out using gloves to protect against contact with dangerous sub...

Page 59: ...the safety catches supplied with the machine WARNING The safety catches supplied with the machine should be inserted into the shafts of the pistons controlling the raising of the hopper 6 Turn the main machine switch to OFF 0 by turning the key a quarter rotation to the left 7 With the proper equipment remove the screws 5 in the side brush hub 8 Remove the worn side brush from the machine WARNING ...

Page 60: ... the brake fluid 1 Engage the parking brake pressing the pedal 1 2 Check the main machine switch is in the OFF 0 position If this is not the case turn the key by a quarter rotation to the left 3 Turn the cover rotation catch 2 4 Using the handle 3 rotate the rear cover as far as it will go WARNING Carry out this procedure only when the engine is off with the engine at ambient temperature and with ...

Page 61: ...hes the middle of the maximum filling bulb 5 WARNING Only use ARNICA 46 oil that conforms to ISO L HV or DIN 51524 t 3 HVLP WARNING It is recommended that the above mentioned operations be carried out by personnel trained by the service centre 68 REPLACING THE HYDRAULIC SYSTEM FILTER Proceed as follows in order to carry out maintenance of the hydraulic system s filter 1 Engage the parking brake pr...

Page 62: ...ngerous solutions 8 Turn the knob 8 clockwise and open the left hatch 9 Place a collection tray under the filter of the hydraulic system 9 10 Unscrew the hydraulic system filter 9 11 Screw in the new hydraulic system filter 9 12 Turn the knob 8 anticlockwise and close the left side hatch 9 Unscrew the cap 7 of the oil tank and remove the insulating tape on the vent hole 10 Screw in the cap 7 of th...

Page 63: ...e service centre 5 With the proper equipment remove the cable of the negative pole from the battery 6 With the proper equipment remove the cable of the positive pole from the battery WARNING This operation must be carried out using gloves to protect against contact with dangerous solutions 7 With the proper equipment remove the locking blade 5 first unscrew the nut 4 8 Remove the dead battery 9 In...

Page 64: ...right side brush from the ground using the lever 3 5 Raise the left side brush from the ground if present as an optional using the lever 4 6 Turn the knob 5 anticlockwise and open the right hatch 7 Release the hinge 6 fixing the articulated arm 7 of the central brush 8 Remove the articulated arm 7 of the central brush from the arm 8 controlling the central brush WARNING This operation must be carr...

Page 65: ...y but leave them loose 18 Adjust the rear flap support 11 so that there are three millimetres between the work surface and the rubber 19 Using the proper equipment tighten the screws 10 that fix the rear flap support 11 to the frame of the machine 20 Reassemble all the elements 71 SIDE FLAP REPLACEMENT If during working you notice that dust comes out from the side parts of the machine this means t...

Page 66: ...11 Insert the rubber pressing blade 7 12 Using the proper equipment fix the nuts 6 that fix the side rubber pressing blade 7 72 REPLACEMENT OF HEADLIGHT BULB To replace a headlight bulb do as follows 1 Engage the parking brake pressing the pedal 1 2 Check the main machine switch is in the OFF 0 position If this is not the case turn the key by a quarter rotation to the left 3 Remove the rotation lo...

Page 67: ...PG CYLINDER BIFUEL VERSION Proceed as follows in order to change the LPG cylinder 1 Engage the parking brake pressing the pedal 1 2 Check the main machine switch is in the OFF 0 position If this is not the case turn the key by a quarter rotation to the left 3 Turn the cover rotation catch 2 4 Using the handle 3 turn the rear cover as far as it will go WARNING Carry out this procedure only when the...

Page 68: ... be at the rear of the machine WARNING Use only 15kg LPG cylinders with dimensions of 315x655 Ømax x height in millimetres 10 Fix the chain 7 to the tie rod 6 using suitable equipment tension the chain 7 by tightening the tie rod 6 11 Tighten the pipe 5 to the tap 4 Remember to insert the seal that s supplied with the cylinder 12 Fully open the cylinder tap 4 rotating it in the direction of the ar...

Page 69: ... to needs see CHOOSING AND USING THE BRUSHES 3 The side brush is worn to adjust it see SIDE BRUSH ADJUSTMENT 4 The debris hopper is full empty it completely 77 THE MACHINE LIFTS DUST DURING OPERATION 1 The flaps that ensure efficient vacuum action are worn replace them 2 The front flap is broken and the machine projected heavy dirty bodies forward replace them 3 The filter is blocked clean the fil...

Page 70: ...at ground WARNING This operation must be carried out using gloves to protect against contact with dangerous solutions 6 Using the proper equipment remove the cover 6 of the electrical box 7 Check the fuses one by one replace the damaged one with one of the same resistance 8 Reassemble all the elements WARNING All installation and maintenance operations must be carried out by expert personnel train...

Page 71: ...ck for leaks in cooling circuit C C D BF Engine coolant check C C D BF Engine oil replacement S S S D BF Engine oil replacement S S S D BF Engine air filter cleaning C D BF Engine air filter cleaning S D BF Alternator belt check C C D BF Battery liquid level check C C C C C D BF External cleaning of motor radiator C D BF Fuel filter replacement S S D BF Motor alternator belt replacement S D BF Tig...

Page 72: ...separate the following materials and send them to the appropriate collection centres in accordance with the environmental hygiene regulations currently in force brushes felt electric and electronic parts batteries plastic parts tanks and handlebars metal parts levers and frame In particular to scrap the electric and electronic parts contact your area distributor ...

Page 73: ...ygroscopic and therefore retains its characteristics even when working in wet conditions TABLE FOR CHOOSING THE BRUSHES Machine No of brushes Code Type of bristles Bristle s Brush Length Notes TITAN 4400 1 430394 431387 431388 432530 PPL PPL PPL PPL STEEL 1 1 0 7 1 4 0 7 0 7 0 35 320 795 CENTRAL BRUSH 1 2 429205 429206 PPL STEEL PPL 1 1 0 7 1 450 SIDE BRUSH ...

Page 74: ...ekIndustries com BortekIndustries com HEADQUARTERS 4713 Gettysburg Road Mechanicsburg PA 17055 USA SWEEPERLAND COM A complete family of power cleaning machines 450RS 500RSGEN II 500SSGEN II 600SS 650RS 750RS 550RDX 650RDX 700RSX 750RDX 870SR 5 500RSX ...

Reviews: