background image

15  

Installation and Maintenance Manual  


Version   :  10//28/2011 
Issue 

:  THT-100-IMM-USA REV A6 


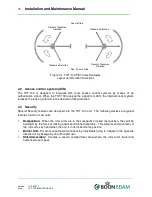
Figure 4-1: THT-100 Plan View Examples  

Layout and Rotation Directions 


4.2  Access control system (ACS) 

The  THT-100  is  designed  to  integrate  with  most  access  control  systems  by  means  of  an 
authorization signal.  When the THT-100 receives the signal from ACS, the internal control system 
releases the locking solenoid in the desired rotating direction.  


4.3  Security 

Several Security features are designed into the THT-100 unit.  The following devices are typical 
features found in most units.  


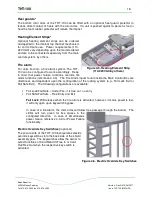
Restposition

:  When the rotor arms are in their respective locked rest position, they will be 

held tight by the force of locking pawls and ratchet assembly.  This will prevent movement of 
the rotor arms by hand when the unit is in its locked home position 


Barrier Unit: 

 Prevents unauthorized entrance by individuals trying to tailgate in the opposite 

direction of a passage by an authorized user.   


Shield  Assembly:

    Creates  a  secure  compartment  area  where  the  rotor  arms  travel  and 

authorized users pass.   


Counter Clockwise 

Rotation 

Secure Side 

Clockwise Rotation 

Counter Clockwise 

Rotation 

Non- Secure Side 

Clockwise Rotation 

Summary of Contents for THT-100

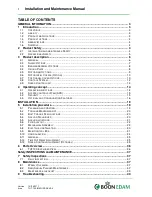
Page 1: ...THT 100 Full Height Turnstile Operation Installation and Maintenance Manual ...

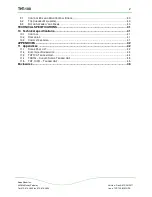
Page 2: ...ating concept 14 4 1 OPERATING FUNCTIONS 14 4 2 ACCESS CONTROL SYSTEM ACS 15 4 3 SECURITY 15 4 4 OPTIONAL AND CONFIGURATION FEATURES 16 INSTALLATION 19 5 Installation procedure 19 5 1 PACKAGING AND CRATING 19 5 2 TOOL AND MANPOWER LIST 20 5 3 BOLT TORQUE SPECIFICATIONS 20 5 4 ANCHOR TECHNIQUES 20 5 5 ANCHOR LOCATIONS 21 5 6 FLOOR LAYOUT 22 5 7 MECHANICAL ASSEMBLY 23 5 8 ELECTRICAL INSTALLATION 30 ...

Page 3: ...2 TOP CHANNEL MECHANISM 40 9 3 ROTOR ASSEMBLY AND FRAME 40 TECHNICAL SPECIFICATIONS 41 10 Technical specifications 41 10 1 CONTROL 41 10 2 SOLENOIDS 41 10 3 COMPLETE BARRIER 41 APPENDICES 42 11 Appendices 42 11 1 SPARE PART LIST 42 11 2 ELECTRICAL SCHEMATICS 43 11 3 THT100 TANDEM UNIT 44 11 4 TASTG CURVED SHIELD TANDEM UNIT 45 11 5 THT 100TL TANDEM UNIT 45 Enclosures 46 ...

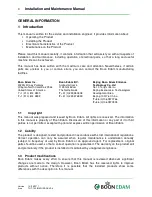
Page 4: ...o 10 Tong Ji Bei Lu Beijing Economic Technological Development Area Beijing 100176 China T 86 0 10 67877766 F 86 0 10 67877805 1 1 Copyright This manual was prepared and issued by Boon Edam All rights are reserved The information in this manual is property of Boon Edam Disclosure of this information or any part of it to third parties is not permitted except with prior and express written permissio...

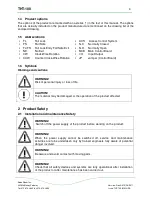
Page 5: ...ation CCW Counter Clock Wise Rotation I O Input Output JP Jumper Control Board 1 6 Symbols Warnings and cautions WARNING Risk of personal injury or loss of life CAUTION The material may be damaged or the operation of the product affected 2 Product Safety 2 1 Installation and maintenance Safety WARNING Switch off the power supply of the product before working on the product WARNING When the power s...

Page 6: ...ct affected if the installation procedure is not followed correctly CAUTION Some of the electronic components in the products covered by this manual contain Electro Static Discharge ESD sensitive devices It is highly recommended that service and maintenance engineers follow the ESD guidelines and procedures when handling such devices 2 2 Operational Safety WARNING Any children or minors using the ...

Page 7: ...le can vary but is typically small enough to discourage two persons passing the THT 100 The typical sizes of a 25 50cm width rotor arm result in a capacity of 25 to 30 persons per minute in one direction depending on the authorization system chosen A variety of surface finishes are available in galvanized powder coat and stainless steel aluminium anodized and even a combination of metals such as a...

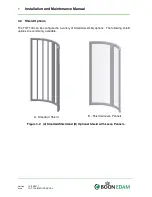
Page 8: ...00 IMM USA REV A6 3 2 Shield Options The THT 100 can be configured in a variety of Shield Assembly options The following shield options are commonly available Figure 3 2 A StandardShield and B Optional Shield with Lexan Pannels A Standard Shield B Shield w Lexan Pannels ...

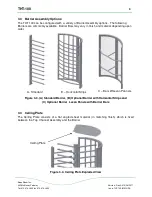
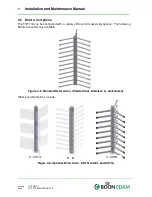
Page 9: ...vailable Barrier Bars may vary in finish and material depending upon order Figure 3 3 A Standard Barrier B Optional Barrier with Horizontal Strips and C Optional Barrier Lexan Panels with Barrier Bars 3 4 Ceiling Plate The Ceiling Plate consists of a flat angled sheet material in matching finish which is fixed between the Top Channel Assembly and the Barrier Figure 3 4 Ceiling Plate Exploded View ...

Page 10: ...rm Options The THT 100 can be configured with a variety of Rotor Arm assembly options The following Rotors are commonly available Figure 3 5 Standard Rotor Arms Powder Coat Stainless or Galvanized Other possible Options include Figure 3 6 Optional Rotor Arms CSTG and EL and ASTG A CSTG B EL C ASTG ...

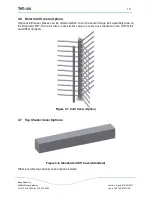
Page 11: ...ion Optional infill cover pieces can be ordered which cover the center flange bolt assembly area on the Standard THT 100 rotor arms note similar snap in covers are standard on the CSTG EL and ASTG models Figure 3 7 Infill Cover Option 3 7 Top Chanel Cover Options Figure 3 8 Standard Lift Off Cover Standard Other possible top channel cover options include ...

Page 12: ... Maintenance Manual Version 10 28 2011 Issue THT 100 IMM USA REV A6 Figure 3 9 Two Piece Cover Option Figure 3 10 Round Canopy Cover EL Option Not pictured top channel cover options Hinged Cover Panel Cover Square Canopy ...

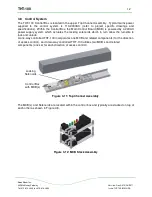
Page 13: ...owered by a 24VAC power supply system which actuates the locking solenoids which in turn allow the turnstile to lock and unlock A one way controlled THT 100 incorporates one MCB and related components for the direction of access control and a two way controlled THT 100 utilizes two MCB s and related components one set for each direction of access control Figure 3 11 Top Channel Assembly The MCB s ...

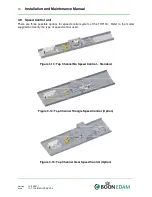
Page 14: ...ol unit There are three possible options for speed control system of the THT100 Refer to the model supplied and verify the type of speed control used Figure 3 13 Top Channel No Speed Control Standard Figure 3 14 Top Channel Triangle Speed Control Option Figure 3 15 Top Channel Gear Speed Control Option ...

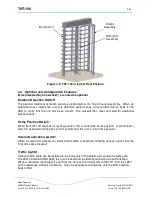
Page 15: ...iguration provides Fail Safe rotation in the specified direction of travel Note Any combination of the above mentioned functions is available in the following configurations Access Control Rotation i e Card read activation Free Rotation No Rotation Direction types Clockwise Counter Clockwise The typical THT 100 rotates in a Counter Clockwise entry from non secure moving into the secure direction W...

Page 16: ...e THT 100 unit The following devices are typical features found in most units Restposition When the rotor arms are in their respective locked rest position they will be held tight by the force of locking pawls and ratchet assembly This will prevent movement of the rotor arms by hand when the unit is in its locked home position Barrier Unit Prevents unauthorized entrance by individuals trying to ta...

Page 17: ...ition Switch When the THT 100 reaches its resting position this is called the home position A small micro switch is activated notifying the control system that the unit is in its home position Solenoid activation switch When a solenoid is activated a small micro switch is activated notifying access control that the rotor arms are unlocked Traffic Lights Optional traffic lights can be installed in ...

Page 18: ... Control Dampening System to reduce the amount of bounce which the rotor arms can experience after a full rotation when pushed hard The Speed Control will apply force against the rotating direction to slow the unit down for a gradual rest position see Section 3 6 Speed Control Unit Out of Use Lock An optional mechanical lock can be ordered with most THT 100 units The lock mechanism is connected to...

Page 19: ...re Alarm inputs found inside the Main Control Box are directional and dependent upon the configuration of the locking system e g Fail Lock Exit or Fail Safe Exit The following configurations are available Fail Lock Fail Safe Under Fire it is free out no entry Fail Safe Fail Safe Free Entry and Exit Fail Lock Will release when the fire alarm is activated however if mains power is lost it will only ...

Page 20: ...he THT 100 be sure to switch off the power supply CAUTION The material may be damaged or the operation of the door affected 5 1 Packaging and Crating Typical packaging crating of a THT 100 unit consists of similar packaging pictured below Note Tandem and Special order unit crating systems may vary Verify with Boon Edam for exact crate dimensions and weights The use of a lift is recommended when re...

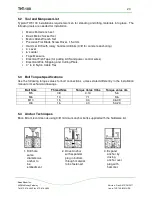
Page 21: ...ure Electrical Fish Tape for pulling ACS and power control wires Electrical Wire Stripping and Cutting Pliers 4 to 6 Nylon Cable Ties 5 3 Bolt Torque Specifications Use the following torque values for bolt connections unless stated differently in the installation manual or mechanical drawings Bolt Size Thread Size Torque Value ft lbs Torque value nm M5 0 8 4 13 5 6 M6 1 0 7 1 9 6 M10 1 5 34 46 09 ...

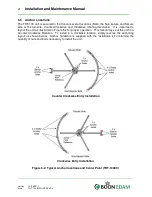
Page 22: ... important to layout the unit as illustrated in Figure 5 2 for proper operation This manual lays out the unit in a Counter Clockwise Rotation To install in a clockwise rotation simply reverse the anchoring layout as shown below Anchor hardware is supplied with the installation kit containing the quantity of nuts and bolts necessary to install the unit Counter Clockwise Entry Installation Clockwise...
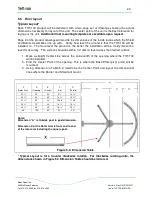
Page 23: ...rify this with a level for accuracy The surface should be within 1 4 6mm level across the finished surface 1 Mark a straight Center Line across the entire width of the opening where the THT 100 will be installed 2 Find the Center Point of the opening This is where the Base Plate pivot point will be mounted 3 Using dimension in Table 5 2 determine the Center Point and layout the dimensional lines w...

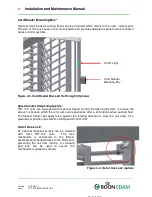
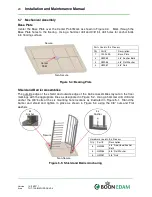
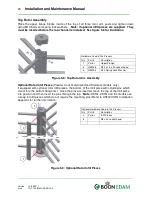
Page 24: ...the floor markings with the appropriate lines as designated in Figure 5 2 Using a hammer drill drill and anchor the 3 8 bolts at the six mounting hole locations as illustrated in Figure 5 1 Stand the barrier and shield and tighten in place as shown in Figure 5 4 using the 3 8 nuts and Flat washers Figure 5 5 Shield and Barrier Anchoring Parts Used in this Process Qty Part Description 1 100 039E Ba...

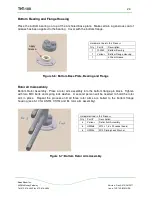
Page 25: ... rotor arm assembly into the bottom flange pin block Tighten with two M10 bolts and spring lock washer A second person will be needed to hold the rotor arm in place Repeat the process until all three rotor arms are bolted to the bottom flange housing see 5 10 for ASTG CSTG and EL rotor arm assembly Figure 5 7 Bottom Rotor Arm Assembly Hardware Used in this Process Qty Part Description 1 100040 Bot...

Page 26: ...pped with optional rotor infill pieces the bottom of the infill piece will include pins which mount into the bottom flange first Once the pins are inserted move the top of the infill piece into position and then insert the pins through the top Note ASTG CSTG and EL models use a snap in Infill pieces which do not require the mounting pins Refer to ASTG CSTG Installation Appendix for further informa...

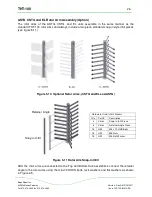
Page 27: ...in style infill pieces see figure 5 11 Figure 5 10 Optional Rotor Arms CSTG and EL and ASTG Figure 5 11 Rotor Arm Snap in Infill After the rotor arms are connected to the Top and Bottom Hub assemblies connect the retainer angle to the rotor arms using the m6 x70 HHCS bolts lock washers and flat washers as shown in Figure 2 5 Hardware Used in this Process Qty Part Description 3 Varies Snap in Infil...

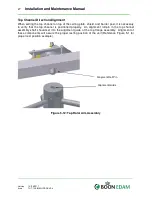
Page 28: ...ost it is necessary to verify that the top channel is positioned properly An alignment roll pin in the top channel assembly shaft should set into the alignment guide of the top flange assembly Alignment of these components will assure the proper resting position of the unit Reference Figure 5 1 for proper rest position example Figure 5 12 Top Rotor Arm Assembly Alingment Roll Pin Alignment Guide ...

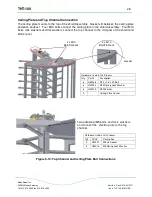
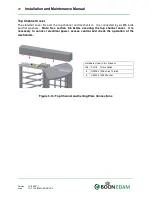
Page 29: ...ts lock washers and flat washers connect the top channel to the mid post of the shield and barrier post Two additional M5 bolts and lock washers and connect the shield up into to the top channel Figure 5 13 Top Channel and Ceiling Plate Bolt Connections Hardware Used in this Process Qty Part Description 6 HW038 M10 x 1 5 x 20 Bolt 6 HW003 M10 Spring Lock Washer 6 HW019 M10 Washer 2 Ceiling Plate G...

Page 30: ...nism It is connected by six M5 bolts and flat washers Note See section 5 6 before securing the top channel cover It is necessary to connect electrical power access control and check the operation of the mechanism Figure 5 14 Top Channel and Ceiling Plate Connections Hardware Used in this Process Qty Part Description 6 HW054 M5x0 8 x 13 Bolt 6 HW020 M5 Washer ...

Page 31: ...uit holes are designed into both mid posts of the THT 100 There are two holes on each side for running mains power access control fire alarm or other necessary communications to the unit The Endposts and Midpost and Barrier post also function as a conduit for channeling electrical wires from the ground up into the control box A standard electrical cable is supplied with the unit which connects to ...

Page 32: ...1 Keyswitch Assembly 1 Cable KS 1 Keyswitch Non Secure ACW rotation 10912 LED 1 Cable LED 1 LED 1 Non Secure Side 10913 LED 2 Cable LED 2 LED 2 Secure Side 10914 Solenoid Activation Switch 1 Cable SOL 1 Solenoid Non Secure activation side 10915 Solenoid Activation Switch 2 Cable SOL 2 Solenoid Secure activation side 10916 Keyswitch Assembly 2 Cable KS 2 Keyswitch Secure Side CW rotation 10917 Rota...

Page 33: ... fuse is located inside the Mains Power Receptacle as noted in Figure 5 18 An integrated fuse holder is located in the lower portion of the receptacle Units using dual phase 220 VAC requires an additional factory supplied fuse located inside the control box Reference electrical drawings in the appendix 11 2 for additional information Figure 5 18 Mains Power Receptacle Receptacle with Fuse Holder ...

Page 34: ...ections are available Figure 5 19 Main Control Box Terminal Strips X1 Terminal Strip AG2 Access Grant CW AG1 Access Grant ACW FA 2 Fire Alarm CW FA 1 Fire Alarm ACW X2 Terminal Strip HOME POS Home Position SOL ACT SW1 Solenoid Activation Switch 1 SOL ACT SW2 Solenoiod Activation Switch 2 ROT DET SW 1 Rotation Detection Switch ACW ROT DET SW 2 Rotation Detection Switch CW X1 X2 MCB Control Board Tr...
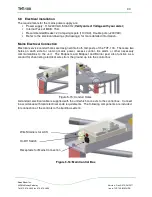
Page 35: ...tting of potiometer R1 determines the holding duration of this relay After the hold time expires the unit will return to its standby state Pulse Relay When the Access Control System sends an access grant signal to the MCB a one shot pulse will automatically generate internally regardless of how long the ACS input signal is held Serial Port Interface Allows the MCB to react to wet voltages 3 25vdc ...

Page 36: ...rox seven seconds or counter clockwise to increase this setting max time approx 20 seconds 5 13 Speed Control Adjustment Optional THT 100 units equipped with an optional speed control system are set during factory assembly but may require additional field adjustment to achieve the desired dampening during position cycle The following procedure can assist in finalizing this setting Rotate the unit ...

Page 37: ...00 Exploded View Figure 6 2 THT 100 Parts Description Part Description A01 Side Shield A02 Card Reader Bracket Optional B01 Top Channel Cover B02 Top Channel Mechanism B03 Ceiling Plate C01 Top Flange Assembly C02 Bottom Flange Assembly C03 Base Plate Assembly w Bearing C04 Rotor Arm Assembly 3 Each D01 Barrier Assembly D02 Barrier Post Cover C04 D01 B01 C03 C02 D02 A02 B03 B02 C01 A01 ...

Page 38: ... Weekly Cleaning It is recommended that a minimum weekly cleaning of the equipment be performed to assure proper operation and optimal function Clean exterior finish with a damp cotton cloth Special finishes can be damaged by abrasive cleaning agents Wipe lens covers on cabinets with soft cloth to clean any buildup from obstructing beams Clean optional lexan panels with soft cloth and mild soap Do...

Page 39: ...g connections especially for damage near moving parts Mechanical Check the anchor mountings and fasten where needed Check the movement of bottom bearing and mounting anchors Lubricate bearing through grease zerk Check the whole installation for correct alignment with floor surroundings Inspect locking pawls for wear Ensure they properly lock and hold Inspect Key override functions Inspect Fire Ala...

Page 40: ...system pulse X X O Duration c Gen Operation X X O 2 Mechanism d Power Fail action X X O A Speed Control unit operat noise X X O e Fire Alarm Function X O B Top Plate Bolts X X O f Wiring connections X O C Centering Disc Blocks X X O g h 3 Electrical i A Inspect Fuses X O j B Main Control Board Functions X O k C Cable Connections X O l D Microswitches X X O 4 Rotor Arms A Mounting Bolts X X O B End...

Page 41: ... on the MCB Powering down the entire THT 100 by shutting down the power and waiting for approx 30 seconds before powering it back up Let the unit fully initialize Check connection of electrical cables to control box Verify proper label and plug connections 9 2 Top Channel Mechanism Speed control dampening option If the speed control system is not dampening properly adjust the shock absorber system...

Page 42: ...d access to authorized persons Capacity Controlled access 1 direction nominal capacity 15 to 30 persons minute Finish Various Stainless steel AISI 304 with a 4 grain finish Powder coated steel galvanized zinc plated steel anodized aluminium finish depending upon model Rotor Arms Various Stainless steel AISI 304 with a 4 grain finish Powder coated steel galvanized zinc plated steel anodized alumini...

Page 43: ...sformer 110 220VAC Control Box 10905 Mains Power Switch Control Box 10904 Main Control Board Control Box 2 5A Fuse Fuse in mains switch 10927 1 5A Fuse Fuse in MCB 17001 Bottom Bearing B334 INA Lower center bearing assembly 100 042 Top Bearing GYA108RRB Upper center bearing assembly 100 128 Locking Pawl Spring LH Typical for Fail Safe 100 129 Locking Pawl Spring RH Typical for FS FL Combo 100 131 ...

Page 44: ...43 Installation and Maintenance Manual Version 10 28 2011 Issue THT 100 IMM USA REV A6 11 2 Electrical Schematics Table 11 1 Electrical Schematic ...

Page 45: ...h incorporates two sets of rotor arms and mechanisms into one extended top channel unit as illustrated in figure below Installation follows the typical THT100 unit Part Description A01 Side Shields A02 Tandem Barrier Assembly A03 Rotor Arm Assembly 6 Each A04 Base Plate Assemblies w Bearings A05 Ceiling Plates A06 Top Channel Mechanism w cover Figure 11 2 THT100 Tandem Unit A04 A02 A01 A03 A06 A05...

Page 46: ...45 Installation and Maintenance Manual Version 10 28 2011 Issue THT 100 IMM USA REV A6 11 4 TASTG Curved Shield Tandem Unit Figure 11 1 TASTG 11 5 THT 100TL Tandem Unit Figure 11 2 TL Tandem ...

Page 47: ...100 46 Boon Edam Inc 402 McKinney Parkway Version Rev A6 10 28 2011 Tel 910 814 3800 fax 910 814 3899 Issue THT 100 IMM USA Enclosures In this chapter specific information regarding the project can be added ...

Page 48: ...0 2361 58202 0 F 49 0 2361 58202 10 Boon Edam Japan Ltd 4th Floor Kyohachi Building 1 16 5 Shinkawa Chuo ku TOKYO 104 0033 Japan T 81 0 3 5117 26 51 F 81 0 3 5117 26 52 Boon Edam A S Arnst Arnebergsvei 30 Postbox 430 N 1324 LYSAKER Norway T 47 0 67 10 3340 F 47 0 67 10 3344 Boon Edam BVBA SPRL Welvaartstraat 14 1 Industriezone Klein Gent B 2200 HERENTALS Belgium T 32 0 14 21 67 17 F 32 0 14 21 67 ...

Reviews: