background image

 
5  Setting up and operating 


bon CP-50 

GA bon CP-50 Rev 1.0 E 271205


8/21


Setting up and operating 

5.1 Setting up 

Depending on the accessories, the chart projector can be mounted on a stand, wall mounted 
or set up on a testing unit column. 
 

5.1.1  Direct projection of the projection screen supplied 

 
Note 
 

1.  The patients’ eyes and the projection screen must be at the same height to ensure 

that the chart is always the right size for the patient and is always at the correct angle. 

2.  The installed projector must always be placed to the side of the patient and usually 

differs in height. Adjust the projection screen according to the angle and to ensure 
maximum reflection of the projector light. 

3.  Ensure that the distance between the patients’ eyes and the projection screen 

(projection distance) is at least 4 m. 5 to 6 m distance is standard 

4.  Ensure that the patient is looking straight through the testing glasses and not at an 

angle, e.g. a phoropter in the centre of the projection screen.   

5.  If using other projection screens ensure that the light density of the testing field is 80 

to 320 cd/m², as stipulated in ISO EN 8596.  


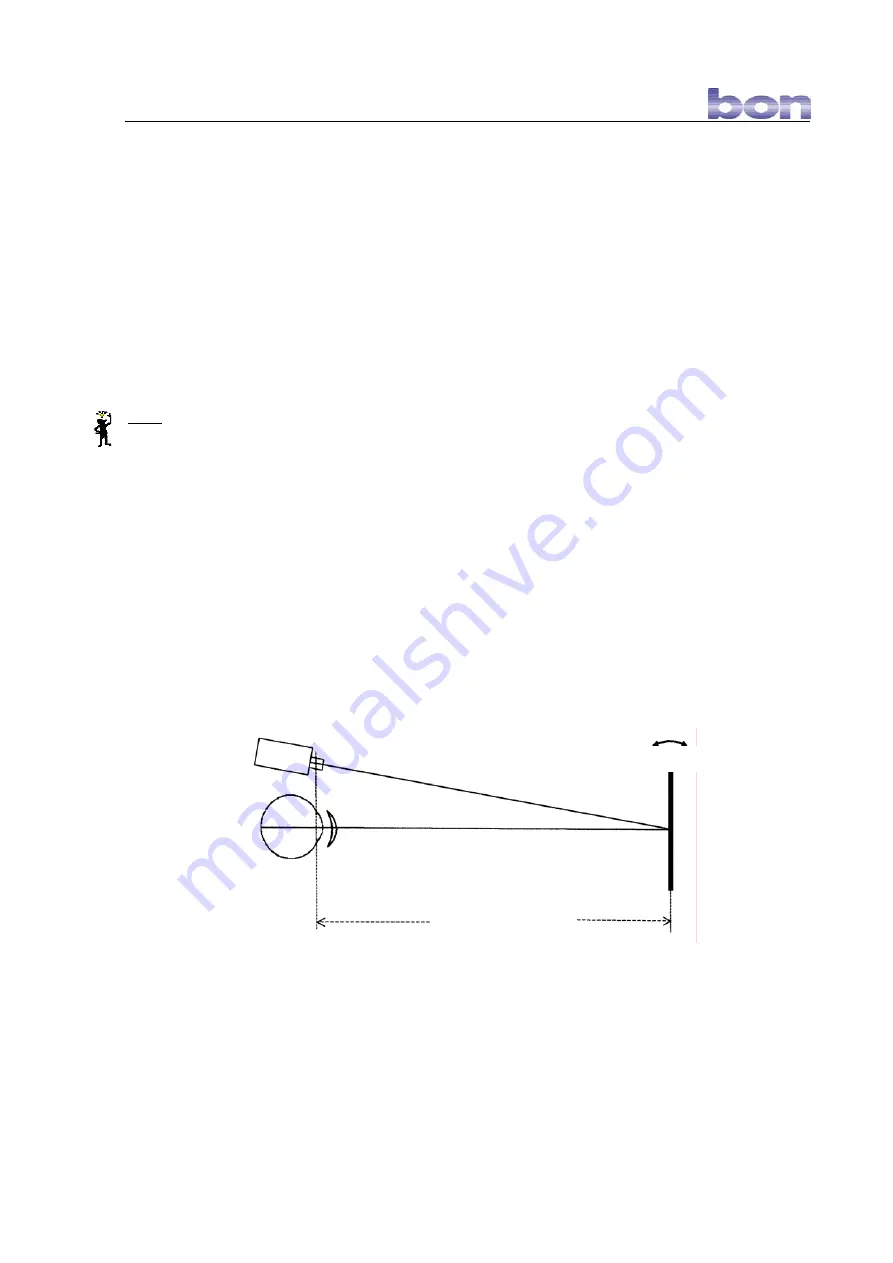
Figure 5-1: Direct projection (top view) 


Projector 

Projection screen 

Patient’s eye 

Projection distance 

Summary of Contents for CP-33

Page 1: ...ernet www bon de Sparkasse zu Lübeck Sort code 230 501 01 Acc No 1 014 885 Swift BIC HSHN DE H1 SPL IBAN DE 2305 0101 0001 0148 85 Commerzbank Lübeck Sort code 230 400 22 Acc No 0 107 755 Postbank Hamburg Sort code 200 100 20 Acc No 409 22 204 bon Optic Vertriebsgesellschaft mbH managing director H Jochen Kaber HR Lübeck HRB 3475 VAT No 161662634 bon CP 50 chart projector ...

Page 2: ...m 9 5 2 Operating 10 6 Operating 11 6 1 Remote control 11 6 2 Special features 12 6 3 Filters 13 6 3 1 Red green filters 13 6 3 2 Polarisation filters 13 6 4 Masks 13 6 5 Programming test series 14 6 5 1 Programming a test series 14 6 5 2 Calling up and ending a test series 14 6 5 3 Changing a test series 14 6 6 Using several projectors in a room 15 7 Care and maintenance 16 7 1 Care 16 7 2 Mainte...

Page 3: ...ing of the symbols in the operating instructions Caution Please observe safety instructions with this symbol to prevent personal danger or damage to property Important Indicates particularly important information to maintain the function of the device system or to extend its life Note Indicates information for correct use so that errors may be avoided This publication may not be copied or transfer...

Page 4: ...he chart projector is manufactured according to the current technical status and the recognised safety regulations and is tested in accordance with strict quality criteria bon Optic only accepts liability for the safety reliability and performance of the device if any changes or repairs have been carried out by a person authorised by bon Optic to do so the power supply to which the device is conne...

Page 5: ...nfrared remote control unit 4 x LR 03 AAA batteries 1 x projection board 1 x red green glasses 1 x pole glasses 1 x dust cover 2 x T 250mA micro fuse 1 x tilt arm 1 x spare bulb 1 x Allen key to open the casing 1 x Allen key to secure the tilt arm Optional accessories To mount set up the device table foot wall fixings For projection Surface mirror Hinged joints ...

Page 6: ...ted selectively using masks The projector enables you to program two separate test series The projector has 5 sets of charts Landolt rings in acuity levels 0 125 to 2 0 Numbers in acuity levels 0 1 to 1 25 Illiterate Es in acuity levels 0 16 to 1 6 Letters in acuity levels 0 05 to 1 6 Illustration for children in acuity levels 0 2 to 1 0 Special features Asticmatic fan test Red green test Bichrome...

Page 7: ...ably trained staff Do not expose to extreme temperatures The recommended temperature range is between 10 C and 40 C The chart projector is not designed to be operated in areas where there is a risk of explosion Do not place any objects on the ventilation vents on the casing This causes the projector to heat up and can destroy it Do not insert any objects on the ventilation vents on the casing Do n...

Page 8: ...lways be placed to the side of the patient and usually differs in height Adjust the projection screen according to the angle and to ensure maximum reflection of the projector light 3 Ensure that the distance between the patients eyes and the projection screen projection distance is at least 4 m 5 to 6 m distance is standard 4 Ensure that the patient is looking straight through the testing glasses ...

Page 9: ...eved using a system of mirrors not supplied Two surface mirrors with angle hinges are required Please observe the information in 5 1 1 To achieve maximum reflection to set up the surface mirrors A and C place a smaller plane mirror on the projection screen B taking care not to damage the projection screen Projection distance a b S1 S2 S3 S4 Figure 5 2 Indirect projection top view S1 S2 S3 S4 ...

Page 10: ...ny key The projector lamp is activated and the corresponding sight test is shown on the projection screen Focussing Turn the thumb wheel on the base of the casing 4 to focus the projected image Figure 5 3 Chart projector front view Figure 5 4 Chart projector back view Press the OFF switch on the remote control to switch off the projection lamp The lamp switches off automatically if no key is press...

Page 11: ...st e Stereo test f Grid cross test g Schober test h Cross cylinder test i Bichrome balance test j Heterophoria test k Heterophoria test with fix point l Aniseikonia test vertikal m Aniseikonia test horizontal n Night myopia test o Dissociation test Control LED Letters 0 05 to 0 8 Illustration for children 0 2 bis 1 0 Numbers 0 1 bis 1 25 Illiterate Es 0 16 bis 1 6 Landolt rings 0 125 bis 2 0 Horiz...

Page 12: ...e refraction balance with polarisation filters Both eyes only register one line Heterophoria test with fix point Polarisation filters to determine heterophoria Vertical and horizontal lines are seen monocularly The fix point is binokular Heterophoria test Polarisation filters to determine heterophoria Vertical and horizontal lines are seen monocularly Aniseikonia test vertical Test with polarisati...

Page 13: ... 6 3 2 Polarisation filters The polarisation filters separately polarise the optotypes in 45 and 135 This function is cancelled by pressing anyone key 6 4 Masks The CP 50 projector allows the follow charts to be selectively shown 0 25 acuity level using a mask disc Landolt rings Numbers Illiterate Es Children s pictures Letters Choose horizontal or vertical masks This function is cancelled by pres...

Page 14: ...cted tests are programmed Step 5 Press Out key 6 5 2 Calling up and ending a test series Call up the test series required with the program keys 1 or 2 The first test is displayed Next test Press c key Previous test Press d key Press any test on the remote control to end a test series 6 5 3 Changing a test series Step 1 Press the 1 or 2 key Step 2 Press the c key until the test to be changed is dis...

Page 15: ... set on the dip switch inside the remote control unit Select the required coding 3 Close the battery compartment 4 Point the remote control unit towards the projector hold down program key IN while switching on the projector at the mains 5 Release program key IN once the projector has confirmed the code following several short and one long signal tones If the projector does not signal that it has ...

Page 16: ...on lens or the infrared receiver Do not use disinfection alcohol 7 2 Maintenance Regular servicing is not required provided the chart projector is used appropriately Please contact bon Optic if repairs are required or in the event of technical problems 7 3 Product safety controls For this device no special safety checks are required In order to meet the requirements of the directive on the operati...

Page 17: ... 4 1 Replacing a fuse Fuse rating see projector type plate Figure 7 1 Chart projector back view 1 Disconnect the mains cable before replacing the fuse 2 Open safety element 2 with a screwdriver 3 Remove the old fuse from its holder and insert the new fuse 4 Replace the fuse holder 1 Mains switch 2 Fuse element ...

Page 18: ...ective plate for 12V 20W 5 Insert the new bulb making sure not to touch it directly 6 Replace the protection plate and close the casing 7 Switch on the device to check that the new bulb works Figure 7 3 Chart projector is opened 7 5 Malfunctions If there are malfunctions in the electromagnet compatibility contact the bon Optic customer service Protection plate and bulb We explicity recommend using...

Page 19: ...e has been used properly and in accordance with the conditions of use Repairs have not been carried out by anyone other than the bon Optic customer service team or persons authorised by bon Optic Guarantee services do not result in extension of the guarantee nor do they represent the start of a new guarantee The sales guarantee is not applicable to consumables The terms and conditions of trade of ...

Page 20: ...type B Fuse rating 0 5 A T 120 V 0 25 A T 230 V Projection distance 2 5 6 5 m Selection speed 0 03 s Inclination 15 Operating conditions Ambient air temperature 10 C to 40 C Relative humidity 30 to 75 Air pressure 700 hPa to 1060 hPa Type plate symbols Transport regulations Fuse Temperature 5 C to 45 C 23 F to 113 F Read operating instructions Air pressure 650 hPa to 1100 hPa Application part type...

Page 21: ...IDB CP 50 Klassifizierung Classification 1 Richtlinie 93 42 EWG Anhang IX Regel 1 1 MDD 93 42 EEC annex IX rule 1 Wir erklären hiermit die Übereinstimmung des vorgenannten Produkts mit der EU Richtlinie 93 42 EWG über Medizinprodukte We declare the compliance of the device with the requirements of the Directive 93 42 EEC on medical devices Angewandete Normen Applicable standards DIN EN 60601 1 03 ...

Reviews: