bObi Classic SW603001 Owner'S Manual Download Page 28

54

55

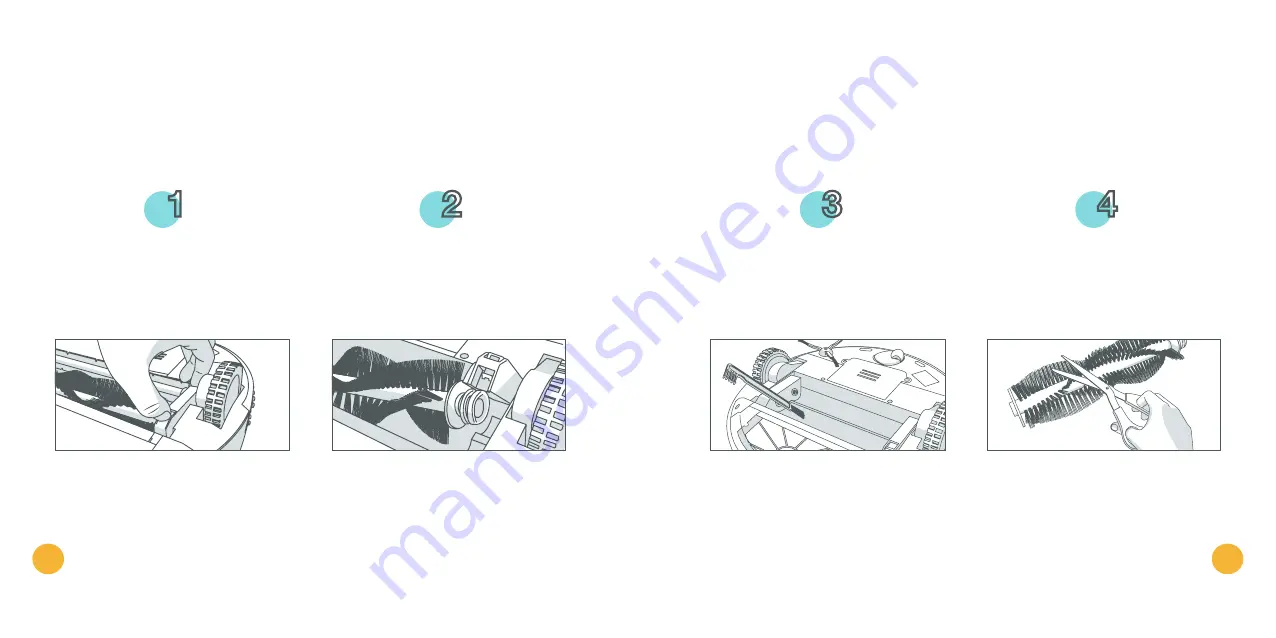
bObi has one bristled brush and one rubber brush. It is recommended that you 

remove and clean bObi’s main brushes every few cleaning cycles.

To remove and clean the main brushes:

Main Brushes

Flip bObi over and press the latch on 

the side of the main brushes.

Use the cleaning tool to remove debris 

from the ends of the brush as well as the 

brush compartment.

Lift the locking bar up and remove the 

main brushes.

You may use a pair of scissors to cut 

away any hair or threads wrapped 

around the brush, or a pair of tweezers 

to remove congestion from the notches 

where the main brush is held.

 1

 3

 2

 4

Summary of Contents for Classic SW603001

Page 1: ...OWNER S MANUAL A guide to your intelligent floor cleaner bObi Classic Model SW603001...

Page 2: ...ad the Quick Start Guide and this manual thoroughly Welcome to the bObsweep family and happy cleaning If you have any questions or concerns feel free to contact our helpful team at support bobsweep co...

Page 3: ...Charging 25 Manual Charging 27 Buttons 30 Syncing Remote 32 Navigational Buttons 33 Current Time Day 38 Cleaning Schedule 40 Auto Resume 43 Mini Mop 48 Dustbin 50 Main Brushes 54 Side Brush 58 UV Lam...

Page 4: ...use her in areas where they may be present Do not use bObi in an enclosed space filled with vapors given off by oil based paint paint thinner moth proofing substances flammable dust or other explosive...

Page 5: ...ol 6 Screwdriver 7 Spare Side Brush 8 Cleaning Tool 9 Pack of Screws 10 Blindfold Stickers 11 Mini Mop Attachment 12 2 Microfiber Mopping Cloths 13 Spare HEPA Filter 14 Owner s Manual Quick Start Guid...

Page 6: ...4 Charging Indicator 5 Touch Sensors 6 Wall Sensors 7 Charging Inlet 8 Power Switch Bottom View 1 Main Brush 2 Rubber Brush 3 Dustbin 4 Right Wheel 5 Left Wheel 6 Side Brush 7 Edge Sensors 8 Front Whe...

Page 7: ...ging Station 2 Remote Control Touchscreen Buttons 1 GO bObi will clean on her default cleaning mode 2 JUICE bObi will search for her charging station to refuel 3 WAFFLE bObi will clean a localized mes...

Page 8: ...Get bObi Ready to Clean...

Page 9: ...ghten the screws 1 2 3 Plug the charging adapter into the side of the charging station The station s blue power light will turn on Place bObi on her charging station with the metal nodes on her front...

Page 10: ...dle with her power switch ON her screen will go blank and she will enter standby mode To wake bObi tap her touchscreen To fully power off bObi flip her power switch OFF bObi s First Clean Clear the ar...

Page 11: ...emove her from her charging station Touchscreen Buttons GO GO is bObi s default cleaning mode bObi will clean a large area until her battery reaches 15 capacity and then she will return to her chargin...

Page 12: ...Charging Station...

Page 13: ...y searches for her charging station when her battery reaches 15 capacity She will chirp stop vacuuming and display JUICE on her cover while searching When bObi detects her charging station she will li...

Page 14: ...al nodes on her front resting against the plates on her station Using the adapter Plug the charging adapter directly into the inlet above bObi s power switch Manual Charging To prolong bObi s battery...

Page 15: ...Remote Control...

Page 16: ...11 WAFFLE 12 GO Remote Control CUR TIME Current Time Sets the current time and weekday SCH TIME Scheduled Time Sets bObi s cleaning schedule All None Selects and deselects all weekdays UV Turns bObi s...

Page 17: ...ld down the remote s navigational buttons to keep bObi moving in the desired direction Release the button when you are done manually driving bObi bObi s edge sensors are located along her front not al...

Page 18: ...Cleaning Schedule...

Page 19: ...4 Thursday 5 Friday 6 Saturday 7 Sunday Signal Indicator Lights up when bObi and her remote communicate UV Indicator Indicates if the UV light is on or off Speed Indicator Indicates bObi s current cle...

Page 20: ...TIME button on bObi s remote Press the FWD and BACK buttons to scroll through the weekdays The first hour digit will start flashing Use the FWD and BACK buttons to adjust the first hour digit When you...

Page 21: ...d the first day of the week number 1 begins to flash The first hour digit under SCHEDULE TIME will start flashing Use the FWD and BACK buttons to adjust the first hour digit Press the FWD and BACK but...

Page 22: ...m she has saved her new schedule 7 8 9 On auto resume mode bObi leaves her charging station EVERY TIME her battery is full to perform back to back cleaning cycles To enable auto resume Auto Resume Mak...

Page 23: ...on the remote s screen Press the SCH TIME button again to save your settings 3 4 To disable auto resume Press the STOP button and FFG0 will reset to the last saved time Press the SCH TIME button agai...

Page 24: ...Parts Maintenance...

Page 25: ...Obi s mop Align the two prongs of the mini mop attachment with their notches on the under side of bObi s dustbin Grip the button on the back of the mop attachment and pull up to unlock Hold the attach...

Page 26: ...es fine particles and allergens and prevents them from escaping back into the air To clean the filter Dustbin HEPA Filter Hold down the eject button on the back of the dustbin Eject the dustbin and re...

Page 27: ...es is her washable dustbin To wash the dustbin first remove the vacuum motor and filter To remove the vacuum motor To reinstall the dustbin Washing the Dustbin Eject the dustbin and remove the HEPA fi...

Page 28: ...bObi over and press the latch on the side of the main brushes Use the cleaning tool to remove debris from the ends of the brush as well as the brush compartment Lift the locking bar up and remove the...

Page 29: ...etal cores remain in place before replacing the brush ends Lower the locking bar until it clicks and locks into place Starting with the rubber brush replace the brushes Insert the socket ends first an...

Page 30: ...ong corners and walls Dirt and dust trapped around the brush can hinder its ability to move freely and reduce bObi s efficiency To clean the side brush Side Brush Remove the side brush using a Phillip...

Page 31: ...an bObi s sensors Wipe the wall and edge sensors using a cloth slightly dampened with cold water or rubbing alcohol Sensors To remove and clean the front wheel Front Wheel Using a flat head screwdrive...

Page 32: ...d sticker and place one onto each of bObi s 4 edge sensors Make sure each sensor is completely covered Remember while bObi is blindfolded she will not be able to detect stairs or edges Blindfold Stick...

Page 33: ...Troubleshooting Checkup Test...

Page 34: ...support bobsweep com or call 1 888 549 8847 for support in the US and Canada Our business hours are Monday Friday 9 am 5 pm PST Visit owners bobsweep com for handy video guides or scan this QR code T...

Page 35: ...of the brushes If bObi displays Error Code 02 while cleaning on a shag carpet or rug you may remove her main brushes and allow her to clean without them but she will not clean as effectively Error Co...

Page 36: ...n and empty it Turn the dustbin around and gently wipe the metal plates on its bottom with a soft dry cloth Look at where the dustbin connects to bObi s body Under the red plastic casing is the dustbi...

Page 37: ...e and GO JUICE and WAFFLE should all remain lit on bObi s cover The 5 lights above the touchscreen buttons should cycle sequentially bObi is now in checkup mode Press RGHT on bObi s remote to cycle th...

Page 38: ...testing her edge sensors Step 2 Firmware Version While in mode 0000 press LEFT on the remote The checkup mode indicator should read 0001 The main 4 digit number in the center of the screen indicates t...

Page 39: ...be tested while she is charging If bObi is fully charged and the voltage is 0000 mv bObi s battery is disconnected Open the battery compartment and check the battery connection Step 4 1 Wall Sensors...

Page 40: ...0 press on any of the touch sensors on the left side of the bumper and the number 6 should be underlined Do the same to the right side and the number 7 should be underlined Step 5 Usage Counter While...

Page 41: ...heckup mode 0302 The main 4 digit number in the center of screen indicates the current of bObi s main brush Normal current for the brushes is below 0280 Vacuum Motor Press LEFT on the remote again to...

Page 42: ...ring some spaces or spending too much time on others but don t worry Rest assured bObi will efficiently clean your home within the course of a full cycle just check bObi s dustbin for the evidence It...

Page 43: ...Warranty FAQs...

Page 44: ...4 uses see page 54 However if you clean them more frequently bObi will be able to store more dirt in her dustbin rather than on her brushes If you notice a thick covering of hair dust and debris on he...

Page 45: ...CHEDULE again to save your settings 6 My bObi won t turn on no matter what I do If bObi does not start after flipping her power switch ON her battery has likely drained too low to operate To recharge...

Page 46: ...here can I buy spare parts Extra parts are available for purchase on our owners website owners bobsweep com With bObi s modular design and our how to videos you can change each individual part easily...

Page 47: ...End User License Agreement...

Page 48: ...or software that you developed for your Bobsweep Any updates or supplements to the Bobsweep Software or the Bobsweep provided to you after the expiration of the one 1 year period are not covered by an...

Page 49: ...bObsweep and bObsweep Inc All rights reserved...

Reviews: