


HMXL44-KIT V2
USER MANUAL
04
www.blustream.co.uk
HMXL44AB-V2
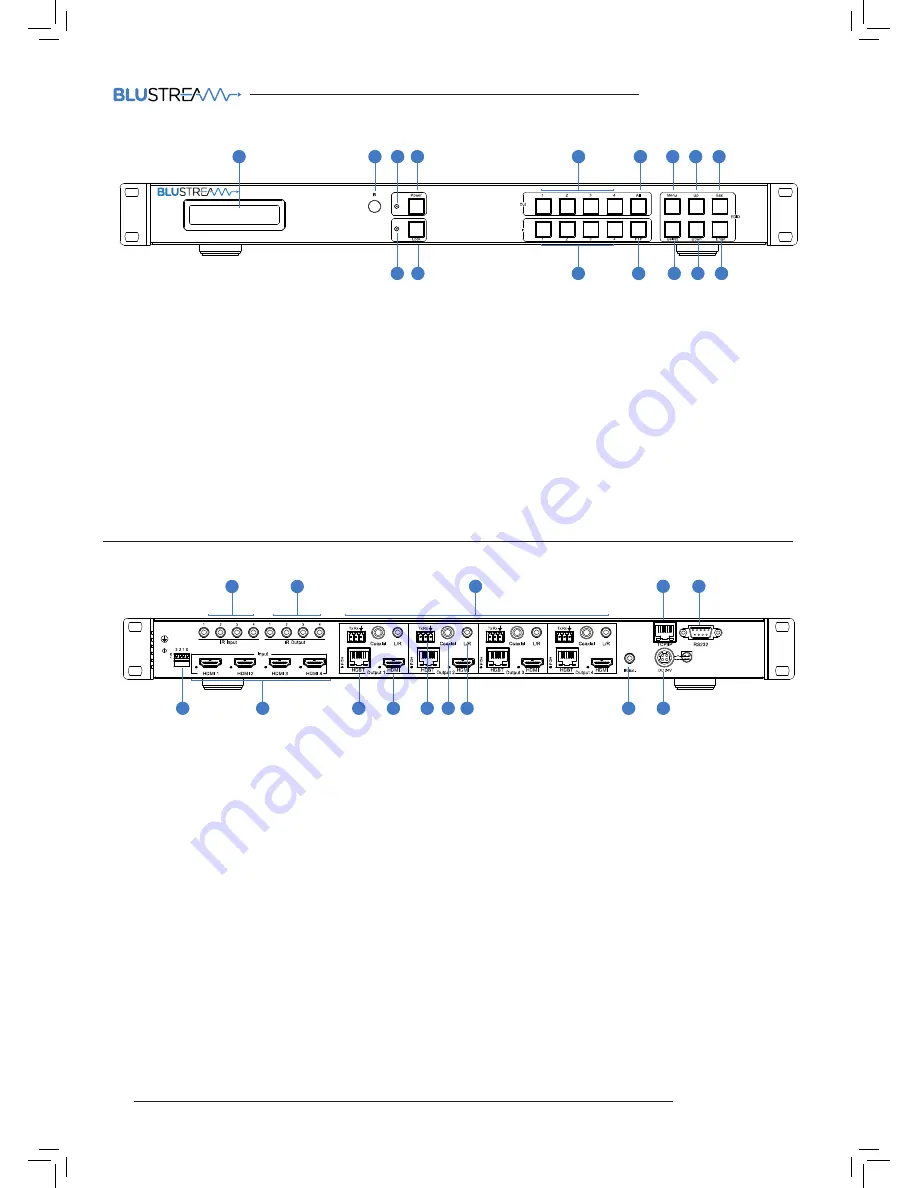
4x4 4K HDBaseT™ Matrix - HDCP 2.2
Rear Panel
1
2
3
4
5
14
12
10
13
11
9
8
7
6
1
IR inputs – 3.5mm stereo jack.
Transmits IR to the zone HDBaseT
receiver (displays). When using the
IRCAB cable (supplied) ensure cable
direction is correct.
2
IR outputs – 3.5mm mono jack –
Routed IR from HDBaseT extender
(zone output). Use supplied
Blustream 5V IR emitters.
3
Zone outputs 1-4 (please see
descriptions 8-12 for further details).
4
TCP/IP (RJ45) – Connect to LAN for
TCP/IP & web browser interface
control of HMXL44 V2 Matrix.
5
RS-232 port – For control of the
Matrix switcher from PC or control
processer.
6
EDID DIP switch – Used for global
EDID settings.
7
HDMI inputs – Connect to HDMI
sources.
8
HDBT output – Connect to HDBaseT
receivers.
9
HDMI output – Connect to HDMI
display. Works simultaneously with
HDBaseT output.
q
Zone specific bi-directional RS-232
ports – Connect to third party control
device to extend RS-232 commands
to HDBaseT receivers RS-232 port.
w
Coaxial digital audio output –
Extracted audio will be concurrent
with the corresponding HDMI video
output.
e
L/R pre-amp variable line level
analogue audio output – 3.5mm
stereo jack. Extracted audio will be
concurrent with the corresponding
HDMI video output.
Please note: input must be PCM 2ch
audio as Matrix does not down-mix
5.1ch audio signals.
r
IR input for matrix control – For
hard wired IR connection. Use 5V
mono cable only. Connect to control
processor or Blustream 5v IR receiver.
t
Power port – Use supplied 24V 3.5A DC
adaptor to power Matrix.
Front Panel
1
2
3
4
5
6
7
8
9
16
15
14
13
12
11
10
1
LCD display – Shows the status of
input/output selection, EDID etc.
2
IR receiver window.
3
Power LED indicator.
4
Power button – Press to power on/
off the Matrix.
5
HDMI output selection button 1 to
4 - To select the output from 1 to 4.
6
All button for HDMI outputs – All
outputs will work as one (Selects all
outputs).
7
Menu button – Press to enter EDID
set mode (see page 5).
8
Up selection button - Press to
change segment’s value.
9
ESC – Press to quit EDID set mode.
q
Lock indicator.
w
Lock button – Press to lock the
buttons of the front panel.
e
HDMI input selection button 1 to 4 –
Press to select the input from 1 to 4.
r
PTP button – Press to mirror all
inputs and outputs (e.g. output 1 to
input 1, output 2 to input 2).
t
Selection button – Press to select
current setting.
y
Down selection button – Press to
change segment’s value.
u
Enter button – Press to set EDID
to specified INPUT or copy EDID
from specified OUTPUT to specified
INPUT.