background image


22 


GENERAL 


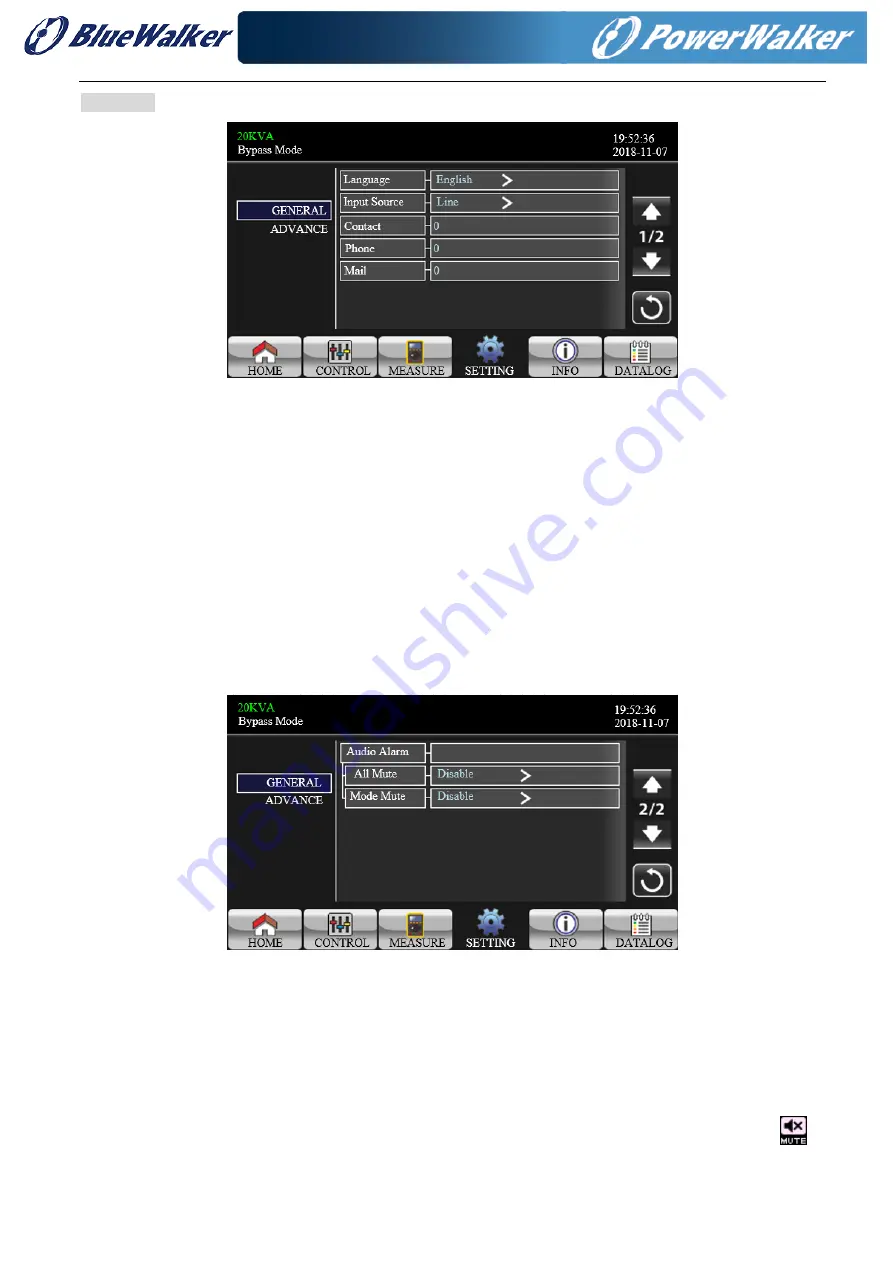
General screen page 1


Language

: Set the LCD language. There are three languages available, English, Simplified Chinese 

and Traditional Chinese.   


Input Source

: Select the input source. There are two options: Line (utility) and generator. Line is 

default setting. This setting value will show on the main page. When “generator” is selected, the 
acceptable input frequency will be fixed at the range of 40~70Hz. This setting value will show on the 
status bar. 


Contact

: Set the name of contact person and the maximum length is 18 characters. 


Phone

: Set the service phone number. Only 0~9, + and – are accepted. The maximum length is 14 

characters. 


Mail

: Set the service email accounts up to two and the maximum length is 36 characters. 


General screen page 2 


Audio Alarm: 

There are two events available to mute. You may choose “Enable” or “Disable” alarm 

when related events occur. 

Enable: When selected, alarm will be mute when related events occur. 
Disable: When selected, UPS will alarm when related events occur.   


All Mute: When “enable” is selected, all the faults and warnings will be mute. It will show 


icon on the top right corner of the main screen. 

Summary of Contents for VFI CPG PF1 3/3 400V 30K

Page 1: ...VFI CPG PF1 3 3 400V 30K 60K 100K 120K 180K 200K VFI CPG PF1 3 3 208V 15K 30K 50K 60K 90K 100K Online UPS Uninterruptible Power Supply System User Manual ...

Page 2: ...Version 1 5 ...

Page 3: ...responsibility or liability for loss or damages whether direct indirect consequential or incidental which might arise out of the use of such information The use of any such information will be entirely at the user s risk Information in this manual is subject to change without notice We make no commitment to update or keep current the information in this manual If you find information in this manua...

Page 4: ...4 2 2 WIRING TERMINAL VIEW 5 2 3 UPS POSITIONING 9 2 4 SINGLE UPS INSTALLATION 10 2 5 UPS INSTALLATION FOR PARALLEL SYSTEM 12 2 6 SOFTWARE INSTALLATION 14 3 OPERATIONS 15 3 1 INITIAL OPERATION 15 3 2 SCREEN DESCRIPTION 15 3 3 AUDIBLE ALARM 39 3 4 SINGLE UPS OPERATION 40 3 5 PARALLEL OPERATION 43 3 6 FAULT CODE 44 3 7 WARNING CODE 46 4 TROUBLE SHOOTING 47 5 STORAGE AND MAINTENANCE 48 5 1 STORAGE 48...

Page 5: ...es on the UPS housing 1 3 Installation Do not connect appliances or devices which would overload the UPS e g big motor type equipment to the UPS output terminal Place cables in such a way that no one can step on or trip over them Do not block air vents on the housing of the UPS Ensure proper unit spacing of ventilation UPS equipped with grounding terminal in the final installation phase connect gr...

Page 6: ...rminal of UPS to a grounding electrode conductor In accordance with safety standard EN IEC 62040 1 installation has to be provided with a Backfeed Protection system as for example a contactor which will prevent the appearance of voltage or dangerous energy in the input mains during a mains fault see figure 24 and respect the wiring diagram of Backfeed Protection depending if the equipment is with ...

Page 7: ...liquid or other foreign objects can enter into the UPS system The UPS can be operated by any individuals with no previous experience 1 6 Standards Safety IEC EN 62040 1 EMI Conducted Emission IEC EN 62040 2 Category C3 Radiated Emission IEC EN 62040 2 Category C3 EMS ESD IEC EN 61000 4 2 CD Level 2 AD Level 3 RS IEC EN 61000 4 3 Level 3 EFT IEC EN 61000 4 4 Level 3 SURGE IEC EN 61000 4 5 Level 3 C...

Page 8: ...acking and Inspection Unpack the package and check the package contents The shipping package should contain One UPS One user manual One monitoring software CD One RS 232 cable option One USB cable One parallel cable only available for parallel model One shared current cable only available for parallel model NOTE Before the installation please inspect the unit Be sure that there is no physical dama...

Page 9: ...5 2 2 Wiring Terminal View Diagram 1 HV 30K LV 15K rear panel ...

Page 10: ...6 Diagram 2 HV 60KL LV 30KL rear panel Diagram 3 HV 60KL LV 30KL input output terminal ...

Page 11: ...7 Diagram 4 HV 100KL HV 120KL LV 50KL LV 60KL Diagram 5 HV 100KL HV 120KL LV front door open view 50KL LV 60KL terminal view ...

Page 12: ...iew 90KL LV 100KL terminal view 1 RS 232 communication port 2 USB communication port 3 Emergency power off function connector EPO connector 4 Share current port 5 Parallel port 6 Intelligent slot 7 External battery connector terminal 8 Line input circuit breaker switch 9 Maintenance bypass switch ...

Page 13: ... 40 C Storage temperature 15ºC 60ºC Relative humidity 0 95 Altitude If the UPS is installed within 1000m the UPS power will not be derated When the height is over 1000m the output power will be derated by following the table Altitude m 1000 1500 2000 2500 3000 3500 4000 4500 5000 Coefficient 100 95 91 86 82 78 74 70 67 Vertical No vibration and the degree of deviation from vertical shouldn t be mo...

Page 14: ... recommended to use AWG 8 or thicker wire for Phase and AWG 4 or thicker wire for Neutral for safety and efficiency NOTE 2 The cable for HV 60KL LV 30KL should be able to withstand over 107A current It is recommended to use AWG 4 or thicker wire for Phase and AWG 1 or thicker wire for Neutral for safety and efficiency NOTE 3 The cable for HV 100KL LV 50KL should be able to withstand over 184A curr...

Page 15: ...rthing wire first when making wire connections Disconnect the earth wire after disconnect the power wire Terminal block wiring diagram for HV 30KL LV 15KL Terminal block wiring diagram for HV 60KL LV 30KL Battery terminal block wiring diagram for HV 60KL LV 30KL ...

Page 16: ...voltage may cause permanent damage of the UPS Make sure the voltage of the battery pack is correct Pay highly attention to the polarity marking on external battery terminal block And make sure the correct battery polarity is connected Wrong connection may cause permanent damage of the UPS Make sure the protective earth ground wiring is correct The wire current spec color position connection and co...

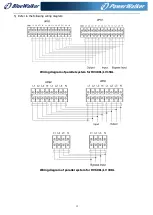
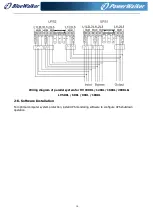
Page 17: ...13 5 Refer to the following wiring diagram Wiring diagram of parallel system for HV30KL LV15KL Wiring diagram of parallel system for HV 60KL LV 30KL ...

Page 18: ...iagram of parallel system for HV 100KL 120KL 180KL 200KL LV 50KL 60KL 90KL 100KL 2 6 Software Installation For optimal computer system protection install UPS monitoring software to configure UPS shutdown operation ...

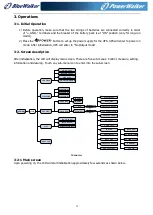
Page 19: ...e are five sub menus Control measure setting information and data log Touch any sub menu icon to enter into the sub screen MAIN Initializing CONTROL DATA LOG MEASURE ON OFF UPS BATTERY TEST MUTE ALL MEASURE1 MEASURE2 MEASURE3 GENERAL BASIC1 BASIC2 SETTING INFO ON OFF CHARGER DATALOG PARAMETERS CALIBRATION EEPROM TOUCH SYS PARAMETER PASSWORD INSTALL INFO VOL CALI CURR CALI INITIAL ELECTRICAL BATTER...

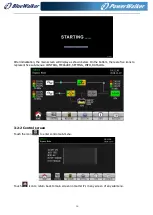
Page 20: ... as shown below On the bottom there are five icons to represent five sub menus CONTROL MEASURE SETTING INFO DATALOG 3 2 2 Control screen Touch the icon to enter control sub menu Touch icon to return back to main screen no matter it s in any screen of any submenu ...

Page 21: ...f the UPS Then the screen will return to main screen Touch Back to return to main screen immediately or No to cancel this operation and back to main screen TURN ON UPS TURN OFF UPS Battery Test It will show Battery Test if the UPS is not in test Touch Yes to start battery test Then it will show Battery testing during battery test period After few seconds battery test result will show on the screen...

Page 22: ...n the top left corner of the main screen Touch Back to return to CONTROL screen immediately or No to cancel this operation and back to CONTROL screen It will show Cancel mute if the UPS is mute already Touch Yes activate audio function or No to keep mute Touch Back to return to CONTRL screen Mute All Cancel Mute all ...

Page 23: ...nd back to CONTROL screen TURN ON CHARGER TURN OFF CHARGER EXIT PARALLEL In the case of multiple machines in parallel clicking this option will pop up the Exit and interface Click Yes to exit the machine from the current parallel system Click No to cancel this operation and return to the operation interface In the case of a single machine clicking this option will pop up the This setting cannot be...

Page 24: ...tage and frequency OUTPUT VOL The real time value of L1 L2 and L3 output voltage L12 L23 L13 voltage and frequency Measure screen page 2 OUTPUT W The real time value of L1 L2 and L3 output power in watt OUTPUT VA The real time value of L1 L2 and L3 output power in VA OUTPUT W The real time value of L1 L2 and L3 output power watt in percentage OUTPUT VA The real time value of L1 L2 and L3 output po...

Page 25: ...L1 L2 and L3 phases Output PF The real time value of output power factor in L1 L2 and L3 phases 3 2 4 Setting screen This sub menu is used to set the parameters of UPS Touch the icon to enter setting menu page There are 2 options Basic and Advanced Touch the icon to return to main screen Touch the icon to go back to previous menu NOTE Not all settings are available in every operation mode If the s...

Page 26: ...t Set the name of contact person and the maximum length is 18 characters Phone Set the service phone number Only 0 9 and are accepted The maximum length is 14 characters Mail Set the service email accounts up to two and the maximum length is 36 characters General screen page 2 Audio Alarm There are two events available to mute You may choose Enable or Disable alarm when related events occur Enable...

Page 27: ...ord to access to the ADVANCE page There are two levels of password protection user and maintainer Entering different level of authority can access to differnet settings ADVANCE User To access to the Advance User Setting menu page the default password is 0000 If entered password is right the page will jump to setting screen If the password is wrong it will ask to enter again Password Error Page ...

Page 28: ...d at 50Hz or 60Hz according to setting of OP Freq The input frequency could be from 46Hz to 64Hz Disable CVCF function is disabled The output frequency will synchronize with the bypass frequency within 46 54 Hz for 50Hz system or within 56 64 Hz for 60Hz system Disable is the default setting Bypass Forbid Enable Bypass forbid is enabled When selected it s not allowed for running in Bypass mode und...

Page 29: ...PS fault or UPS transfers to bypass due to overload on AC mode the UPS will force to turn on bypass output by default Bypass VOL Range Set the bypass voltage range L Low voltage point for bypass The setting range is 176V 209V when UPS is HV system The setting range is 96V 110V when UPS is LV system H High voltage point for bypass The setting range is 231V 264V when UPS is HV system The setting ran...

Page 30: ...omatically shut down The setting range is 10 5V 12 0V 10 7V is default setting BATT Age Set up battery age Battery Parameters Battery AH setting battery capacity MISCELLANEOUS Miscellaneous setting page Auto Restart Enable After Enable is set once UPS shutdown occurs due to low battery and then utility restores the UPS will return to line mode Disable After Disable is set once UPS shutdown occurs ...

Page 31: ...u page it s required to enter password Please contact your local dealer to get maintainer password CAUTION This setting menu is only for qualified technician Otherwise mis operation will cause UPS damage There are five sub menus under Advance Maintainer setting SYS PARAMETER INSTALL INFO VOL CALI CURR CALI INITIAL ELECTRONIC BATT MISCELLANEOUS and UPS SELFTEST SYS PARAMETER SYS PARAMETER Page1 ...

Page 32: ...nt of battery float voltage 13 6V is default setting UPS Type There are two options HV and LV This change is only allowed for qualified technician NOTE It s required to restart the UPS after setting Power Setting Set power factor in percentage Output setting Set UPS output setting There are two selections 3 1 and 3 3 NOTE It s required to restart the UPS after setting Customer Code Set customer co...

Page 33: ... Press up key to increase 0 1 and press down key to decrease 0 1 Press OK key to confirm the modification VOL CALI Page2 Line VOL Line voltage calibration Each click is 0 1 no matter it s pressing up or down key Press up key to increase 0 1 and press down key to decrease 0 1 Press OK key to confirm the modification Output VOL Output voltage calibration Each click is 0 1 no matter it s pressing up ...

Page 34: ...ypass VOL Bypass voltage calibration Each click is 0 1 no matter it s pressing up or down key Press up key to increase 0 1 and press down key to decrease 0 1 Press OK key to confirm the modification CURR CALI CURR CALI Page Output CURR Output current calibration Each click is 0 1 no matter it s pressing up or down key Press up key to increase 0 1 and press down key to decrease 0 1 Press OK key to ...

Page 35: ...creen Touch YES to clear the DATALOG page Touch Back or No to cancel this operation and back to INITIAL menu page INITIAL PARAMETERS Page PARAMETERS After pressing the confirmation window it will pop up as shown in above screen Touch YES to restore default value Touch Back or No to cancel this operation and back to INITIAL menu page ...

Page 36: ...EPROM Page EEPROM After pressing the confirmation window it will pop up as shown in above screen Touch YES to clear all setting value in EEPROM Touch Back or No to cancel this operation and back to INITIAL menu page INITIAL TOUCH Page TOUCH CALI After pressing the confirmation window it will pop up as shown in above screen Touch screen to recalibrate Then the blue screen appears and please click o...

Page 37: ...abled It s not allowed for running in Bypass mode under any situations Disable Bypass Forbid is disabled UPS will run in Bypass mode It is the default setting Neutral Line Check Check if neutral line is correctly connected or not Disable Disable the neutral loss detection function The UPS will not detect the neutral loss or not Auto The UPS will automatically detect the neutral is lost or not If n...

Page 38: ...em The setting range is 96V 110V when UPS is LV system H High voltage point for bypass The setting range is 231V 264V when UPS is HV system The setting range is 139V 146V when UPS is LV system Bypass FRE Range Set the bypass frequency range The acceptable bypass frequency range from 46Hz to 54Hz when UPS is 50Hz system and from 56Hz to 64Hz when UPS is 60Hz system ECO mode Enable Disable ECO mode ...

Page 39: ...y It s a self learning function for battery Enable When enabled it will calibrate the battery virtual capacity and calculate backup time according to a complete charging and discharging process Disable When disabled the backup time will not be updated during the charging and discharging process Battery Initial Yes When selected the battery virtual capacity will be initialized to 100 Because batter...

Page 40: ...utes after the UPS shuts down New Password Set up new password to enter ADVANCE User menu page DefaultUserPassword YES After YES is set User password will restore default setting value NO After NO is set the UPS will cancel this operation BatteryLock Currently this setting is not available UPS SELFTEST This function is only effective when UPS type setting is HV Therefore please disconnect all load...

Page 41: ...the UPS according to the self test instructions Please check local dealer for self test instructions 3 2 5 Information screen Touch the icon to enter information page Touch the icon or to browse information Touch the icon to return to main screen Touch the icon to go back to previous menu Basic Information Page Basic Information MCU Version MCU version DSP Version DSP version Serial NO The serial ...

Page 42: ...able auto bypass function when UPS is off ECO Mode Enable disable ECO function Auto Restart Enable disable auto restart function Parameter Information Page 1 Parameter Information Line VOL Range The acceptable line input voltage range Line FRE Range The acceptable line input frequency range Bypass VOL Range The acceptable input voltage range for bypass mode Bypass FRE Range The acceptable input fr...

Page 43: ...utomatically restart in setting minutes after the UPS shuts down BATT Number It shows battery numbers 3 2 6 Data Log screen Touch the icon to enter date log page Data log is used to record the warning and fault information of the UPS The record contains date time code type and description Touch the icon or to page up or down if there are more than one page in the date log Touch the icon to return ...

Page 44: ...ry mode 1 Make sure that the two strings of batteries are connected correctly at UPS s GND terminals and the breaker of the battery pack is at ON position 2 Press the button to set up the power supply for the UPS UPS will enter to power on mode After initialization UPS will enter to No Output mode 3 A few seconds later the UPS will be turned on and enter to Battery mode 3 Connect devices to UPS Af...

Page 45: ...u need to check the battery status when the UPS is running in AC mode CVCF mode you could touch CONTROL and select Battery Test Refer to Battery Test screen 2 Users also can set battery self test through monitoring software 7 Turn off the UPS with utility power supply in AC mode 1 Touch CONTROL and select On Off UPS icon It will show Turn off UPS in screen and select Yes Refer to On Off UPS screen...

Page 46: ...ult occurs Don t try to turn on the UPS again before solving the issue If the problems can t be fixed please contact the distributor or service personnel immediately 3 For emergency case please cut off connection from utility external battery and output immediately to avoid possible damage to the UPS or equipment 12 Operation in maintaining bypass mode This operation is only available for professi...

Page 47: ...nously and then the parallel system is now complete 5 Turn on the parallel system in Battery mode a Turn on the battery breaker and output breaker of each UPS b Turn on any UPS A few seconds later the UPS will enter to battery mode c Turn on another UPS A few seconds later the UPSs enter to Battery mode and add to the parallel system d If you have the third UPS follow the same procedure of c Then ...

Page 48: ...failure 06 Converter over current 48 Two DSP firmware versions are incompatible in parallel system 11 Inverter soft start failure 60 Bypass phase short circuited 12 High inverter voltage 61 Bypass SCR short circuited 14 Inverter L1 output line to neutral short circuited 62 Bypass SCR open circuited 15 Inverter L2 output line to neutral short circuited 63 Voltage waveform abnormal in L1 phase 16 In...

Page 49: ...45 35 Parallel communication loss 76 INV IGBT over current in L3 phase 36 Parallel output current unbalance 77 ISO Over temperature 41 Over temperature 78 LCD MCU communication failed ...

Page 50: ...m 04 IP phase abnormal 33 Locked in bypass after overload 3 times in 30 minutes 05 Bypass phase abnormal 34 Converter current unbalanced 07 Over charge 3A Cover of maintain switch is open 08 Low battery 3C Utility extremely unbalanced 09 Overload 3D Bypass is unstable 0A Fan failure 3E Battery voltage too high 0B EPO enable 3F Battery voltage unbalanced 0D Over temperature 40 Charger short circuit...

Page 51: ...the UPS and restart it Fault code is shown as 43 UPS is overload too long and becomes fault Then UPS shut down automatically Remove excess loads from UPS output and restart it Fault code is shown as 14 15 16 17 18 or 19 The UPS shut down automatically because short circuit occurs on the UPS output Check output wiring and if connected devices are in short circuit status Other fault codes are shown ...

Page 52: ...d precautionary measures may replace batteries and supervise operations Unauthorized persons must be kept well away from the batteries Verify that no voltage between the battery terminals and the ground is present before maintenance or repair In this product the battery circuit is not isolated from the input voltage Hazardous voltages may occur between the battery terminals and the grounding earth...

Page 53: ... ms When phase lock fails 4ms interruption occurs from inverter to bypass Inverter ECO 10 ms EFFICIENCY AC Mode 95 5 ECO Mode 98 5 Battery Mode 94 5 BATTERY Type Depending on applications Numbers 32 40 adjustable Charging Current max 1 12A adjustable 1 18A adjustable 2 36A adjustable 3 54A adjustable Charging Voltage 13 65 VDC N 1 N 16 20 PHYSICAL Standard Model Dimension D X W X H mm 815 x 300 x ...

Page 54: ...rter Bypass 0 ms When phase lock fails 4ms interruption occurs from inverter to bypass Inverter ECO 10 ms EFFICIENCY AC Mode 93 5 ECO Mode 98 5 Battery Mode 92 5 BATTERY Type Depending on applications Numbers 32 40 adjustable Charging Current max 1 12A adjustable 1 18A adjustable 2 36A adjustable 3 54A adjustable Charging Voltage 13 65 VDC N 1 N 16 20 PHYSICAL Standard Model Dimension D X W X H mm...

Reviews: