background image

PAGE  12

PREP TABLE

8. MAINTENANCE PROCEDURES

WARNING:

 DISCONNECT ELECTRICAL POWER SUPPLY BEFORE CLEANING ANY PARTS ON THE UNIT.

8A - CLEANING LOWER STORAGE CABINET

Use warm, soapy water to clean lower storage cabinet and doors. NEVER use cleaners containing grit, 
abrasive materials, bleach or harsh chemicals. Rinse thoroughly and dry with a clean soft cloth. Always 
rub in the same direction as the grain pattern on the stainless steel.  

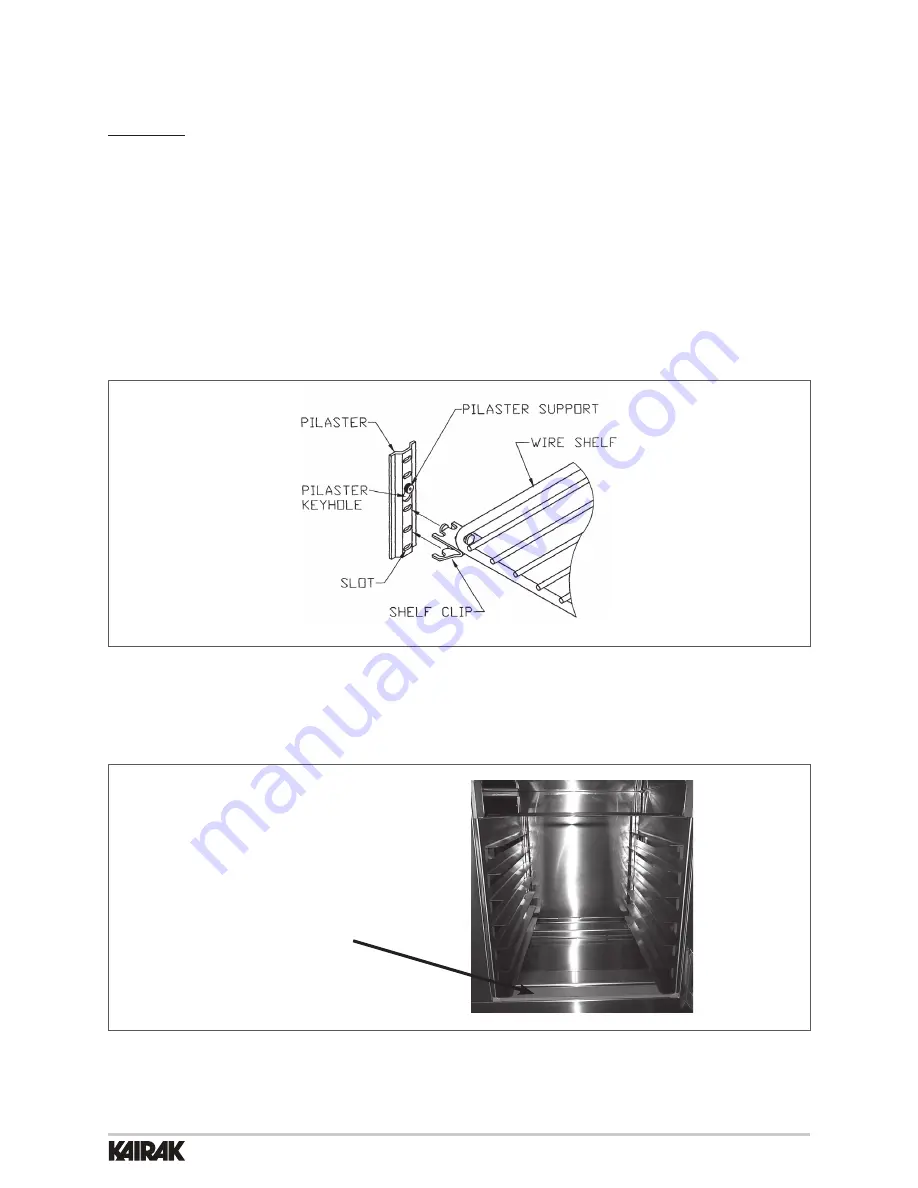
To clean the inside of the lower storage cabinet, remove wire shelves. All wire shelves are adjustable and 
can be easily removed. Clean shelving in a sink. If shelf clips have been removed, make sure the four clips 
per shelf are at same height in pilaster. The shelf clips have a small projection on top which holds the shelf 
in position and prevents it from slipping forwards. The clip must be “snapped” in place by squeezing clip 
together and inserting into slot in pilaster keyhole. (See Fig. 5)

FIG. 5

If equipped with tray slides, the tray slides can be removed by lifting up on the front of the tray slide 
assembly to allow the front tray slide frame to clear the bottom of the door opening, then pull the frame 
assembly out. (See Fig. 6)

FIG. 6

TRAY SLIDE FRAME

Summary of Contents for K99597F15

Page 1: ...INSTRUCTION MANUAL KBP PREP TABLE ...

Page 2: ...ng door or drawer locks and optional door hinging REMOTE REFRIGERATION BLU Kairak is committed to producing environmentally friendly and sustainable product offerings without sacrificing quality or reliability Kairak s Remote Refrigeration System assures customers maximum energy savings and a substantially smaller environmental footprint PAGE 1 PREP TABLE KAIRAK 4401 Blue Mound Rd Fort Worth TX 76...

Page 3: ... at Night C Leaving Food Product at Night 7 OPERATION A Pan Chiller B Lower Storage Cabinet C Shutdown for Extended Periods 8 MAINTENANCE PROCEDURES A Cleaning Lower Storage Cabinet B Cleaning Pan Chiller C Cleaning Condensing Unit D Cleaning Air Filter E Cleaning Evaporator Coils 9 TROUBLESHOOTING GUIDE 10 TIPS 11 PRODUCT REGISTRATION INFO 12 WARRANTIES PAGE 3 PAGE 4 PAGE 4 PAGE 4 PAGE 4 PAGE 5 P...

Page 4: ...ut your Kairak product such as the model and serial number The tag is located inside the storage cabinet on all standard KBP model refrigerated units Prior to installation test the electrical service to assure that it agrees with the specifications of the equipment marked on the serial tag READING THE SERIAL TAG 1 THE SERIAL TAG ...

Page 5: ...ion You may contact Kairak customer care at 800 833 1106 3 INSTALLATION 3A UNPACKING Inspect equipment for shipping damage prior to installation If shipping damage is found save the packing materials and contact the carrier within 5 days of delivery Some components are packed and shipped inside the lower storage cabinet to avoid damage during shipment Remove these items from the cabinet and remove...

Page 6: ...PAGE 5 PREP TABLE 3 INSTALLATION CONTINUED 3C INSTALLING LOOSE PARTS Place cutting board so that holes in cutting board line up with pins on the counter top See Fig 1 FIG 1 CUTTING BOARD COUNTER ...

Page 7: ...ire panel Slide the filter into the tracks located below the compressor compartment Be careful not to catch the filter on sharp edges when installing Replace louvered panel by installing top of panel into track and pushing in the bottom so that the locking clips fit inside the opening See Fig 2 FIG 2 INSTALLING FILTER REPLACING LOUVERED PANEL ...

Page 8: ...compressor compartment This is your glycol system See Fig 3 The glycol used is a non toxic food grade propylene glycol 5 Check fill tank level small plastic tank A small amount of glycol may spill from tank during shipment Prior to startup tank should be approximately 1 2 full Add 35 Propylene Glycol if necessary 6 Next inspect the two insulated hoses located in the back of the compressor compartm...

Page 9: ...blue LED Temperature Display located just above the louver panel See Fig 4 5 At start up the readout will read H1 This signifies that the temperature is above normal operating range The reading will alternate every 5 seconds displaying the refrigerated cabinet temperature and the glycol liquid temperature 6 When the liquid temperature cools to 30 F the unit is ready to go 4 STARTUP INSTRUCTIONS CO...

Page 10: ...n the back of the unit for electrical ratings 5 ELECTRICAL CONNECTIONS 6A CONTROL TEMPERATURE SETTINGS BLU Prep Tables are designed with four optional factory pre set temperature settings All temperature settings can be adjusted only by an Authorized Kairak Service Agent The LED Display is located above the compressor compartment with a blue light indicating which cooling zone is activated These s...

Page 11: ... cover pan chiller section with provided night cover to prevent refrigeration from escaping 6C LEAVING FOOD PRODUCT IN THROUGHOUT THE NIGHT RECOMMENDED This unit is preset at factory and does not require periodic shutdowns for defrost cycle This upgraded BLU refrigeration system eliminates the operational burden of removing food pans prior to the defrost period or for overnight storage No defrost ...

Page 12: ...e that the existing refrigeration equipment be sized properly and in good working condition 8 Kairak recommends specified pans for optimum performance 7B LOWER STORAGE CABINET The lower storage cabinet is designed to maintain temperature between 33 F and 40 F If the base is overloaded with warm food products a certain amount of time is required to remove heat from items before operating temperatur...

Page 13: ...e shelves All wire shelves are adjustable and can be easily removed Clean shelving in a sink If shelf clips have been removed make sure the four clips per shelf are at same height in pilaster The shelf clips have a small projection on top which holds the shelf in position and prevents it from slipping forwards The clip must be snapped in place by squeezing clip together and inserting into slot in ...

Page 14: ...rawer frame module can be removed by loosening the black clamping knob on the Cross Rail Locks and Liner Locks Pull the Cross Rail Locks toward the center of the drawer frame module and allow the Liner Locks to drop away from the top of the liner The entire frame assembly is now free to slide out of cabinet See Figs 7 8 LINER LOCK BACK CLAMPING KNOB CROSS RAIL LOCK 1 ON EACH SIDE OF DRAWER FIG 7 D...

Page 15: ...in must be cleared cleaned regularly for proper operation Drains should be cleaned a minimum of once a month The drain in the pan chiller compartment is typically located above the louvered compressor compartment A removable screen has been provided to prevent the drain from clogging See Fig 9 Clear drain of dirt and debris so that condensate can flow freely If drain is piped to floor sink pan chi...

Page 16: ...ng up and out Remove rear access panel located in the back of unit A phillips head screwdriver is required to remove rear access panel Carefully clean dirt and lint from the condenser coil using a vacuum cleaner or soft brush do not use a wire brush 8D CLEANING AIR FILTER The filter is located behind the louvered panel below the condensing unit in the compressor compartment Remove filter by carefu...

Page 17: ... liquid temp warmer than 35 F 4Prep top overloaded with warm food product food temperature above 41 F 4Remove warm food product and replace with properly chilled product food must be colder than 41 F before placement into prep top 4 Chiller plates are coated in water and or ice thin layer 4Normal operation 4No action required Condensation on the chiller plates will occur in most kitchen environmen...

Page 18: ...ny other solid object in front of compressor areas air flow is needed for proper breathing 9 Be aware of condensate evaporator some models and plug underneath unit particularly when mopping or sweeping Also make sure plug is fully sealed 10 Evaporator coils in bases should be cleaned every 6 months Unplug unit or disconnect power then access by removing the 4 Phillips head screws on the rear acces...

Page 19: ...before freight charges are paid File claim for damages with freight agent immediately BLU FIXTURES manufactured by Kairak hold a 3 year parts and labor warranty Kairak holds a 5 year compressor warranty with a one time compressor only replacement after the first year Kairak will warranty the labor to replace the compressor for the first three years 30 days from the ship date After the first three ...

Page 20: ...NOTES ...

Page 21: ...KAIRAK 4401 Blue Mound Rd Fort Worth TX 76106 Phone 714 870 8661 Web www kairak com KAIRAK a division of ITW Food Equipment Group LLC All Rights Reserved Rev 4 10 ...

Reviews: