background image

Operation

30

Blodgett IQ2

T

 Vision Control

PRODUCT KEY PROGRAMMING
To enter the product programming mode

1. Press and hold the PROGRAM KEY (3). The

DISPLAY (2) reads:

Prod Cnt

Programming

Use the PROGRAM ARROW KEYS (4) to highĆ

light Programming. Press the PROGRAM KEY

(3) to select. The display reads:

ENTER CODE

Use the PRODUCT KEYS (14) to enter the proĆ

gramming access code 1724. Press the PROĆ

GRAM KEY (3). The display reads:

RECIPE

Press the PROGRAM KEY (3). All of the prodĆ

uct LEDSs will light and the display reads:

Select Product

To Program

To select the product to program

2. Press  the  desired  product  key.  The  display

reads:

All

Name

With  All  highlighted,  press  the  PROGRAM

KEY (3). The display reads:

Product Name

AAA

The  first  alphabetical  listing  in  the  product

name library appears.

3. To change the product name, use the PROĆ

GRAM ARROW KEYS (4) to scroll through the

product name library. When the desired prodĆ

uct name is highlighted, press the PROGRAM

KEY (3) to select.

To program the product

4. The display reads:

Shelf Cook

XXX

Definition:

 Shelf cook enables the operĆ

ator to reference product to one of the

five shelf positions in the oven. At the

end of a shelf cooking cycle the oven

will display the name of the product and

the shelf number that is ready to be

pulled. 

Shelf cooking is not available

for multiĆstage recipes.

Use non shelf cooking when you do not

need to reference product to one of the

five shelf positions in the oven. Non

shelf cooking may be used for single

stage recipes and 

MUST be use for

multiĆstage recipes.

Use the PROGRAM ARROW KEYS (4) to seĆ

lect either YES (for shelf cooking) or NO (for

non shelf cooking).  Press the PROGRAM KEY

(3).

5. The display reads:

Stage 1 Time

XX:XX

Use the PRODUCT KEYS (14) to enter the deĆ

sired cook time. Press the PROGRAM KEY (3).

6. The display reads:

Stage 1 Temp

XXXF (or C)

Use the PRODUCT KEYS (14) to enter the deĆ

sired cook temperature. Press the PROGRAM

KEY (3).

Summary of Contents for DFG-50

Page 1: ...TENANCE DFGĆ50 FOURS À CONVECTION MANUEL D INSTALLATION FONCTIONNEMENT ENTRETIEN BLODGETT OVEN www blodgett com 44 Lakeside Avenue Burlington Vermont 05401 USA Telephone 802 658Ć6600 Fax 802 864Ć0183 PN 17355 Rev R 8 10 E 2010 G S Blodgett Corporation ...

Page 2: ...TRETIEN NON CONFORME AUX NORMES PEUT CAUSER DES DOMMAGES À LA PROPRIÉTE DES BLESSURES OU LA MORT LISEZ ATTENTIVEĆ MENT LES DIRECTIVES D INSTALLATION D OPÉRATION ET D ENTRETIEN AVANT DE FAIRE L INSTALLATION OU L ENTRETIEN DE CET ÉQUIPEMENT The information contained in this manual is important for the proper installation use and maintenance of this oven Adherence to these procedures and instrucĆ tio...

Page 3: ...ett ovens contact your Blodgett representative Cela fait maintenant dessus un siècle et demi que Blodgett se spécialise dans la fabrication de fours Nous avons établi les normes de qualité qui s appliĆ quent dans l industrie à tous les types de fours utilisés dans les services aliĆ mentaires quel qu en soit la taille l exploitation ou le budget En fait ni n offre plus de modèles de tailles et d ap...

Page 4: ... Address Adresse de votre agence de service Model Modèl Serial Number Numéro de série Your oven was installed by Installateur de votre four Your oven s installation was checked by Contrôleur de l installation de votre four ...

Page 5: ... and Preventative Maintenance 40 Troubleshooting Guide 41 Introduction Description et Spécifications du Four 42 Éléments du Four 43 Installation Livraison et Implantation 44 Montage du bâti 45 Montage du Four 47 Assemblage du Four sur le Socle 47 Pose des Pieds 48 Mise à Niveau du Four 48 Ventilation 49 Hotte D évacuation Type Voûte 49 En Prise Directe 50 Branchements de Service Normes et Codes 51...

Page 6: ...e cooking chamber before being vented from the oven resulting in substantial reĆ ductions in energy consumption and enhanced oven performance GAS SPECIFICATIONS U S Canada and General Export Natural Gas Propane Gas US Units SI Units US Units SI Units Heating Value 1000 BTU cu ft 37 3 MJ m3 2550 BTU cu ft 95 0 MJ m3 Specific Gravity air 1 0 0 63 0 63 1 53 1 53 Gas Manifold Pressure 3 5 W C 87 kPa 1...

Page 7: ...gas ovens Control Panel contains wiring and components to control the oven operation Oven Racks five racks are provided standard Additional racks are available Rack Supports hold oven racks Blower Wheel Cover located on the side interiĆ or wall of the oven Protects the blower wheel Blower Wheel spins to circulate hot air in the baking chamber Convection Motor provides power to turn the blower whee...

Page 8: ...30 cm D Oven body back 12 30 cm NOTE On gas models routine servicing can usuĆ ally be accomplished within the limited movement provided by the gas hose reĆ straint If the oven needs to be moved furĆ ther from the wall the gas must first be turned off and disconnected from the oven before removing the restraint Reconnect the restraint after the oven has been reĆ turned to its normal position It is ...

Page 9: ... upside down on a work surĆ face 2 Attach one leg to each of the corner stud bolts on the bottom of the stand top 3 Place a lock washer and nut on each stud and tighten securely 4 The stand is now ready for the oven assembly Stands With Shelves 1 Place stand frame upside down on a work surĆ face 2 Attach one leg to each of the corner stud bolts on the bottom of the stand top 3 Place a lock washer ...

Page 10: ... of the leg through the leg and through the shelf corĆ ner bracket 6 Place a lock washer and nut on each bolt and tighten securely See the Figure 2 7 Repeat Steps 3 6 for the top shelf NOTE Be sure the slots in the top shelf are aligned with the support angles 8 Insert the top of the rack stops into the two back clips on the angle supports as shown InĆ sert the bottom of the rack stops into the sl...

Page 11: ... single section ovens only For double stacked ovens step 8 will be completed once the ovens are stacked Figure 4 Double Section 1 Assemble the lower section to the stand as deĆ scribed DO NOT replace the side control compartment or close the front control panel 2 With a tool punch out the knockĆouts in the oven top of the lower oven 3 Remove the side control compartment cover and open the front co...

Page 12: ...n corĆ ners Tighten the hex nut at the top of each leg 3 Tip the oven up on the legs 4 Turn the adjustable leg feet to level the oven Figure 6 OVEN LEVELING After assembly the oven should be leveled and moved to the operating location 1 The oven can be leveled by adjusting the feet or casters located on the bottom of each leg ...

Page 13: ...disĆ tributor please call the Blodgett Oven Company at 0011Ć802Ć860Ć3700 WARNING Failure to properly vent the oven can be hazardous to the health of the operator and may result in operational problems unsatisfactory baking and possible damĆ age to the equipment Damage sustained as a direct result of imĆ proper ventilation will not be covered by the manufacturer s warranty CANOPY TYPE EXHAUST HOOD ...

Page 14: ...o a hood The flue should be capped with a UL Listed type vent cap to isolate the unit from exterĆ nal environmental conditions The direct vent cannot replace air consumed and vented by the oven Provisions must be made to supply the room with sufficient makeĆup air Total makeĆup air requirements for each oven section should be approximately 19 CFM per section To increase the supply air entering the...

Page 15: ...autions required and have complied with all requirements of state or local authorities having jurisdiction U S and Canadian installations Installation must conform with local codes or in the absence of local codes with the National Fuel Gas Code NFPA54 ANSI Z223 1 Latest Edition the Natural Gas Installation Code CAN CGAĆ B149 1 or the Propane Installation Code CAN CGAĆB149 2 as applicable Installa...

Page 16: ...U Since the total required gas pressure 257 500 BTU is less than 320 000 BTU the current gas piping will not have to be inĆ creased NOTE The BTU capacities given in the tables are for straight pipe lengths only Any elbows or other fittings will decrease pipe capaciĆ ties Contact your local gas supplier if you have any questions Maximum Capacity of Iron Pipe in Cubic Feet of Natural Gas Per Hour Pr...

Page 17: ...ulator is essenĆ tial to the proper operation of the oven and should not be removed It is preset to provide the oven with 3 5 W C 0 87 kPa for natural gas and 10 5 W C 2 50 kPa for Propane at the manifold DO NOT INSTALL AN ADDITIONAL REGULATOR WHERE THE OVEN CONNECTS TO THE GAS SUPPLY UNLESS THE INLET PRESSURE IS ABOVE MAXIMUM Prior to connecting the oven gas lines should be thoroughly purged of a...

Page 18: ...ng cable supplied with the flex hose WARNING If the restraint is disconnected for any reason it must be reconnected when the oven is returned to its original position U S and Canadian installations The connector must comply with the Standard for Connectors for Movable Gas Appliances ANSI Z21 69 or Connectors For Moveable Gas ApĆ pliances CAN CGAĆ6 16ĆM87 and a quick disconĆ nect device that compli...

Page 19: ... SUME RESPONSIBILITY FOR LOSS OR DAMAGE SUFFERED AS A RESULT OF IMPROPER INSTALĆ LATION WARNING This appliance is equipped with three prong grounding type plug for your protection against shock hazard and should be plugged directly into a properly grounded three prong receptacle DO NOT cut or remove the grounding prong from this plug ELECTRICAL SPECIFICATIONS Model Hz Volts Phase Amps Electrical C...

Page 20: ...nded pressure requirements allow the oven to burnĆoff for 2 hours If the pressure readings are not set correctly turn off the oven and readjust accordingly WARNING The break in procedure burns off excess oils present in the metals during fabricaĆ tion Smoke may be produced Proper ventilation is required ADJUSTMENTS ASSOCIATED WITH INITIAL INSTALLATION Each oven and its component parts have been th...

Page 21: ...ell gas D DO NOT try to light any appliance D DO NOT touch any electrical switches D Use an exterior phone to call your gas supplier immediately D If you cannot reach your gas supplier call the fire department What to do in the event of a power failure D Turn all switches to off D DO NOT attempt to operate the oven until the power is restored NOTE In the event of a shutĆdown of any kind alĆ low a ...

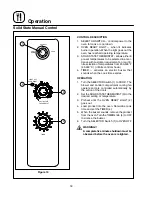
Page 22: ...rom 200Ć500_F 95Ć260_C infinite control shown 4 TIMER activates an electric buzzer that sounds when the cook time expires OPERATION 1 Turn the SELECTOR Switch 1 to COOK The blower and control compartment cooling fan operate and are controlled automatically by the action of the doors 2 Set the SOLID STATE THERMOSTAT 3 to the desired setting or temperature 3 Preheat until the OVEN READY LIGHT 2 goes...

Page 23: ...P KEY used to show set temperature in the display NOTE Actual temperature is shown while the TEMP key is held down 10 HOLD KEY turns Hold Mode on or off 11 PULSE KEY turns Pulse Mode on or off PROGRAMMING To set the cook temperature 1 Press TEMP 9 key 2 Rotate dial 6 to enter temperature To set the cook time 1 Press TIME 8 key 2 Rotate the dial 6 to enter time NOTE Time is entered in hours minutes...

Page 24: ...zer turns off after a few seconds The disĆ play reads HOLD until the oven reaches the hold temperature Then the timer begins to count up 7 Push the START STOP key 7 to stop timer 8 Remove the product 9 Push HOLD 10 key to turn off hold mode Cook with Pulse NOTE PULSE light is on when pulse mode is on and off when pulse mode is off 1 Turn the SELECTOR SWITCH 1 to the deĆ sired position 2 Enter cook...

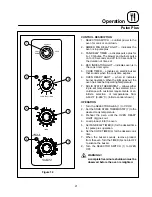
Page 25: ...operation When the light goes out the oven has reached operating temperature 7 SOLID STATE THERMOSTAT allows either 8 preĆset temperatures to be selected in acĆ cordance with customer requirements or an infinite selection of temperatures from 0Ć500_F 0Ć260_C infinite control shown OPERATION 1 Turn the SELECTOR Switch 1 to COOK 2 Set the SOLID STATE THERMOSTAT 7 to the desired cook temperature 3 Pr...

Page 26: ...indicates burner operation When the light goes out the oven has reached operating temperature 3 COOK THERMOSTAT controls oven temĆ perature in the cook cycle 4 COOK TIMER activates an electric buzzer that sounds when the cook time expires 5 HOLD THERMOSTAT controls oven temĆ perature in the hold cycle 6 HOLD LIGHT Ć indicates the oven is in hold 7 COOK HOLD TIMER controls the length of cook time f...

Page 27: ...operate and are controlled automatically by the action of the doors 2 Set the COOK THERMOSTAT 3 to the deĆ sired cook temperature 3 Set the HOLD THERMOSTAT 5 to the deĆ sired hold temperature 4 Preheat the oven until the OVEN READY LIGHT 2 goes out 5 Load product into the oven 6 Turn the SELECTOR Switch 1 to COOK HOLD 7 Set the COOK HOLD TIMER 7 to the deĆ sired cook time 8 When the cook time ends...

Page 28: ...loaded 5 TEMPERATURE DISPLAY gives cook and hold temperatures 6 HEAT INDICATOR when lit indicates the oven is heating 7 TEMPERATURE ARROW KEYS press to enĆ ter cook and hold temperatures 8 HOLD KEY turns hold mode on or off 9 TEMP KEY press to display actual oven temperature 10 FAN KEY turns pulse mode on or off The LED above the fan key is always on 11 PRODUCT KEYS three programmable keys 12 MANU...

Page 29: ...en is at the set temperature Load product into the oven 7 Press the START KEY 13 The TIME DISPLAY 2 counts down The manual key LED flashes 8 When the cook time expires both displays flash and an audible alarm sounds for several seconds then self cancels The hold key LED flashes The time display begins to count up while the oven cools to the hold temperature When the oven reaches the hold temperatu...

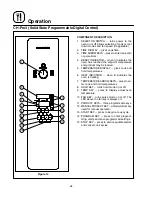
Page 30: ...to the hold temperaĆ ture and the time display counts up 6 Remove the product 7 Turn the SELECTOR SWITCH 1 to OFF to shut down the oven PROGRAMMING THE PRODUCT KEYS 1 Turn the SELECTOR SWITCH 1 to the deĆ sired position 2 Press the desired PRODUCT KEY 11 The product and fan key LEDs light 3 Press and hold the PROGRAM KEY 14 until the corresponding LED flashes approximateĆ ly five seconds 4 Press t...

Page 31: ...EY Press to view time remaining on multiple cook cycles and to review recipe proĆ gramming 10 COOL DOWN KEY press to enter the cool down mode 11 TEMP TOGGLE CLEAR KEY press during programming to toggle options 12 HOLD KEY press to enter hold mode 13 SET BACK KEY 14 PRODUCT KEYS 1Ć10 assigns a key to a programmed recipe and begins a proĆ grammed cooking process Also used to enĆ ter numeric values i...

Page 32: ...ct name and counts down the remaining cook time NOTE If the selected product has a cook time of greater than 59 59 the DISPLAY 2 switches to hours minutes NOTE If the selected product is a single stage recipe the LEDS for all single stage products with the same cook temperaĆ ture and fan speed will light If the seĆ lected product is a multiple stage recĆ ipe no other product LEDS will light NOTE P...

Page 33: ...d hold the SCAN KEY 9 The display cycles through the remaining cook times for each product Only the led for the product with the cook time displayed will be lit 5 When a cook time expires an alarm sounds The display reads DONE The led for the finished product lights All other LEDS are dark 6 Press the SHELF KEY 16 for the finished product to silence the alarm Remove the product Close the oven door...

Page 34: ...gh the product name library When the desired prodĆ uct name is highlighted press the PROGRAM KEY 3 to select To program the product 4 The display reads Shelf Cook XXX Definition Shelf cook enables the operĆ ator to reference product to one of the five shelf positions in the oven At the end of a shelf cooking cycle the oven will display the name of the product and the shelf number that is ready to ...

Page 35: ...lect the fan cycle If heat or full are selected skip to step 10 If pulse is selected the display reads Stage 1 Fan On XX XX Use the PRODUCT KEYS 14 to enter the deĆ sired length of the time the fan should be on in the pulse cycle Press PROGRAM KEY 3 The display reads Stage 1 Fan OFF XX XX Use the PRODUCT KEYS 14 to enter the deĆ sired length of the time the fan should be off in the pulse cycle Pre...

Page 36: ...e of 00 00 is entered skip to step 13 Press the PROGRAM KEY 3 13 The display reads Hold Temp XXXF Use the PRODUCT KEYS 14 to enter desired hold temperature The minimum hold temperĆ ature is 140F Press the PROGRAM KEY 3 14 The display reads Hold Done XXX Use the PROGRAM ARROW KEYS 4 to seĆ lect either AUTOMATIC or MANUAL Press the PROGRAM KEY 3 15 The display reads Hold Fan Speed XXX Use the PROGRA...

Page 37: ... or NO 2 The display reads Language XXX Use the PROGRAM ARROW KEYS 4 to seĆ lecteither English or Other Press the PROĆ GRAM KEY 3 to select the desired language 3 The display reads Tone Volume XXX Use the PROGRAM ARROW KEYS 4 to seĆ lect None 1 2 3 or 4 Press the PROGRAM KEY 3 to select the desired level for all audiĆ ble signals 4 The display reads Temperature XXX Use the PROGRAM ARROW KEYS 4 to ...

Page 38: ...M KEY 3 11 The display reads Recipe Name YES This enables you to program a product name Use the PROGRAM ARROW KEYS 4 to seĆ lect either Yes or No Press the PROGRAM KEY 3 12 The display reads Recipe Shelf YES Use the PROGRAM ARROW KEYS 4 to seĆ lect either Yes or No Press the PROGRAM KEY 3 13 The display reads Recipe Fan Speed YES Use the PROGRAM ARROW KEYS 4 to seĆ lect either Yes or No Press the ...

Page 39: ...ib 2 Use the up and down PROGRAM ARROW KEYS 4 to scroll through the existing product names Or press the PRODUCT KEY 14 that corresponds with the first letter of the name you are looking for Then use the PROGRAM ARROW KEYS 4 to scroll to the desired name 3 Press the SCAN KEY 9 to edit the name 4 Use the PRODUCT KEYS 14 to edit the prodĆ uct name Press the right arrow key to adĆ vance to the next ch...

Page 40: ...ce to the next character To clear the alarm name press the TEMP TOGGLE CLEAR KEY 11 NOTE Use product key 1 for spaces periĆ ods quotation marks and underlines 5 Once the alarm name has been entered press the PROGRAM KEY 3 The display reads Save Library ADD Use the PROGRAM ARROW KEYS 4 to seĆ lect either ADD MODIFY or CANCEL Select ADD to create a new alarm name Select MODIFY to change an existing ...

Page 41: ...creases the cook time causing shrinkage Time hours 25_ Temperature F 50_ 75_ 100_ 125_ 150_ 175_ 200_ 225_ 250_ ÇÇÇ ÇÇÇ ÇÇÇ ÇÇÇ Oven switches from cook to hold Product may be removed and served Meat temp 3 4 5 6 1 2 7 8 9 Oven temp Product may be held up to 16 hours Stored heat Figure 16 Product Cook Temp Hold Temp Quantity Cook Time Hrs Min Hold Time Hrs Total Time Hrs Prime rib bone cap off 14Ć1...

Page 42: ... of product loaded the type of pan and the temperature OPERATING TIPS Pans and Racks Product or pan height determines how many racks are used The oven holds up to nine 18 x 26 45 7 x 66 0 cm bun pans Load the oven from the bottom centering the pans on the rack Never place a pan or aluminum foil on the bottom of the oven This obstructs the flow of air and results in uneven baking and roasting Roast...

Page 43: ...350_F 177_C 400_F 204_C 425_F 220_C 20 mins 10 mins 9 mins 5 3 5 Cheese Macaroni Cheese Casserole Melted Cheese Sandwiches 350_F 177_C 400_F 204_C 30 mins 8 mins 5 10 Potatoes Idaho Potatoes 120 ct Oven Roasted Potatoes sliced or diced 400_F 204_C 325_F 163_C 50 mins 10 mins 5 5 Baked Goods Frozen Berry Pies 22 oz Fresh Apple Pie 20 oz Pumpkin Pies 32 oz Fruit Crisp Bread 24 Ć 1 lb loaves Southern...

Page 44: ... blower wheel and the aluminized steel panel diĆ rectly behind it 1 Remove the racks rack supports and blower wheel from the oven 2 Soak the parts in a solution of ammonia and water 3 Reinstall after cleaning NOTE If the oven is moved the restraint must be reconnected after the unit is returned to it s regular position PREVENTATIVE MAINTENANCE The best preventative maintenance measures are the pro...

Page 45: ...ick connect Check all gas connections S Call your local gas representative S Deactivate fan delay feature S SYMPTOM Convection fan does not run S Oven is not plugged in S Oven is not set to the cook mode S Circuit breaker tripped S Fan delay feature may be activated if applicable S Doors are open S Plug in electrical supply cord S Set the control panel to COOK or OVEN ON S Reset the breaker S Deac...

Page 46: ... à l intérieur même de la chambre de cuisson d importantes économies d énergie peuvent être réalisées en même temps que d excellents résultats de cuisson SPECIFICATIONS POUR GAZ Installation aux États Unis et au Canada et généralités concerĆ nant à l exportation Gaz Naturel Gaz Propane Unités US Unités SI Unités US Unités SI Valeur de Chauffe 1000 BTU cu ft 37 3 MJ m3 2550 BTU cu ft 95 0 MJ m3 Gra...

Page 47: ...éléments permettant de contrôler le fonctionĆ nement du four Grilles de four cinq grilles sont fournies en équipement standard Des grilles supplémentaiĆ res sont disponibles Support de Grille tient les grilles en place Couvercle de Ventilateur situé sur la paroi intéĆ rieur au côté du four Protège le ventilateur Ventilateur tourne pour faire circuler l air chaud dans le four Moteur à Convection fo...

Page 48: ...re du four 30 cm 12 REMARQUE L entretien régulier peut en général être effectué dans les limites du déĆ placement que permet la chaîne de retenue Si le four doit être plus écarĆ té du mur l alimentation en gaz doit être coupée et la canalisation déĆ branchée du four avant d enlever la chaîne CelleĆci doit être utilisée pour empêcher d exercer toute contrainte sur le coupleur de gaz Il est essentie...

Page 49: ...envers sur une surĆ face de travail 2 Fixez une pied à chaque boulon de coin situé sur le dessous du dessus du bâti 3 Placez une rondelleĆfrein et un écrou sur chaĆ que boulon et serrez à fond 4 Le bâti peut maintenant recevoir le four Bâtis avec tablettes 1 Mettez le cadre du bâti à l envers sur une surĆ face de travail 2 Fixez un pied à chaque boulon de coin situé sur le dessous du dessus du bât...

Page 50: ...ur et dans la cornière de la tablette 6 Posez une rondelle frein et un écrou sur chaĆ que boulon et serrez à fond Reportez vous à la Figure 2 7 Répétez les étapes 3 à 6 pour la tablette supéĆ rieure REMARQUE Veillez à aligner les trous percés dans la tablette supérieure avec les cornières 8 Insérez la partie supérieure des butées de grilĆ les dans les deux pinces arrière des cornières tel qu illus...

Page 51: ... Dans le cas de fours doubles suĆ perposés effectuez l étape 8 une fois les deux fours superposés Figure 4 Section double 1 Assemblez la section inférieure du bâti tel que décrit NE REFERMEZ PAS le couvercle du compartiment latéral ni le panneau de comĆ mande avant 2 Au moyen d un outil détachez les rondelles amovibles situées sommet du four inférieur 3 Retirez le couvercle du compartiment latéral...

Page 52: ...x en haut de chaque pied 3 Mettre le four debout sur ses pieds 4 Tourner les vis de réglage des pieds pour metĆ tre le four à niveau Figure 6 MISE À NIVEAU DU FOUR Après assemblage le four doit être mis à niveau et installé à son emplacement d utilisation 1 Le four peut être mis à niveau en ajustant les vis de mise à niveau ou les roulettes en bas de chaque pied ...

Page 53: ...istributeur local appeler la Blodgett Oven ComĆ pany au 0011Ć802Ć860Ć3700 AVERTISSEMENT Un mauvais système d aération peut abouĆ tir à un mauvais fonctionnement du four des résultats de cuisson peu satisfaisants il peut également abîmer l appareil Les dégâts causés par une mauvaise venĆ tilation ne sont pas couverts par la garanĆ tie du fabricant HOTTE D ÉVACUATION TYPE VOÛTE La méthode de ventila...

Page 54: ... four dans une hotĆ te La cheminée doit être chapeautée avec une coiffe de type homologué UL pour isoler la chemiĆ née des intempéries extérieurs Dans ce cas îl est important de fournir assez d air secondaire car l installation à pris directe ne peut pas renouveler l air absorbé et ventilé par le four Le volume total d air neuf et d évacuation à consiĆ dérer lors de la détermination de la capacité...

Page 55: ...uises et respecter tous les réglements promulgués par les autorités provinciales ou locales compétentes Installation aux États Unis et au Canada Les branchements de gaz doivent être en accord avec les codes locaux ou en l absence de codes locaux avec le Code National du Gaz de ChauffaĆ ge ANSI Z223 1 le Code d Installation du Gaz NaĆ turel CAN CGAĆB149 1 ou le Code d Installation du Propane CAN CG...

Page 56: ...exemple la capacité totale est de 320 000 BTU la conduite de gaz actuelle n a pas besoin d être augmentée REMARQUE Les capacités en BTU données sur les tableaux sont uniquement pour des longueurs droites de tuyaux Tous les coudes et autres raccords diminuent la capacités de la conduiĆ te Pour toute autre question prendre contact avec la compagnie locale de distribution du gaz Maximum Capacity of I...

Page 57: ...onnement correct du four et il ne doit pas être retiré Il est préréglé pour alimenĆ ter le four avec une pression de gaz naturel au colĆ lecteur de 0 87 kPa 3 5 WC à la colonne d eau et une pression de propane au collecteur de 2 50 kPa 10 5 WC NE PAS INSTALLER DE RÉGULATEUR SUPPLÉĆ MENTAIRE OÙ LE FOUR SE CONNECTE SUR L ALIMENTATION DE GAZ SAUF SI LA PRESSION D ENTRÉE EST AU DESSUS DU MAXIMUM Avant...

Page 58: ...5 cm 3 8 prévu à l angle supérieur de l unite juste auĆdessous de l arrivée de gaz AVERTISSEMENT Si la retenue est déconnectée quelqu en soit la raison elle doit être reconnectée quand le four est remis à sa position d oriĆ gine Installations aux États Unis et au Canada Le coupleur doit être conforme à la Norme AppliĆ cable aux Coupleurs pour Appareils à Gaz MobiĆ les ANSI Z21 69 ou Coupleurs pour...

Page 59: ...ABLE DES PERTES OU DOMMAGES SUBI PAR SUITE DE L INSTALLAĆ TION INCORRECTE DE FOURS AVERTISSEMENT Pour votre protection contre les risques d électrocution cet appareil est doté d une fiche a trois broches avec fil de terĆ re et doit etre branché directement dans une prise a trois trous adéquatement mise a la terre Ne coupez ou ne retirez en aucun cas la broche de terre de la fiche SPÉCIFICATIONS ÉL...

Page 60: ...aux j Si le relevé de pression sont conformes du vaĆ leur recommandé laissez chauffer le four pendant deux heures S il est inacceptable procédez aux réglage requis AVERTISSEMENT Les ruptures dans le procédé brûlent les excès d huile présents dans le métal penĆ dant la fabrication De la fumée peut en réĆ sulter Une ventilation correcte est requiĆ se RÉGLAGES À FAIRE LORS DE L INSTALLAĆ TION INITIAL...

Page 61: ... NE PAS essayer d allumer l appareil D NE PAS toucher d interrupteur électrique D Utiliser un téléphone extérieur pour appeler imĆ médiatement la compagnie du gaz D Si la compagnie du gaz ne répond pas appeler les pompiers Que faire en cas de panne de secteur D Fermer tous les interrupteurs D NE PAS tenter d utiliser le four avant que l élecĆ tricité soit revenue REMARQUE Dans le cas d un arrêt de...

Page 62: ...active un vibreur électrique qui retentit au terme de la durée de cuisson deĆ mandée pour indiquer à l utilisateur le moĆ ment d enlever l aliment du four UTILISATION 1 Mettez le SÉLECTEUR 1 en position COOK Le ventilateur du four se mettent en marche Il est contrôlés automatiquement par le mouĆ vement des portes 2 Réglez le THERMOSTAT 3 à la température désirée 3 Préchauffez le four jusqu à ce qu...

Page 63: ...lumés 4 VOYANT PULSE Ć s allume lorsque le mode de ventilateur par impulsions est activé 5 VOYANT HOLD Ć s allume lorsque le mode de maintien est actif 6 CADRAN Ć permet l entrée des réglages vouĆ lus sur l affichage 7 TOUCHE START STOP Ć démarre ou arrête la minuterie 8 TOUCHE TIME Ć indique la durée sur l affiĆ chage 9 TOUCHE TEMP Ć indique le réglage de temĆ pérature sur l affichage REMARQUE Po...

Page 64: ...sur la touche START STOP 7 Pour régler le mode par impulsions 1 Appuyez sur la touche PULSE 11 REMARQUE Le voyant PULSE s allume 2 Choisissez la durée de pulse à l aide du CAĆ DRAN 6 Le mode d impulsion est une porĆ tion du temps de cuisson UTILISATION Cuisson 1 Placez le SÉLECTEUR DE MODE 1 à la posiĆ tion désirée 2 Entrez la durée de cuisson et la température de cuisson 3 Chargez l aliment dans ...

Page 65: ...deux fois sur HOLD 10 pour désacĆ tiver le mode de maintien Cuisson par Impulsions REMARQUE Le voyant PULSE s allume lorsque le mode est actif et s éteint lorsqu il ne l est pas 1 Placez le SÉLECTEUR DE MODE 1 à la posiĆ tion désirée 2 Entrez la durée de cuisson et la température de cuisson 3 Appuyez sur PULSE 11 Entrez la températuĆ re d impulsions REMARQUE Le mode d impulsion est une portion du ...

Page 66: ... allumé il indiĆ que le fonctionnement du brûleur Quand il s éteint le four a atteint la température opéraĆ tionnelle 7 THERMOSTAT À SEMIĆCONDUCTEURS permet soit la sélection de 8 températures préĆréglées sélectionnées en accord avec les demandes du client soit une infinité de sélecĆ tions entre 95 et 260_C contrôle infini illustré UTILISATION 1 Placer le SÉLECTEUR DE MODE 1 sur COOK CUISSON 2 Rég...

Page 67: ...éteint le four a atteint la température opéraĆ tionnelle 3 THERMOSTAT DE CUISSON contrôle la température du four pendant le cycle de cuisĆ son 4 MINUTERIE DE CUISSON active le ronfleur électrique qui se déclenche quand le temps de cuisson est terminé 5 THERMOSTAT DE MAINTIEN contrôle la température du four pendant le cycle de mainĆ tien 6 VOYANT DE MAINTIEN indique que le four est en mode de maint...

Page 68: ...ment fonctionnement et sont autoĆ matiquement contrôlés par l action des porĆ tes 2 Régler le THERMOSTAT DE CUISSON 3 sur la température désirée 3 Régler le THERMOSTAT DE MAINTIEN 5 sur la température de maintien désirée 4 Préchauffer le four jusqu à ce que le VOYANT FOUR PRÊT 2 s éteigne 5 Charger le produit dans le four 6 Tourner le COMMUTATEUR SÉLECTEUR 1 sur COOK HOLD CUISSON ET MAINTIEN 7 Rég...

Page 69: ...e lorsqu il est allumé que le four chauffe 7 TOUCHES FLÉCHÉES DE TEMPÉRATURE ć utiliser ces touches pour entrer la température de cuisson et d attente 8 TOUCHE ATTENTE ć active ou désactive le mode d attente 9 TOUCHE DE TEMPÉRATURE ć appuyer sur cette touche pour afficher la température vériĆ table du four 10 TOUCHE VENTILATEUR ć active et désactive le mode d impulsion Le DEL auĆdessus de la touch...

Page 70: ...ttente s allume 6 L INDICATEUR PRÊT 4 s allume lorsque le four a atteint la température de cuisson choiĆ sie Mettre l aliment au four 7 Appuyer sur la TOUCHE DÉMARRAGE 13 Le CADRAN DE LA MINUTERIE 2 commenĆ ce le compte à rebours Le voyant DEL de l opération manuelle clignote 8 Lorsque le temps de cuisson touche à sa fin les deux cadrans se mettent à clignoter et une alarme retentit pendant quelqu...

Page 71: ...ser les TOUCHES FLÉCHÉES DE LA MINUTERIE 3 pour entrer le temps d impulsion Le voyant DEL de la touche ventilateur s allume 7 Appuyer sur la TOUCHE DE PROGRAMMAĆ TION 14 pour enregistrer les réglages proĆ grammés FONCTIONNEMENT DES OPTIONS PAR DÉFAUT DE LA TOUCHE CUISSON MANUELLE 1 Régler le SÉLECTEUR 1 sur la position désirée 2 Appuyer sur la TOUCHE CUISSON MANUELĆ LE 12 Les voyants DEL des touch...

Page 72: ... FLÉCHÉES DE LA MINUTERIE 3 pour entrer le temps d impulsion Le voyant DEL de la touche ventilateur s allume 7 Appuyer sur la TOUCHE DE PROGRAMMAĆ TION 14 pour enregistrer les réglages proĆ grammés FONCTIONNEMENT DE LA TOUCHE DE PRODUIT 1 Régler le SÉLECTEUR 1 sur la position désirée 2 Appuyer sur la TOUCHE DE PRODUIT 11 désirée Les voyants DEL des touches pertiĆ nentes s allument 3 Appuyer sur la...

Page 73: ...haute vitesse 8 DEL LOW FAN VENTILATEUR BAS lorsĆ qu il est allumé cela indique que le ventilateur fonctionne à basse vitesse 9 TOUCHE SCAN BALAYAGE Enfoncer pour visualiser le temps qui reste sur les cycles de cuisson multiples et revoir la proĆ grammation des recettes 10 TOUCHE COOL DOWN REFROIDISSEĆ MENT enfoncer pour entrer le mode de reĆ froidissement 11 TOUCHE TEMP TOGGLE CLEAR TEMP BASCULER...

Page 74: ... minuterie de l étagère est basculée sur la position ON pour cette touche PRODUCT l AFFICHEUR 2 indique PICK SHLF Enfoncer une touche SHELF 16 pour attribuĆ er le produit à cette étagère et amorcer le cycle de cuisson Dans les cinq secondes qui suivent l AFFICHEUR 2 défile le nom du proĆ duit et le numéro de l étagère et compte à reĆ bours le temps de cuisson qui reste Si la fonction de synchronis...

Page 75: ...ction de synchronisation de l éĆ tagère est commutée à la position OFF pour ce produit enfoncer la touche PRODĆ UCT pour amorcer le cycle de cuisson L AFFICHEUR 2 défile le nom du produit et compte à rebours le temps de cuisson qui reĆ ste 3 Mettre le deuxième produit dans le four puis enfoncer la touche PRODUCT désirée 14 L AFFICHEUR 2 indique PICK SHLF Enfoncer une touche SHELF 16 pour attribuĆ ...

Page 76: ...condes si aucune touche n est enĆ foncée PROGRAMMATION DE LA TOUCHE DE PRODUIT Pour entrer le mode de programmation du proĆ duit 1 Maintenir enfoncée la touche PROGRAM 3 L AFFICHEUR 2 indique Prod Cnt Programming Utiliser les touches flèches PROGRAM 4 pour mettre en évidence PROGRAMMING Enfoncer la touche PROGRAM 3 pour sélecĆ tionner L AFFICHEUR indique ENTER CODE Utiliser les touches PRODUCT 14 ...

Page 77: ...T 14 pour enĆ trer le temps de cuisson désiré puis enfoncer la touche PROGRAMY 3 6 L AFFICHEUR indique Stage 1 Temp XXXF or C Utiliser les touches PRODUCT 14 pour enĆ trer la température de cuisson désirée puis enfoncer la touche PROGRAM 3 7 L AFFICHEUR indique Stage 1 Timing XXX Définition Il existe trois options pour le mode de minuterie lors de la cuisson sur une étagère consécutif flexible et ...

Page 78: ...la touche PROGRAM 3 10 Si vous programmez un produit qui utilise la fonction de cuisson sur une étagère passez à l étape 11 Si vous programmez un produit qui n utilise pas la fonction de cuisson sur une étagère l AFFICHEUR indique Stage 2 Time XX XX Reprendre les étapes de 5 à 10 pour chaque étape qui reste Si vous programmez une reĆ cette à étape unique sans fonction de cuisson sur une étagère en...

Page 79: ...enĆ trer la température de maintien désirée La température de maintien minimale est 140 F Enfoncer la touche PROGRAM 3 14 L AFFICHEUR indique Hold Done XXX Utiliser les touches flèches PROGRAM 4 pour sélectionner AUTOMATIC ou MANUAL Enfoncer la touche PROGRAM 3 15 L AFFICHEUR indique Hold Fan Speed XXX Utiliser les touches flèches PROGRAM 4 pour sélectionner HIGH ou LOW Enfoncer la touche PROGRAM ...

Page 80: ...sûr des recettes exisĆ tantes seront se sont dégagés Utiliser les touches flèches PROGRAM 4 pour sélecĆ tionner YES ou NO 2 L AFFICHEUR indique Language XXX Use the PROGRAM ARROW Utiliser les touches flèches PROGRAMKEYS 4 pour sélectionner ENGLISH ou OTHER Enfoncer la touche PROGRAM 3 pour sélectionner la langue désirée 3 L AFFICHEUR indique Tone Volume XXX Utiliser les touches flèches PROGRAM 4 p...

Page 81: ... Recipe Stage YES Utiliser les touches flèches PROGRAM 4 pour sélectionner YES ou NO Enfoncer la touche PROGRAM 3 10 L AFFICHEUR indique Recipe Name YES Ceci vous permet de programmer un nom de produit Utiliser les touches flèches PROĆ GRAM 4 pour sélectionner YES ou NO EnĆ foncer la touche PROGRAM 3 11 L AFFICHEUR indique Recipe Shelf YES Utiliser les touches flèches PROGRAM 4 pour sélectionner Y...

Page 82: ...s le haut et vers le bas pour défiler à travers les noms des produits existants ou enfoncer la touche PRODUCT 14 qui correspond à la première lettre du nom que vous recherchez Utiliser ensuite les touches flèches PROĆ GRAM 4 pour défiler jusqu au nom désiré 3 Enfoncer la touche SCAN 9 pour modifier le nom 4 Utiliser les touches PRODUCT 14 pour modiĆ fier le nom du produit puis enfoncer la touche f...

Page 83: ...mer le nom de l alarme enfoncer la touche TEMP TOGGLE CLEAR 11 REMARQUE Utiliser la touche PRODUCT no 1 pour les espaces les points les guillemets et les soulignés 5 Entrer le nom de l alarme puis enfoncer la touche PROGRAM 3 L AFFICHEUR indiĆ que Save Library ADD Utiliser les touches flèches PROGRAM 4 pour sélectionner ADD MODIFY ou CANCEL Sélectionner ADD pour créer le nouveau nom de l alarme Sé...

Page 84: ...ngelée par réfrigération Utiliser de la viande congelée augmente le temps de cuisson et cause sa réducĆ tion de volume Durée heures 25_ Temperature F 50_ 75_ 100_ 125_ 150_ 175_ 200_ 225_ 250_ ÇÇÇ ÇÇÇ ÇÇÇ ÇÇÇ Le four passe du mode cuisson au mode maintien L aliment peut etre sorti du four et servi Temp de la viande 3 4 5 6 1 2 7 8 9 Temp du Four L aliment peut etre gardé dans le four pendant 16 he...

Page 85: ...é cuite du type de plat utilisé et de la température sélectionĆ née CONSEILS Plats et grilles La hauteur de l aliment ou du plat détermine le nombre de grilles utilisables Le four peut recevoir un maximum de 9 plaques à petits pains de 18 x 26 po 457 x 660 mm Charger le four en commençant par le bas centrer les plats sur la grille Ne jamais placer un plat ou une feuille d aluminium sur le fond du ...

Page 86: ..._C 425_F 220_C 20 mins 10 mins 9 mins 5 3 5 Fromages Macaroni au gratin CroqueĆMonsieur 350_F 175_C 400_F 205_C 30 mins 8 mins 5 10 Pommes de Terre Au four 120 ct Pommes de terre rôties 400_F 205_C 325_F 165_C 50 mins 10 mins 5 5 Pains et Patisseries Tourtes aux baies surgelées 22 oz Tourte aux pommes fraîche 20 oz Tartes au potiron 32 oz Croquant aux fruits Pain 24 Ć 1 lb Pain à la farine de maïs...

Page 87: ...c la plaque d acier aluminé située juste derrièĆ re la roue du ventilateur 1 Retirer du four les grilles les supports de grilĆ les et la roue de soufflerie 2 Faire tremper les pièces dans une solution d ammoniaque et d eau 3 Remettre en place après nettoyage REMARQUE Si le four est déplacé la retenue doit être remise en place quand l unité est remise à sa position habituelle ENTRETIEN PRÉVENTIF Il...

Page 88: ...ction de délai de ventilateur est peut être activée si applicable S Problème interne avec le contrôle de températuĆ re principal S Attendre que le four est atteint sa température de préchauffage S Vérifier la vanne de gaz et l ouvrir si nécessaire S Reconnecter la connexion rapide Vérifier toutes les connexions de gaz S Appeler un technicien de la compagnie du gaz S Invalider la fonction de délai ...

Page 89: ...au four S Contrôles informatisés mauvaise programmaĆ tion pour le produit S Calibrage du thermostat hors service S Mauvaise ventilation du four S Reprogrammer le contrôle suivant la section UtiĆ lisation S S Indique un type d intervention délicate qui devrait être confiée uniquement à un personnel qualifié Plutôt que d intervenir personnellement en tant qu utilisateur ou acheteur de l appareil il ...

Page 90: ...INSERT WIRING DIAGRAM HERE PLACER SCHÉMA DE CÂBLAGE ICI ...

Reviews: