background image

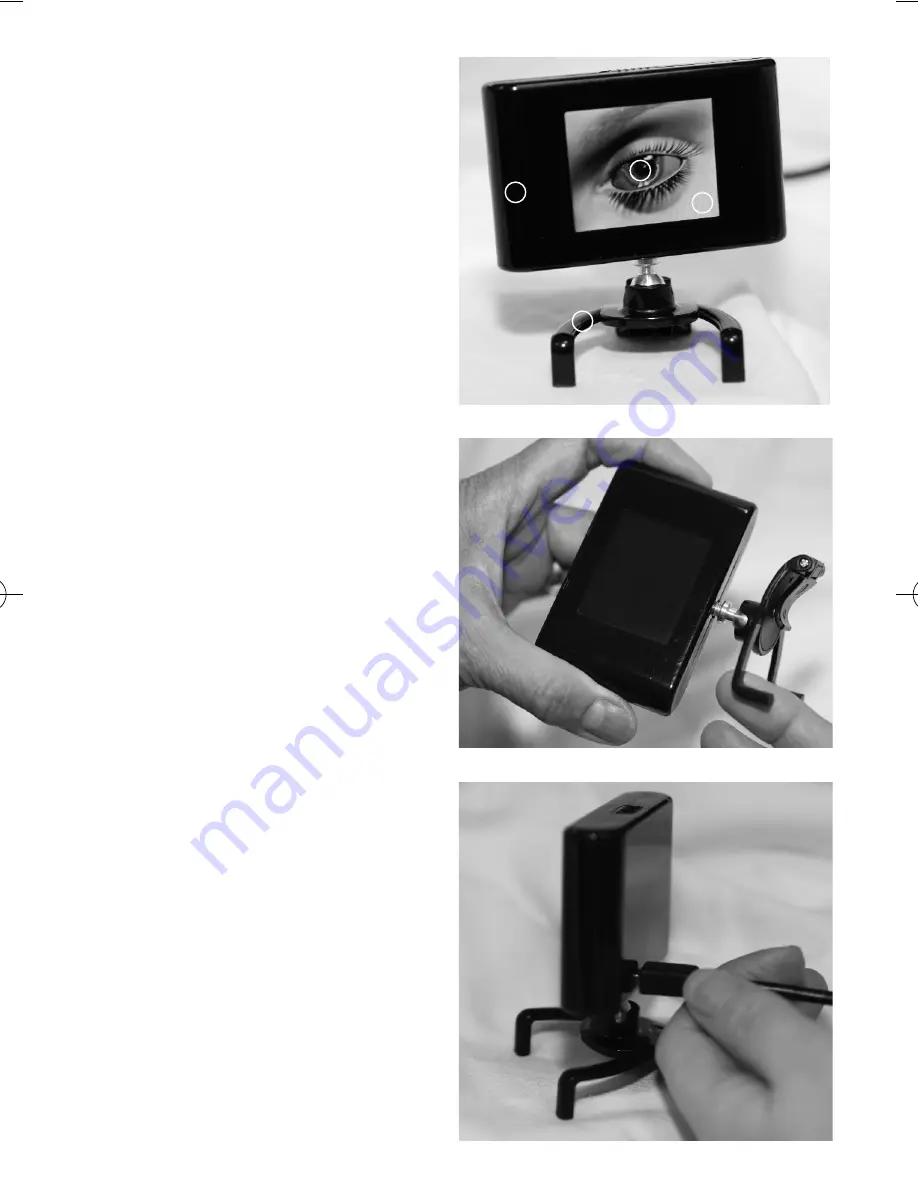
Blinknow Device 

(1) 

1. Device Housing
2. Clip/Claw Feet for monitor attachment
3. LCD Screen
4. Blink Animation

Setting up the Blinknow device

Remove the contents from the packaging
Attach the LCD screen (with housing) to the
clip/claw feet section by screwing the two
sections together as shown (2) (Please do not
use excessive force to tighten screw and take
care not to damage the feet on the clip/claw feet
section) 

Please attach the mains power cable or one end
of the USB power cable to the socket on the back
of the Blinknow device (3). Please note that the
Blinknow device is a stand alone device and as
such requires NO software installation prior to
use. 

1

2

3

4

(1) 

(2) 

(3) 

Blinknow_IM  7/4/10  13:41  Page 4

Summary of Contents for Device

Page 1: ...USER MANUAL PLEASE READ THIS USER MANUAL CAREFULLY PRIOR TO USING THE BLINKNOW DEVICE PLEASE KEEP IN A SAFE PLACE blinknow ...

Page 2: ...ng in a feeling of tiredness and irritation in the eyes with difficulty focusing on near objects after a short duration Screen fatigue or computer vision syndrome can be very uncomfortable Who is at the greatest risk of developing Computer Vision Syndrome Individuals at the greatest risk of developing CVS are people who use computers intensively for two or more hours on a daily basis How does the ...

Page 3: ...et section by screwing the two sections together as shown 2 Please do not use excessive force to tighten screw and take care not to damage the feet on the clip claw feet section Please attach the mains power cable or one end of the USB power cable to the socket on the back of the Blinknow device 3 Please note that the Blinknow device is a stand alone device and as such requires NO software install...

Page 4: ...ay prefer to attach the Blinknow device as shown in the example above Some computer or VDU users may prefer to read text or study images on a computer screen starting at the bottom of the page and scroll the read text upwards These individuals may opt to place the blinknow device on the side of the computer screen on the desk The clip claw feet mechanism in the closed position enable the blinknow ...

Page 5: ... is required The LCD screen housing can be easily rotated as shown in the photograph to adjust the device position 7 Turn Blinknow device to ON position using the on off button on the top of the device 8 Once the device is switched on it will show a blink The blink will be repeated at regular intervals Blink rate on the animation cannot be altered by the user Follow the cue provided by the animati...

Page 6: ...y and continuously while working at the computer If you are unsure whether the Blinknow device will be of benefit to yourself please visit www blinknow co uk faq The importer manufacturer is only able to offer an exchange if the product is faulty or defective If your device is faulty first contact tech support to verify the problem Email support blazeeurope com We will send you an authorisation nu...

Page 7: ... partner then please return to your original place of purchase for an exchange Your statutory rights are not affected The importer manufacturer warrants this product against defects in materials and workmanship for a period of one 1 year from the date of original purchase If a defect exists the importer manufacturer will either repair the product at no cost or exchange the product with a new or re...

Page 8: ...any guarantees of protection It does not prevent computer vision syndrome from other causes such as excessive screen glare Please be aware that red and sore eyes can be caused by other more serious eye conditions like glaucoma eye infection etc and if problems persist or worsen during computer use it is recommended to seek expert medical attention Any modification made to the device will make the ...

Reviews: