background image

43

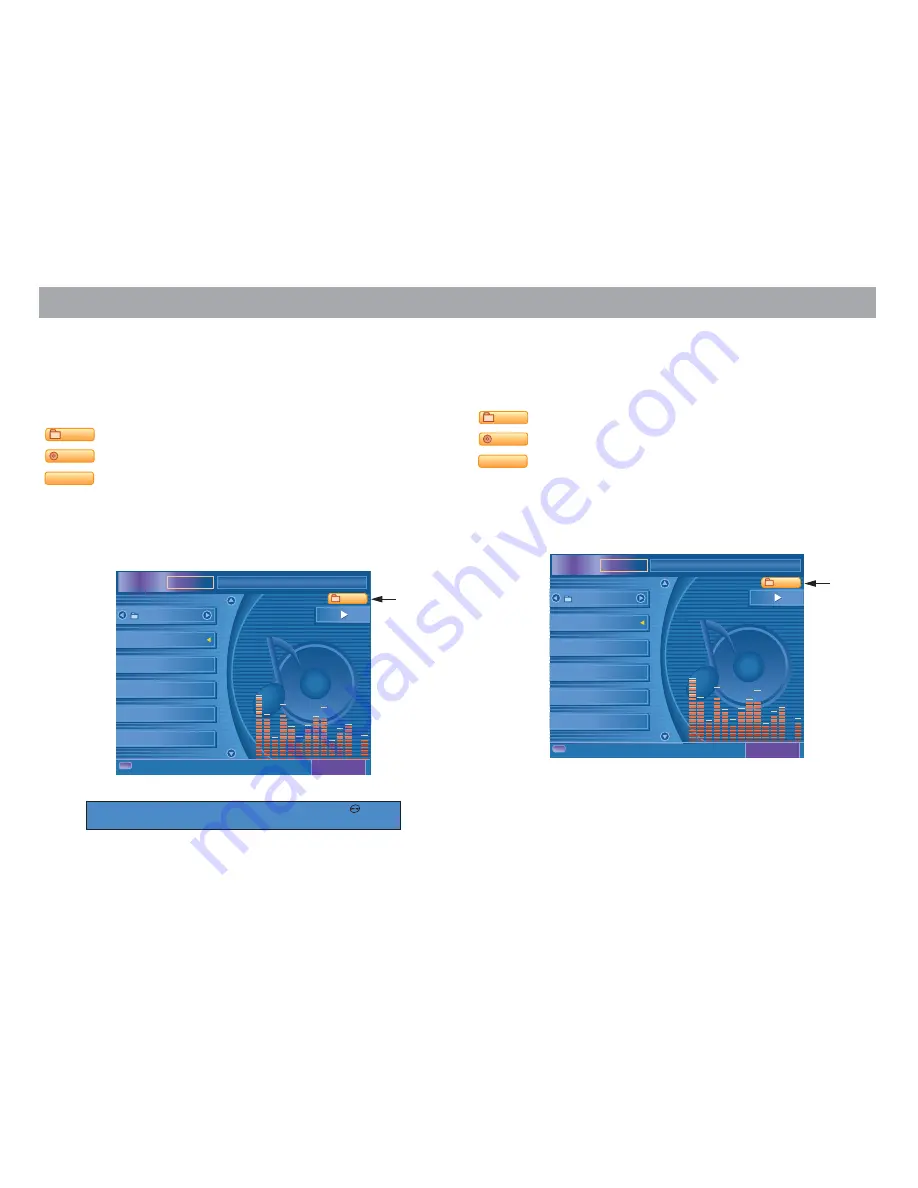
Random play

You can play the MP3 files from one directory or from all the
directories on the CD in a random order.

The various options offered by the random function are displayed
on the monitor 

B

.

MIX

 (Random play from the current folder)

MIX

 (Random play from all folders)

NORMAL

 (Random play off)

1.

Press the MIX key on the remote control or the 5 / MIX key
on the device as often as necessary to activate the mix
function that you want or to switch it off.

m

P3

m

P3

I D 3

I D 3

CD-MP3

CD-MP3

00:02'44

00:02'44

TI

TI

m

E

001

001

FILE

FILE

NORMAL

5. B.O.N - Take my

5. B.O.N - Take my

4. Austria 3 - Weu

4. Austria 3 - Weu

3. Art Garfunkel _

3. Art Garfunkel _

2. America _ The L

2. America _ The L

1. Abba - I have a

1. Abba - I have a

Kuschelrock

Kuschelrock

I have a dream

I have a dream

MIX

01:05

01:05

RDM

 1

t01-02 48

-

MP3

Random display with monitor retracted.

Scan

You can also listen to a sample of 15 seconds from each of the
MP3 files in sequence.

The various options for the scan are displayed on the monitor 

C

.

SCAN

 (Sample the tracks in the folder)

SCAN

 (Sample the disc)

NORMAL

 (Normal playback).

1.

Press the SCAN key on the remote control or the
6 / SCAN key on the device as often as necessary to acti-
vate the scan function that you want or to switch it off.

m

P3

m

P3

I D 3

I D 3

CD-MP3

CD-MP3

00:02'44

00:02'44

TI

TI

m

E

001

001

FILE

FILE

5. B.O.N - Take my

5. B.O.N - Take my

4. Austria 3 - Weu

4. Austria 3 - Weu

3. Art Garfunkel _

3. Art Garfunkel _

2. America _ The L

2. America _ The L

1. Abba - I have a

1. Abba - I have a

Kuschelrock

Kuschelrock

I have a dream

I have a dream

SCAN

01:05

01:05

Play – MP3

B

C

Summary of Contents for CHICAGO IVDM-7002

Page 1: ...In Car Video In Dash Monitor DVD CD MP3 Receiver Chicago IVDM 7002 Operating instructions www blaupunkt com ...

Page 2: ...2 Remote control general functions 2 1 6 8 10 11 12 13 15 18 23 29 27 25 31 ...

Page 3: ...tivate navigation mode and keys Keys for browsing through the on screen menu ENTER key Confirm the chosen menu item SETUP key Open and close the setup menu DOWNMIX key Switch the audio downmix on off B REAR key Display the image from an optional reversing camera G TILT key Adjust the monitor s tilt I LCD key Adjust the colour of the display K SRC key Select a different signal source In the setup m...

Page 4: ...4 Remote control DVD mode 30 5 7 9 11 14 16 19 28 24 21 17 4 3 ...

Page 5: ...stop playback and keys Keys for browsing through the main menu keys Hold these keys down for fast forward or reverse PTY ZOOM keys Zoom or zoom A WIDE key Swap formats 16 9 4 3 C GOTO key Selection menu for directly selecting a chapter E REPEAT key Repeat a chapter or title H RDS MENU key Display a DVD s main menu L keys Skip to the previous or following chapter N REG ANGLE key Select the camera p...

Page 6: ...or 1 second or longer to store the station that is currently tuned keys Manually search for stations upwards downwards PTY ZOOM key Open the PTY menu H RDS MENU key Open the radio menu J BAND key Change the waveband Press the key and hold it down for 1 second or longer to search for stations and save them automatically L key Search upwards downwards automatically N REG ANGLE key Switch the REG fun...

Page 7: ... file in CD changer and MP3 mode ENTER key Confirm the selection of the track or file keys Hold these keys down for fast forward or reverse D SCAN key Play a 10 second sample of each of the files or tracks E REPEAT key Play a disc track or file again F MIX key Play tracks or files in random order L keys Skip to the following or previous track or file 21 7 11 12 14 20 28 22 21 ...

Page 8: ...8 Controls Chicago IVDM 7002 32 33 35 36 34 37 45 48 40 39 38 47 46 43 42 42 44 41 ...

Page 9: ...ee FM memory banks and the AM waveband Long press Start the Travelstore function Y Reset key Z Key 1 DISC Change to the previous CD or previous di rectory in CD changer MP3 mode Key 2 DISC Change to the next CD or next directory in CD changer MP3 mode Key 3 ZOOM This key activates the zoom function in DVD mode Key 4 RPT In CD CD changer MP3 mode this key is used to repeat individual tracks or the ...

Page 10: ...2 Familiarise yourself with the controls before setting off on your journey Stop somewhere suitable if you want to reprogram the Chicago IVDM 7002 Only operate the controls of the Chicago IVDM 7002 when driving if traffic conditions permit CD DVD For reasons of safety a CD DVD must only be inserted or removed when the vehicle is stationary A DVD can only be played when the vehicle is stationary ...

Page 11: ...io 24 Switching to radio mode 24 Selecting the waveband memory bank 24 Convenient RDS functions AF REG 25 Switching AF on and off 25 Switching REG on off 25 Tuning into stations manually 26 Automatic station seek tuning 26 Storing stations 26 Storing stations automatically Travelstore 26 Programme type PTY 26 Selecting the programme type 27 Manually start the PTY search 27 Traffic radio station 27...

Page 12: ...Select the setup menu 46 General settings 46 Select menu 46 DVD Setup 47 Language 47 Display 47 Parental Control 48 Audio setup 49 Input sensitivity 49 Adjusting the ProLogic2 audio effect 49 Adjusting the sound effects audio effect 50 Adjusting the downmix audio effect for two zone operation 51 7 Band equalizer 51 Loudspeakers 52 Delay 53 Volume level 54 Dynamic range 54 Test tone 55 Monitor setu...

Page 13: ...e manufacturer Precautions Observe all the warnings precautions and notes on servicing provided in this user manual in order to extend your monitor s service life As the driver do not use the monitor when driving to avoid traffic accidents Only run the device from the recommended 12 V DC power supply Do not attempt to open the monitor or to dismantle it as this can result in an electric shock If y...

Page 14: ...e upper and lower sides because the structure of the CD DVD places the information layer immediately under the print ed side the label Whenever possible only hold the CD DVD by the edge Comments on readability Any soiling or damage to a CD DVD can make it difficult to read The seriousness of the read error depends on the dirt and on the seriousness of the mechanical damage Deep scratches cause rea...

Page 15: ... to play a DVD that has a different regional code This player supports the following disc formats DVD DVD R DVD RW VCD SVCD CD CD R CD RW MP3 Licence Manufactured under licence from Dolby Laboratories Dolby Pro Logic and the double D symbol are trademarks of Dolby Laboratories The product contains components and uses techniques protect ed by specific US patents The intellectual property is owned b...

Page 16: ...s retracted is shown beneath the illustration of the TFT display when necessary The following symbols are used to identify individual steps so that you can quickly locate information in these instructions 1 Identifies actions that you must take in order to achieve the desired result Reactions from the device that should follow an action are identified in this way Note Depending on the type of DVD ...

Page 17: ...S NA VI VO L D IS C DI SC ZO OM RP T MIX SCAN TU NE BS M CHICAGO IVDM 700 2 4 5 6 1 2 3 BN D The device switches off about 30 seconds after the control panel is detached All the current settings are saved Any CD DVD already inserted in the device remains there Attaching the control panel 1 Slide the control panel from right to left into the device s guide SR C DIS NA VI VO L D IS C DI SC ZO OM RP ...

Page 18: ...enne 2 NDR 2 2 NDR 2 1 Radio 21 1 Radio 21 R D S AF AF TA TA REG REG TP None None 1ch A1 534 Radio display with monitor closed The Welcome screen is displayed after the system has started up Note The device automatically starts up in whatever operating mode was set last Switching off 1 To switch off hold the key on the device pressed for more than two seconds or press the key on the remote control...

Page 19: ...e upwards LOADING LOADING LOADING LOADING LOADING Loading display with monitor closed Replay starts automatically Ejecting CDs DVDs 1 Press the key to eject the disc EJECT EJECT EJECT EJECT EJECT Eject display with monitor closed The DVD CD is ejected Introduction ...

Page 20: ... vol ume Press the VOL key to decrease the volume On the remote control Press the VOL key to increase the volume Press the VOL key to decrease the volume Activate muting RADIO RADIO Radio 21 Radio 21 STATION STATION FM 1 FM 1 105 8 105 8 MHz MHz 6 150 9 MHz 6 150 9 MHz 5 148 1 MHz 5 148 1 MHz None None 4 145 1 MHz 4 145 1 MHz 3 140 5 MHz 3 140 5 MHz 2 138 5 MHz 2 138 5 MHz 1 105 8 MHz 1 105 8 MHz ...

Page 21: ... the monitor to its original position Picture format 1 On the device The picture format can only be adjusted through the Setup menu On the remote control Press the WIDE key to switch be tween the wide and normal picture formats Note Picture formats WIDE 16 9 NORMAL 4 3 Select signal source 1 On the device and on the remote control Press the SRC key repeatedly until the desired signal source is fou...

Page 22: ...djustments to the current audio function Note The current setting or option is displayed at the bottom right of the monitor You will find more infor mation in the Audio Setup section of the Setup Menu chapter You can make the following settings Sound effects OFF Studio Hall Church Stadium Movie Club Dolby PL II OFF Pro Logic Music Movie Matrix 7 Band equalizer Flat Classic Jazz Rock Pop Ballad Dan...

Page 23: ...camera as an accessory It is switched on automatically when reverse gear is engaged Please read the section Select an External Sig nal Source in the chapter on the Setup Menu to activate this function Note Press the REAR key on the remote control to switch on the reversing camera manually Press the key again to switch the reversing camera off Screensaver The screensaver becomes active if the disc ...

Page 24: ...io mode 1 On the device or on the remote control Press the SRC key to select the radio The waveband is displayed as text stereo mode via a symbol on the display 1ch F1 1058 ST FM Radio display with monitor closed Selecting the waveband memory bank This radio receives stations both in the VHF FM waveband and MW AM stations Three memory banks are available for the FM waveband and one for MW Six stat...

Page 25: ...rent content The REG function prevents the radio from switching to alter native frequencies that have different programme content Switching AF on and off 1 Press the RDS MENU key on the remote control RDS Set appears on the bottom line of the monitor 2 Select AF Set with the keys 3 Press the keys to switch the AF function on or off Note Alternatively you can switch the function on or off by pressi...

Page 26: ...ations If the Chicago IVDM 7002 is disconnected from the supply voltage all the station settings will be lost and will have to be stored again 01 05 01 05 RADIO RADIO Radio 21 Radio 21 STATION STATION FM 1 FM 1 105 8 105 8 MHz MHz 6 150 9 MHz 6 150 9 MHz 5 148 1 MHz 5 148 1 MHz 4 FFN 4 FFN 3 Antenne 3 Antenne 2 NDR 2 2 NDR 2 1 Radio 21 1 Radio 21 R D S AF TA REG TP None None Storing stations autom...

Page 27: ...on is switched off if ALL is se lected as the programme type Manually start the PTY search 1 Press the keys on the remote control The search will begin and the next station with the select ed programme type is tuned in Note If no station is found offering the chosen pro gramme type the PTY function is switched off and the station that was being received most recently is re stored Traffic radio sta...

Page 28: ...e will play traffic announcements Note Alternatively you can switch the function on or off by pressing the TA AUDIO key Adjust the announcement volume for radio mode 1 Press the RDS MENU key on the remote control RDS Set appears on the bottom line of the monitor 2 Select TA Radio with the keys 10 10 RADIO RADIO Radio 21 Radio 21 STATION STATION FM 1 FM 1 105 8 105 8 MHz MHz 6 150 9 MHz 6 150 9 MHz...

Page 29: ...S Set appears on the bottom line of the monitor 2 Select TA Volume with the keys 3 Press the key to adjust the volume of announce ments Note When an announcement is made the audio source DVD CD MP3 AUX is muted and the an nouncement is made with the volume set here Addi tion as in the case of radio does not take place ...

Page 30: ...nges to DVD mode automatical ly when a DVD is inserted DVD playback is continued for passengers in the back seats if a different signal source radio AUX CDC is selected on the device 1418 D The time Dolby Digital etc are shown on the display t01 C004 D Press the DIS FLIP key to display more information Play pause DVDs are automatically read and played when they are inserted Playback can be interru...

Page 31: ...itle chapter DVD DVD 00 00 52 00 00 52 TI TImE _ _ CHAP CHAP 00 00 TITLE TITLE O unknown O unknown OFF OFF 01 05 01 05 Fast forward reverse To move forwards or backwards at high speed during playback 1 Press the key on the remote control Fast forward reverse B begins 2 By pressing the keys repeatedly you can change the forward or reverse speed by factors of 1 5 2 4 6 or 8 Note Sound is not played ...

Page 32: ...subtitles B DVD DVD 00 00 52 00 00 52 TI TImE 000 000 CHAP CHAP 00 00 TITLE TITLE german german german german 01 05 01 05 Repeat Two repeat functions are available when playing DVDs Chapter C and Title T 1 Press the REPEAT key on the remote control or the 4 RPT key on the device The various options for the repeat function can be chosen by pressing the key repeatedly and are displayed on the monito...

Page 33: ... change the zoom factor The zoom factor changes as follows each time the PTY ZOOM key is pressed Normal x1 5 x2 x3 Camera angle You can select the camera perspective when playing DVDs that provide the multi angle function 1 On the remote control Press the REG ANGLE key The camera angle is changed 2 Press the REG ANGLE key repeatedly to select from the available perspectives Play DVD ...

Page 34: ...ion H Track list I Name of the CD if CD text is available Opening the audio CD menu 1 On the device or on the remote control Press the SRC key repeatedly until the audio CD menu is displayed Note The system changes to CD mode automatically when an audio CD is inserted t01 02 48 Display with monitor retracted Track playing time etc Play pause Audio CDs are automatically read and played when they ar...

Page 35: ... 1 x 2 x 2 3 Press the PLAY PAUSE key to play the audio CD again at normal speed Repeat 1 Press the REPEAT key on the remote control or the 4 RPT key on the device The repeat function is switched on and displayed on the monitor B 01 05 01 05 T E X T T E X T Audio CD Audio CD 00 21 35 00 21 35 TI TImE 01 01 TRACK TRACK 6 TRACK 6 6 TRACK 6 4 TRACK 4 4 TRACK 4 3 TRACK 3 3 TRACK 3 2 TRACK 2 2 TRACK 2 ...

Page 36: ...5 MIX key on the device to switch the function off again Display at the monitor NORMAL Play CD C Scan This function plays a sample of about 15 seconds of each of the tracks on the CD in sequence 1 Press the SCAN key on the remote control repeatedly or the 6 SCAN key on the device The scan function is started and displayed on the monitor D 01 05 01 05 CD C CD C 00 00 35 00 00 35 TI TImE 01 01 TRACK...

Page 37: ...l repeat scan mix D Display the CD being played and the play mode E Graphic equalizer display F Clock time G Track list Open CD changer menu 1 On the device or on the remote control Press the SRC key repeatedly until the CD C menu is displayed 10 DISC t01 02 48 Display with monitor retracted Track playing time disk no etc Play pause Play starts automatically as soon as the source is selected 1 Pre...

Page 38: ... 1 Fast search If you want to skip straight to a particular passage while playing a track you can do this with the fast search function 1 Press the key on the remote control The track is played forwards or backwards audibly A 01 05 01 05 CD C CD C 00 00 35 00 00 35 TI TImE 01 01 TRACK TRACK NORMAL CD 1 CD 1 6 TRACK 6 6 TRACK 6 5 TRACK 5 5 TRACK 5 4 TRACK 4 4 TRACK 4 3 TRACK 3 3 TRACK 3 2 TRACK 2 2...

Page 39: ... the repeat function to play a track or a CD repeatedly The various options offered by the repeat function are displayed on the monitor A REPEAT repeat track REPEAT repeat disc NORMAL repeat off 1 Press the REPEAT key on the remote control or the 4 RPT key on the device as often as necessary to acti vate the repeat function that you want or to switch it off 01 05 01 05 CD C CD C 00 00 35 00 00 35 ...

Page 40: ...ACK 5 5 TRACK 5 4 TRACK 4 4 TRACK 4 3 TRACK 3 3 TRACK 3 2 TRACK 2 2 TRACK 2 1 TRACK 1 1 TRACK 1 MIX RDM 10 DISC t01 0248 Random display with monitor retracted Scan You can listen to a sample of 15 seconds of all the tracks on a CD or of all the CDs in the changer The various options for the scan are displayed on the monitor C SCAN Scan disc SCAN Scan magazine NORMAL Scan off 1 Press the SCAN key o...

Page 41: ...k list with display of the file names I Name of the folder currently being played Open MP3 menu 1 On the device or on the remote control Press the SRC key repeatedly until CD MP3 is shown as the signal source Note The system changes to CD MP3 mode automat ically when an MP3 disc is inserted The ID3 tag interpret etc is only displayed at the bottom of the monitor MP3 t01 02 48 1 Display with monito...

Page 42: ...ds audibly By pressing the keys repeatedly you can change the forward or reverse speed by factors of 2 4 6 or 8 2 Press the PLAY PAUSE key to play the MP3 CD again at normal speed Repeat Activate the repeat function to play a track or a CD repeatedly The various options offered by the repeat function are displayed on the monitor A REPEAT repeat file REPEAT repeat folder NORMAL repeat off 1 Press t...

Page 43: ...a I have a 1 Abba I have a Kuschelrock Kuschelrock I have a dream I have a dream MIX 01 05 01 05 RDM 1 t01 02 48 MP3 Random display with monitor retracted Scan You can also listen to a sample of 15 seconds from each of the MP3 files in sequence The various options for the scan are displayed on the monitor C SCAN Sample the tracks in the folder SCAN Sample the disc NORMAL Normal playback 1 Press th...

Page 44: ...itor The chosen AUX source appears briefly on the monitor s top line AUX 1 Brief AUX display with retracted monitor followed by display of the time Note If an IVSC is connected it will be available as an additional signal source All the connecting sources can then be displayed on the Chicago through the IVSC Navigation A TravelPilot e g the DX V can also be connected to the Chicago IVDM 7002 in ad...

Page 45: ...ated in the setup menu Please read the section Select an External Sig nal Source in the chapter on the Setup Menu Proceed as follows to adjust the volume 1 Press the SRC key to change to the AUX 3 input 2 Set the volume that you want using the VOL keys on the Chicago IVDM 7002 Note If the range of adjustment is not enough you can also increase the volume of the TravelPilot itself Read the TravelPi...

Page 46: ...E FRE SPA SPA OTHERS OTHERS MENU MENU ENG ENG GER GER FRE FRE ITA ITA SPA SPA A Selected sub menu B Options C Help menu D Select sub menu E Setup Menu Select menu Note All the settings in the setup menu are made via the remote control 1 You can make your way through the following setup men us by repeatedly pressing the SRC key DVD AUDIO SCREEN USER 2 You select the sub menu using the keys 3 Press ...

Page 47: ...s op tions 3 Set the option you want with the keys 4 Press the ENTER key to confirm the setting Note With the OTHERS option you can select one of the other languages that are listed in the DVD Lan guage Code Table see page 66 Enter the four figure number for the desired language This will only work if the language is supported by the DVD Display Display Display SET ENTER SRC RETURN SETUP BACK END ...

Page 48: ... keys you can adjust the level of pa rental control to what you want The following protection levels are available General G suitable for all ages G Most audiences Mature young audience PG with parental supervision Teenage audience PG 13 children under 13 with pa rental supervision Mature teenage audience Mature audience R for children under 17 only with pa rental supervision Adult audience NC 17 ...

Page 49: ...t the AUX option that you want to adjust 2 Use the keys to set the input voltage 3 Press the ENTER key to confirm the setting 4 Repeat steps 1 3 to make further settings 5 Press the RETURN key to close the menu Adjusting the ProLogic2 audio effect audio Effect Control Audio Effect Control SET ENTER SRC RETURN SETUP BACK END MENUE CHANGE AUDIO AUDIO NEXT NEXT DownMIX Lt Rt Stereo VSS SFC Studio Hal...

Page 50: ... Press the RETURN key to close the menu Adjusting the sound effects audio effect You are in the AUDIO setup menu 1 Use the keys to select the Audio Effect Control sub menu and press the ENTER key The ProLogic2 option is highlighted 2 Use the keys to select the SFC sound effects option audio Effect Control Audio Effect Control SET ENTER SRC RETURN SETUP BACK END MENUE CHANGE AUDIO AUDIO NEXT NEXT D...

Page 51: ... SETUP BACK END MENUE CHANGE AUDIO AUDIO NEXT NEXT DownMIX DownMIX Lt Rt Lt Rt Stereo Stereo VSS VSS SFC SFC Studio Studio Hall Hall Church Church OFF OFF ProLogic2 ProLogic2 ProLogic2 ProLogic2 Music Music OFF OFF You can make the following settings Lt Rt Mix the surround sound for the rear loudspeakers into the signal for the front loudspeakers Stereo Convert the surround sound into a stereo sig...

Page 52: ...w choose the frequency band you want with the keys 4 It is now possible to use the keys to adjust to the level for the selected frequency 6 6 5 Press the ENTER key to complete the setting 6 It is now possible to make further adjustments or to leave the menu using the RETURN key Loudspeakers Here you can configure where loudspeakers are installed in the vehicle as well as set their size Speaker Set...

Page 53: ...or NO Delay You can set the propagation time delay here for the centre and rear loudspeakers in milliseconds Speaker Delay Speaker Delay SET ENTER SRC RETURN SETUP BACK END MENUE CHANGE AUDIO AUDIO PREV PREV REAR Oms CENTER Oms You are in the AUDIO setup menu 1 Use the keys to select the Speaker Delay sub menu and press the ENTER key The CENTER option is highlighted 2 Use the keys to select the CE...

Page 54: ...R CENTER or SUBWOOFER and press the ENTER key 3 Use the keys to raise or lower the loudspeaker level for the chosen loudspeaker and press the ENTER key to confirm the settings Dynamic range Note The dynamic range can be raised or lowered in the following steps OFF 1 8 2 8 3 8 4 8 5 8 6 8 7 8 FULL Dynamic Range Dynamic Range SET ENTER SRC RETURN SETUP BACK END MENUE CHANGE AUDIO AUDIO PREV PREV D R...

Page 55: ...rs Monitor setup 1 Press the SETUP key and then choose the SCREEN set up menu by repeatedly pressing the SRC key The SCREEN setup menu appears Tilt Tilt SET ENTER SRC RETURN SETUP BACK END MENUE CHANGE SCREEN SCREEN BACKWARD BACKWARD POSITION POSITION BACKWARD BACKWARD FORWARD FORWARD OPEN CLOSE OPEN CLOSE Automatic Automatic Manual Manual TILT TILT 2 2 1 1 0 1 1 2 2 1 1 2 2 Monitor tilt Here you ...

Page 56: ...trast 0 Color Color 0 Brightness Brightness 0 You are in the SCREEN setup menu 1 Use the keys to select the Control sub menu and press the ENTER key The Brightness option is highlighted 2 Use the keys to choose the option you want from Brightness Color Contrast Tint or Dimmer and press the ENTER key 3 Make the adjustments using the keys and confirm by pressing the ENTER key User setup 1 Press the ...

Page 57: ...r the old password is highlight ed 2 To change the password you must first enter the old password into the OLD CODE field 3 You then enter the new password into the NEW CODE field and repeat it in the RE CODE field Image management The Chicago IVDM 7002 allows you to display different back ground images You can also load your own pictures into the de vice from a CD ROM and choose these for the bac...

Page 58: ...key The chosen image is displayed as the background It is also possible to change the background image for the active audio source directly 1 Press the DISP WALLPAPER key as often as necessary to bring the desired image into view Automatic change If automatic change is switched on the background image chang es with each track that is played from the audio or MP3 CD The background changes every 5 m...

Page 59: ...ter insert ing the CD ROM Image Manager Image Download SET ENTER SETUP END IMAGE 1 IMAGE 2 IMAGE 3 IMAGE 4 IMAGE 5 IMAGE 7 IMAGE 6 F r o m t h i s m e n u y o u c a n d e l e t e a c u r r e n t l y s t r e d i m a g e o r d o w n l o a d a n e w i m a g e f r o m y o u r C D R O M A f t e r y o u s e l e c t t h e i m a g e f i l e y o u w o u l d l i k e t o e d i t 1 7 H i g h l i g h t f i l e...

Page 60: ...g I M A G E _ 2 j p g I M A G E _ 3 j p g I M A G E _ 4 b m p A menu displaying the images stored on the CD ROM ap pears 2 Choose the image you want and press the ENTER key The image is displayed on the monitor File 003 RETURN RETURN STORE 3 Choose the STORE option to load the image The image is stored following a security confirmation question or 3 Select the RETURN option to go back to the selec...

Page 61: ...ey Select external signal source You can activate or deactivate the AUX sources in this menu and you can specify the inputs to which particular additional de vices navigation unit reversing camera are connected You can make the following settings The connection of a navigation device NAVI NONE RGB AUX 1 AUX 2 AUX 3 The connection of the reversing camera CAMERA NONE RGB AUX 1 AUX 2 AUX Reversing th...

Page 62: ...sing the keys and confirm by pressing the ENTER key 4 Make other settings if necessary 5 Leave the menu by pressing the RETURN key Factory settings Protected Configuration Protected Configuration SET ENTER SRC RETURN SETUP BACK END MENUE CHANGE USER USER Reset Load Default Config Load Default Config You are in the USER setup menu 1 Use the keys to select the Protected Configuration sub menu factor...

Page 63: ...p or if some of its functions can no longer be operated it is possible to restart the device software by pressing the reset button using the tip of a ballpoint pen The reset button is located behind the re movable control panel If the problem persists please contact your dealer Setup Menu ...

Page 64: ...oudspeakers in the back of the vehicle as well as a subwoofer DVD video DVD video is a software standard specified by the DVD Forum specifically for video signals An application layer is also neces sary for DVD This specifies standards for such things as the play back speed forward reverse play interactivity up to eight audio tracks with up to eight channels and adjustment of camera an gles MP3 MP...

Page 65: ...75 ohms Audio output level typical 4 Vrms 0 2 Vrms Channel separation 55 dB Signal noise ratio 75 dB Bandwidth 20 Hz 20 kHz 2 dB Channel matching 0 5 dB Harmonic distortion factor RMS 0 05 Output power 4 x 16 watts sine according to DIN 45 324 at 14 4 V 4 x 45 watts max power Centre loudspeaker 1 x 12 watts sine according to DIN 45 324 at 14 4 V 1 x 25 watts max power AUX 1 2 3 Signal noise ratio ...

Page 66: ...Komi 7579 Korean 7574 Kuanyama 7585 Kurdish 7679 Lao 7665 Latin 7686 Latvian 7666 Letzeburgesch 7678 Lingala 7684 Lithuanian 7775 Macedonian 7771 Malagasy 7783 Malay 7776 Malayalam 7784 Maltese 7186 Manx 7773 Maori 7782 Marathi 7772 Marshall 7779 Moldavian 7778 Mongolian 7865 Nauru 7886 Navajo 7868 Ndebele North 7882 Ndebele South 7871 Ndonga 7869 Nepali 8369 Northern Sami 7879 Norwegian 7866 Norw...

Page 67: ...7 337 210 94 12 711 Ireland IRL 01 4149400 01 4598830 Italy I 02 369 62331 02 369 62464 Luxembourg L 40 4078 40 2085 Netherlands NL 023 565 6348 023 565 6331 Norway N 66 817 000 66 817 157 Portugal P 01 2185 00144 01 2185 11111 Spain E 902 120234 916 467952 Sweden S 08 7501500 08 7501810 Switzerland CH 01 8471644 01 8471650 Czech Rep CZ 02 6130 0441 02 6130 0514 Hungary H 01 333 9575 01 324 8756 P...

Reviews: