


10
www.blaubergventilatoren.de
KOMFORT EC S/SB
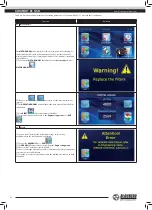
The S11 control panel includes a lithium cell
CR1220
with a limited time
resource.
The battery keeps the internal clock running while the unit is
disconnected from power supply. If the unit is disconnected from power
supply and the battery is low, the clock stops and the day and time settings
are reset. This leads to incorrect date and time indication when the unit is on
and, as a result, to incorrect scheduled operation of the unit. In this case, the
battery should be replaced. To replace the battery use a new battery only.
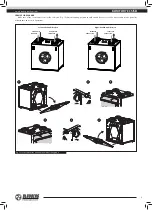
Battery replacement:
1. Disconnect the air handling unit from power supply.
2. Remove the two screws in the bottom part of the casing.
3. Remove the Display. Replace the battery as shown.
4. 4. Assemble the control panel in the reverse order. If the terminal
block wires on the upper circuit board were unplugged make sure to re-
connect them correctly. Failure to re-connect the wires properly will result in
operating failure of the equipment.
5. Connect the panel to the power supply and set the current date and
time.
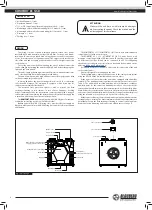
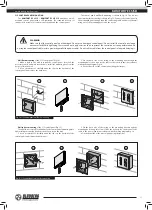
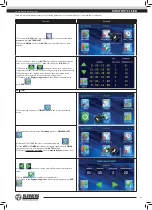
S11 CONTROL PANEL MOUNTING
The
KOMFORT EC S S11 / KOMFORT EC SB S11
units have a wall-
mounted control panel S11 with a touch screen. The standard delivery set
includes a 10 m cable for connection of the unit and the control panel. The
control panel installation chart is shown in Fig. 13. The room temperature
sensor is integrated into the control panel. For that reason the control panel
must be installed in a temperature balanced place, at least 1 m away from the
heating equipment, doors and windows.
Fix the control panel to the wall using the screws and connect it to the air
handling unit using a supplied four-wire connecting cable.
For control panel mounting refer to Fig. 13.
WARNING
Make sure that the control panel is not damaged. Do not use a damaged control panel! Do not install the control panel on an uneven
surface! While tightening the screws do not apply excessive force to prevent the control panel casing deformation. Do not lay the
control panel cable in close proximity parallel to a power cable! Do not coil the cable from the control panel in loops while laying it.
!
4
1
2
3
Fig. 13. S11 control panel mounting