Blagdon Powersafe Series Quick Start Manual Download Page 4

Switch Box Mounting

The Switch box should be situated in a  
site that is protected from:

• 

Flooding

• 

Extreme heat

• 

Physical damage

• 

Tampering by adults children or pets

Installation step by step

Remove the Switch box from the mounting bracket.

Unscrew the four screws at the back of the box to remove the Switch box cover.  
Place in a safe location.

INSTALLATION

4

IMPORTANT: 

Please note all electrical work on garden lighting and power installations must 

comply with part P of the building regulations. Failure to comply is a criminal offence. If the  

installation of this product is not carried out by a competent electrician who is registered under the 

Part P self-certification scheme then you must notify the local building control department before 

work begins. For further information and guidance on this matter and other electrical installations 

in your home that might be covered by the relevant legislation, contact your local authorities 

building control department.
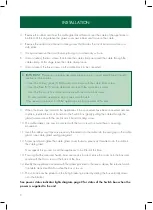
FIXING PLATE

POST OR WALL

HOLE FOR WALL PLUG WALL

6mm

28mm

IMPORTANT: 

Before removing the cover for wiring or adding additional appliances to the Switch 

box always ensure that the mains power supply is off and isolated.

Summary of Contents for Powersafe Series

Page 1: ...e due to a blown fuse Each switch has an individual fuse to provide overload protection ensuring that even if one or more items of equipment fail the other essential equipment is still able to functio...

Page 2: ...LIGHT Switch on or off Fuse has blown no power Individual switch power outlets Power Supply Status TECHNICAL SPECIFICATION CHART SWITCH BOX 2 WAY 3 WAY 4 WAY 5 WAY Voltage 220 240V 220 240V 220 240V 2...

Page 3: ...current not exceeding 30mA must be installed in the supply circuit This unit should be connected to a mains supply that is fused with a 13 amp fuse or 15 amp circuit breaker IMPORTANT Do not drill or...

Page 4: ...s Failure to comply is a criminal offence If the installation of this product is not carried out by a competent electrician who is registered under the Part P self certification scheme then you must n...

Page 5: ...d for a application This should be inserted to maintain a weatherproof seal INSTALLATION 5 IMPORTANT Please note that the mains input must be connected to the green power input cable block only Switch...

Page 6: ...cable gland see cable gland sealing diagram 12 Screw and hand tighten the cable gland cover that was previously threaded onto the cable to the cable gland Now repeat this process for all the applianc...

Page 7: ...lifting in a vertical action 2 Remove the four cover locating screws from the back of the box 3 Having identified which switch fuse has blown 5 amp for switch 1 or 1 5 amp for subsequent switches rem...

Page 8: ...atergardening co uk www pondaquariumproblemsolver co uk blagdon IMPORTANT 8 GUARANTEE This product is guaranteed against defects in material and workmanship for 3 years from the date of purchase under...

Reviews: