background image

10 

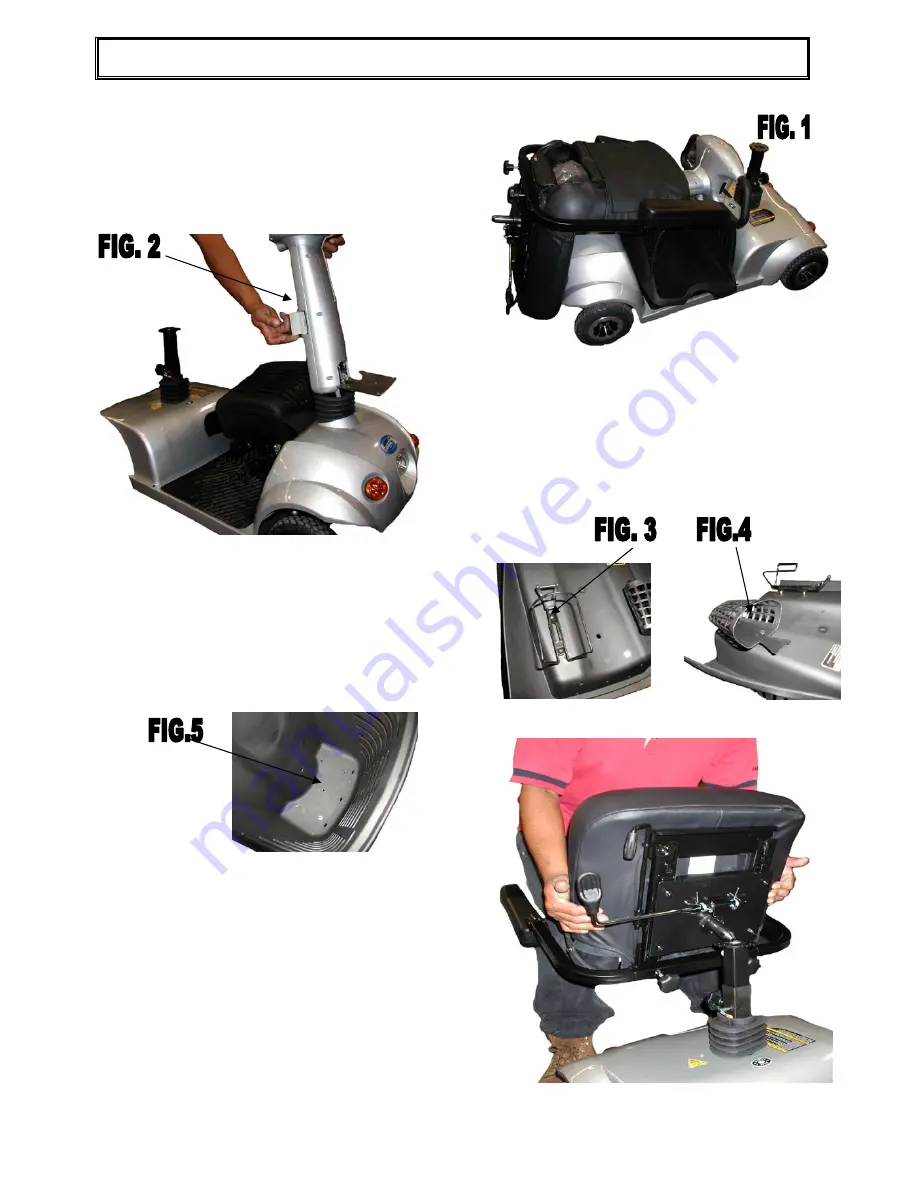
1. Once removed from the box the vehicle will appear as shown (Fig. 1). 

2. Remove the seat and the basket from the 
vehicle and set it aside. Locate the tiller 
lever and fold the handle bars up. See photo 
below (Fig. 2). 


3. Locate your basket, water bottle holder, and 
your cell phone basket. Attach your water 
bottle holder and your phone basket to the 
large basket using the screws provided. (Fig. 3 
and 4) Once you have your basket ready you 
can now attach it to the vehicle. 

4. To attach the basket to the vehicle use 
the five screws provided. Place the basket 
on the metal bracket on the front of the 
vehicle and line up the five holes in the 
bottom of the basket (Fig. 5) to the holes 
on the metal bracket. Insert the screws and 
tighten to secure the basket. 


5. Lastly attach the seat. Line up the pin on the 
bottom of the seat with the seat post and slide 
it into place. Lift the lever on the side of the 
seat to lock the seat into place. 


5. ASSEMBLY INSTRUCTIONS 

Summary of Contents for Travel Mate DKS280

Page 1: ...1 DKS280 Travel Mate OWNER S MANUAL BLADEZ HEALTH PRODUCTS CORPORATION PHONE 1 866 610 0330 20155 ELLIPSE EMAIL BLADEZHEALTHPRODUCTS EBLADEZ COM FOOTHILL RANCH CA 92610 WEBSITE WWW EBLADEZ COM...

Page 2: ...r Vehicle 6 3 Setting the Free Wheel and Drive Mode 11 7 CHARGING AND BATTERY 7 1 Charging the Battery 7 2 Battery 17 8 INSPECTION AND MAINTENANCE 8 1 Daily Checking 8 2 Regular Checking Record 8 3 Fu...

Page 3: ...injury and or property damage L Suggestion Follow these instructions to maintain safe and efficient operations and functions of this vehicle This manual includes a repair and maintenance record chart...

Page 4: ...our vehicle in busy areas such as shopping malls business centers etc If you take any prescription drugs consult your physician before operating your vehicle Some medications may impair your ability t...

Page 5: ...aterway without any fences or hedges These conditions can affect the performance of your vehicle and could lead to an accident or injury Do not drive at night or in raining snowing or misting weather...

Page 6: ...de gutters or you may get your wheels stuck Do not make sudden turns when driving on gravel roads or ramps Avoid any terrain or obstacle that makes you feel the vehicle will not perform in a safe mann...

Page 7: ...ity This is called its immunity level The higher the immunity level is the greater the protection is Current technology is capable of achieving at least a 20 V m immunity level which would provide use...

Page 8: ...ic interference EMI from sources such as radio and TV stations amateur radio HAM transmitters two way radios and cellular phones can affect electric powered vehicles such as your motorized vehicle Fol...

Page 9: ...ol Panel 4 Tiller 5 Basket 6 Head Lamp 7 Signal Lamp 8 Cup Bottle Holder 9 Arm Rest 10 Seat 11 Seat Angle Adjust Bar 12 Height Adjustable Seat Post 13 Rear Turning Light 14 On Board Charger 15 Free Wh...

Page 10: ...provided Fig 3 and 4 Once you have your basket ready you can now attach it to the vehicle 4 To attach the basket to the vehicle use the five screws provided Place the basket on the metal bracket on th...

Page 11: ...ON or OFF OFF Power is turned off ON Power is turned on without lights on LIGHT Both power and light are turned on Speed Dial Allows the user to set the speed according to preference Forward Reverse a...

Page 12: ...incline NEVER set the vehicle to free wheel mode In such case the electromagnetic brake will not activate Seat Seat can be turned 360 degrees in 90 degree increments Seat height can be adjusted by re...

Page 13: ...batteries may respond slower and the traveling distance may be less than in the summer 4 When driving on an incline the battery indicator may move up and down This is normal 5 Under normal circumstan...

Page 14: ...g lever gradually to tilt the tiller 2 Adjust the tiller to the desired angle 3 Let the adjusting lever go and the tiller will automatically be fixed at the desired angle WARNING Do not set the vehicl...

Page 15: ...rgency stop and possible injury 3 Do not set to highest speeds while driving indoors 4 Do not adjust speed dial while driving the sudden change of speed may endanger you and cause the failure of your...

Page 16: ...l activate the electromagnetic brake and stop 2 Turn the power switch to OFF and remove the key from the vehicle ATTENTION The stopping distance will vary with your speed When parking your vehicle par...

Page 17: ...ously shortened or decayed if the battery is repeatedly used without being fully charged For optimum performance charge the batteries every day 2 When finished charging the electric power will slowly...

Page 18: ...sealed lead acid batteries maintenance free so it is not necessary to change the battery liquid or refill the liquid WARNING Do not open the battery seal cap for any reason at any time Cleaning the b...

Page 19: ...GGESTION 1 Make sure the battery wiring harnesses are installed properly on the terminals and re install the shroud 2 Do not use the batteries to charge telecom equipment or other items 3 Always repla...

Page 20: ...eleased Motor Are there any abnormal noises from the motor Does the electromagnetic brake work properly Free wheel Mode Does the free wheel mode lever work properly Battery Condition meter Is the ligh...

Page 21: ...n Item Period 1 mo 6 mo 12 mo 18 mo 24 mo 30 mo Forward Reverse speed lever The function of switches Control Panel Connection of Socket Plug is good Operation and Noise Function of Electromagnetic Bra...

Page 22: ...If the power switch is ON and the battery indicator is not lit check the fuses LSUGGESTION Contact your authorized Bladez Health Products Corporation Service Center for inspecting or replacing the fus...

Page 23: ...lead to accidents or vehicle malfunction Use soft and dry cloths to keep your vehicle clean for optimum appearance and performance ATTENTION When conducting the maintenance of your vehicle turn the po...

Page 24: ...ions Vehicle battery charge may be low Check the battery indicator on the control panel and charge if needed Check for obstructions on or around the vehicle or in your pathway Check adjustable speed d...

Page 25: ...4 Current limit time out Drive inhibited The motor current has reached too high a value Check the condition of the motor and wiring harnesses Contact your service agent 5 Free wheel engaged Drive inhi...

Page 26: ...omagnetic brake Net Weight with battery 117 lbs Net Weight without battery 88 lbs Weight Capacity 300 lbs Slope Grade Ability 13 degrees Range Per Charge Up To 15 miles Maximum Speed 4 5 mph Turning R...

Page 27: ...y can be performed by authorized Bladez Health Products Corporation Service Centers only 3 Transportation repair or replacement costs will be the purchaser s responsibility 4 Replaced parts will be th...

Page 28: ...in accordance with the owner s manual 4 Modifications or repairs performed by unauthorized service centers or the use of non genuine Bladez Parts will not be covered under warranty 5 Failure of unit d...

Page 29: ...Bladez Health Products Corporation dealer where it was purchased 11 2 5 Warranty rights are non transferable Bladez health product corporation warranty is non transferable The warranty will only be h...

Reviews: