background image


21


SECTION 9 


WARRANTY


USA Warranty 

Warranties may vary in other countries.  See your local Bladez Dealer. 


BLADEZ FITNESS 

extends the following exclusive, limited warranty of POWERMILL, which shall 

apply only to the use of the device in the home, for residential, non-commercial purposes only. Any other 
use of the device shall void this warranty. 
 

FRAME

 – LifeTime 

Bladez Fitness warrants the Frame against defects in workmanship and materials for Lifetime, so long as it 
remains in the possession of the original owner. 
 

MOTOR

 – 10 Years 

Bladez Fitness warrants the Motor against defects in workmanship and materials for a period of TEN years 
from the date of original purchase, so long as the device remains in the possession of the original owner. 
 

ELECTRONICS & PARTS

 – 2 Years 

Bladez Fitness warrants the Electronic components and all original parts (other than the Motor) against 
defects in workmanship and materials for a period of two years from the date of original purchase, so long 
as the device remains in the possession of the original owner. 
 

LABOR

 – 1 Year 

Bladez Fitness shall cover the 

labor

 cost for the repair of the device for a period of one year from the date 

of original purchase, so long as the device remains in the possession of the original owner. 
 
EXCLUSIVE REMEDY 
The exclusive remedy for any of the above warranties shall be repair or replacement of defective parts, or 
the supply of labor to cure any defect, provided that labor shall be limited to one year. All labor shall be 
supplied by the local retailer and the product must be located within the retailer’s service area. Products 
located outside the retailer’s service area will not be covered by the labor warranty. 
 
EXCLUSIONS AND LIMITATIONS 

This warranty applies only to the original owner and is not transferable. This warranty is expressly limited 
to the repair or replacement of a defective Frame, Electronic component, or defective part and is the sole 
remedy of the warranty. The warranty does not cover normal wear  

BLADEZ FITNESS expressly disclaims all other warranties, express or implied, including but not limited 
to all warranties of fitness for a particular purpose or of merchantability. This warranty gives you specific 
legal rights and your rights may vary from state to state. 

WARRANTY REGISTRATION 

Your warranty card must be completed and sent to BLADEZ FITNESS before a warranty claim can be 
processed.  


Summary of Contents for POWERMILL BF-6422

Page 1: ...Treadmill Owner s Manual BF 6422...

Page 2: ...BF 6422 POWERMILL This will allow you to get a full understanding of all the features BLADEZ treadmills provide If you have any questions or concerns please contact BLADEZ Corporation or any authorize...

Page 3: ...TS SECTION PAGE 1 IMPORTANT SAFETY INSTRUCTIONS 3 2 ASSEMBLY INSTRUCTIONS 5 3 GETTING STARTED 10 4 PROGRAMS DETAILS 14 5 PREVENTIVE MAINTENANCE 16 6 EXPLODED VIEWS 17 7 PARTS LIST 18 8 TROUBLESHOOTING...

Page 4: ...when servicing the treadmill 4 Close supervision is necessary when this appliance is used by on or near children invalids or disabled persons 5 Use this appliance only for its intended use as describe...

Page 5: ...An improper connection of the equipment grounding conductor can result in a risk of an electrical shock Check with a qualified electrician or serviceman if you are in doubt as to whether the product i...

Page 6: ...ASSEMBLY PART LIST ITEM NO DESCRIPTION QUANTITY a Bolt M5 x P0 8 x 10 4 b Bolt M5 x P0 8 x 15 2 c Bolt M8 x P1 25 x 15 8 d Bolt M8 x P1 25 x 60 8 e Screw 5 x 25 2 f Allen wrench 5mm 1 g Allen wrench 6...

Page 7: ...t C or right D side uprights You will find two holes on one side and that is the inner side of the left and right uprights 2 Tie the attached black guide wire to the wire connector and feed the wire s...

Page 8: ...hem with 4 bolts a as shown 4 Feed the handrail wires through the console mounting pipe G and H openings and pull them out from the top Insert handrails I and J onto console mounting pipes G and H J h...

Page 9: ...view Pull the wire connector from the top of the console mounting pipe and rest the handrail on top of the uprights Secure them with 4 bolts d 6 Connect wire connectors coming out from the console A...

Page 10: ...9 ASSEMBLY INSTRUCTIONS CONTINUED 7 Tighten all handrail bolts Press to snap the left and right handrail covers K and L in place and secure them with 2 screws e...

Page 11: ...NG To unfold the treadmill from the upright position simply depress the unfolding pedal with your right foot and guide the deck down with both hands Make sure that you do not let go until the deck is...

Page 12: ...g belt and stand on the plastic side rails Insert the safety key and attach the rope to your clothing Do not stand on the walking belt while starting or stopping the treadmill QUICK START 1 Turn on PO...

Page 13: ...lse window KEY FUNTIONS START This key is used to begin any treadmill program or quick start MODE This key is used to enter into the program mode It is also used to change the values on the display re...

Page 14: ...r of minutes left in the program that you have selected In Quick start it will read the number of minutes that you have been exercising CALORIES This reading is the amount of body heat in calories bur...

Page 15: ...S The following is a dot matrix level scale display showing INCLINE and SPEED windows Each pre set program P1 P6 has 3 levels of workout choices as shown in the following profiles P1 9 HOLE P2 CARDIO...

Page 16: ...15 PROGRAM DETAILS CONTINUED P3 RUNNING P4 FAT BURN INCLINE SPEED INCLINE SPEED P4 INTERVALS P6 HILL INTERVALS INCLINE SPEED INCLINE SPEED...

Page 17: ...adjusted closer to the center the treadmill can be powered on again It is recommended that the deck be lubricated every 6 12 months according to the frequency of usage Use 6mm Allen wrench to loosen t...

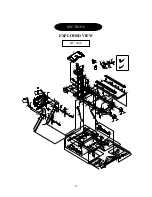
Page 18: ...17 SECTION 6 EXPLODED VIEW BF6527 HRP BF 6422...

Page 19: ...25x40 2 83 Bolt M8xP1 25x40 2 25 Bolt 5x25 2 84 Sponge 20x100x1 5t 6 26 Plate L NO 2392 L 1 85 Walking board 1 27 Plate R NO 2392 R 1 86 Power cord 1 28 Base 1 87 Control wire bottom 1 29 Bolt K 288...

Page 20: ...nsor position Speed Sensor Faulty Replace S Sensor Loose Display Cable Check Display Cable connection Faulty MCB D2 LED on Replace MCB Drive Motor disconnected Check D Motor connection Drive Motor Fau...

Page 21: ...Elevation Motor screw binding Clean screw and lubricate Elevation Motor out of Range Check Zero Position of E Motor E Motor Potentiometer Replace Elevation Motor E7 Elevation Motor Elevation Motor out...

Page 22: ...t for the repair of the device for a period of one year from the date of original purchase so long as the device remains in the possession of the original owner EXCLUSIVE REMEDY The exclusive remedy f...

Reviews: