background image

C H A P T E R   6   -   C O N F I G U R A T I O N   U T I L I T Y

21

1 - 8 7 7 - 8 7 7 - 2 2 6 9

w w w . b l a c k b o x . c o m

An EEPROM can be saved to a file using the Save to File button.  This allows for the current state of the 
EEPROM to be restored at a later time.

P O R T   1 / P O R T   2   B U T T O N S

When Port 1 is depressed, the Write Radio and Read Radio buttons communicate through Port 1.  When Port 
2 is depressed, the Write Radio and Read Radio buttons communicate through Port 2.

C A L C   B A U D   B U T T O N

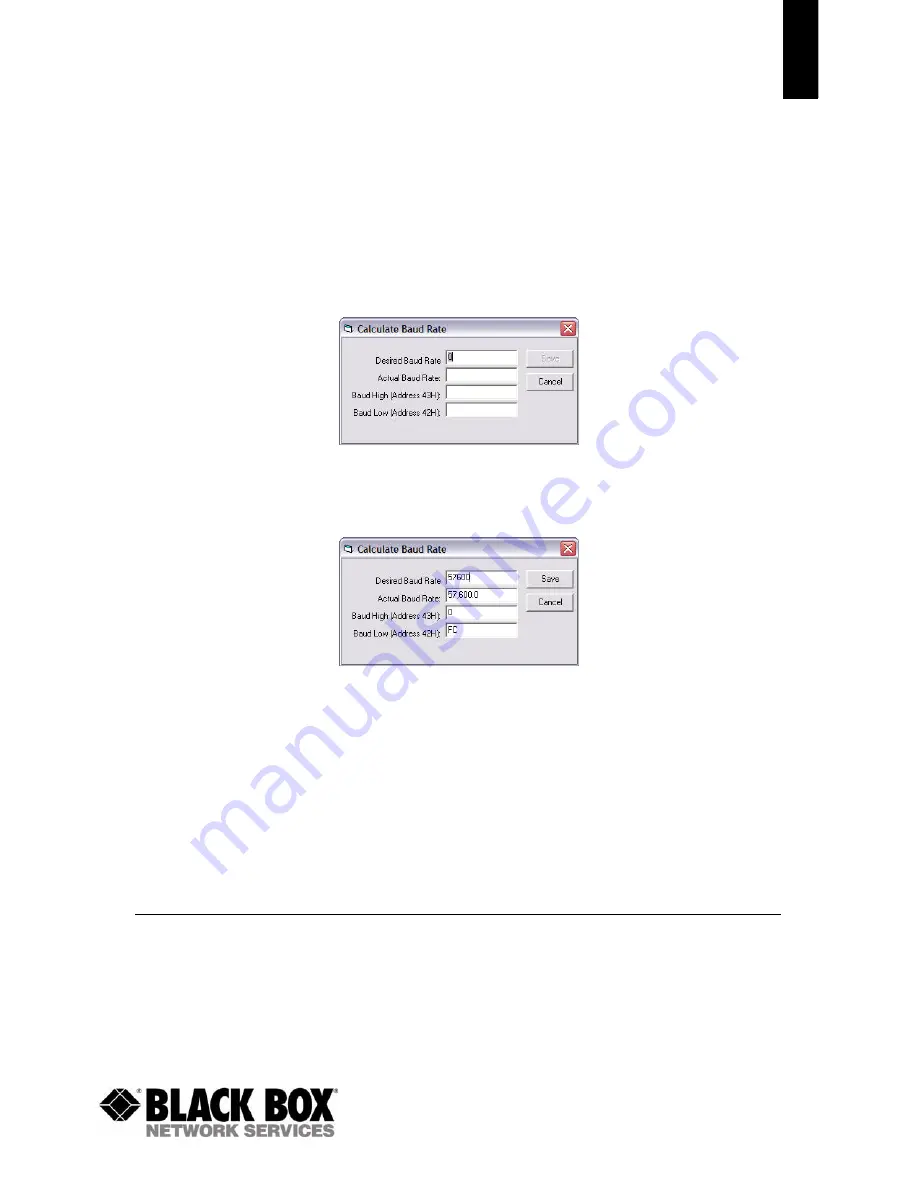
The Baud pull-down menu includes all standard PC baud rates.  To select a non-standard baud rate, the 
Calc Baud button can be pressed.  This will bring up the following window:

To calculate the settings for a particular baud rate, type that baud rate into the Desired Baud Rate window 
and click the Calculate button.  If the baud rate is not supported by the radio, an error message will be 
displayed.  Otherwise, the information will be filled in and the Update button will be enabled.  An example is 
shown below:

Clicking the Save button will cause the baud rate shown in the Actual Baud Rate window to be displayed in 
the Baud window on the Configure page of the software.  Clicking Cancel will ignore these changes.  The 
Actual Baud Rate will not always match the Desired Baud Rate.  However, the program verifies that the 
Desired Baud Rate is within 3% of the Actual Baud Rate (as required by the radio).

H E X / D E C I M A L   B U T T O N

All of the text entry type boxes found on the Configure page have a button located to the right of the box.  
When pressed a menu will be shown which allows the selection of either Hexadecimal or Decimal 
numbering format for that particular text box.  When the program is restarted, all text boxes will revert 
back to Hexadecimal.

T E R M I N A L / C H A T   P A G E

The Terminal/Chat page is a terminal emulator (simular to HyperTerminal) used to send small data packets 
between two COM ports.  As data is received it is appended to the appropriate Port window.  An example of 
the Terminal/Chat page is shown below.

Summary of Contents for MDR29x

Page 1: ...eless 900 MHz Modem User s Manual Version 1 5 1000 Park Drive Lawrence PA 15055 1018 Website www blackbox com Email info blackbox com Order Toll Free in the US Call 877 877 BBOX Outside the US call 72...

Page 2: ...environmental requirements such as military medical life support or life sustaining equipment are specifically not recommended without additional testing for such application Limited Warranty Disclai...

Page 3: ...O V E R V I E W The MDR29x uses Frequency Hopping Spread Spectrum modulation where the units hop from frequency to frequency many times per second using a specific hop pattern applied to all the tran...

Page 4: ...on specifications interface definition configuration information and mechanical drawings The OEM is responsible for ensuring the final product meets all appropriate regulatory agency requirements list...

Page 5: ...quency Band 902 928 MHz USA 915 928 MHz Australia RF Data Rate 76 8 kbps fixed RF Technology Frequency Hopping Spread Spectrum Output Power Conducted no antenna EIRP 3dBi gain antenna MDR292 4A 743mW...

Page 6: ...en On indicates that the unit is powered up Link Red On indicates that the Client unit s and Server unit are in range of each other Client units activate the Link LED when in Range of the Server unit...

Page 7: ...T H E R R S 2 3 2 E Q U I P M E N T The MDR292A is a DCE Data Communications Equipement device Typically devices like PC s are considered DTE Data Terminal Equipment devices while periphial devices a...

Page 8: ...C E t o D C E I n te r fa c e J1 J 2 SIG NAL F i g u r e 7 D B 9F t o D B 9F S t r ai gh t T hr o u g h C a bl e 1 1 DCD 2 2 RXD 3 3 TXD 4 4 DTR 5 5 GND 6 6 DSR 7 7 RTS 8 8 CTS 9 9 RI Shell Shell GND...

Page 9: ...e m al e N u l l Mo d em C a b l e 1 N C DCD 2 3 RXD 3 2 TXD 4 6 DTR 5 5 GND 6 4 DSR 7 8 RTS 8 7 CTS 9 N C RI Shell Shell GND J1 6 1 9 5 1 70 72 00 1 1 70 5 9 6 J2 If you previously used a straight th...

Page 10: ...RS 485 traffic over the RF Conversely as soon as a MDR294A receives a packet over the RF it will transmit the packet over the RS 485 bus Note When using RS485 2 wire Half Duplex a RS485 to RS232 conv...

Page 11: ...USB Slave device peripheral and cannot be connected to another USB Slave device U S B D R I V E R The MDR291A is a stand alone RF module that interfaces to a USB port on the Host device It uses a Vir...

Page 12: ...nd to its host it checks the state of Ready To Send and if it is logic low will send data to its host If RTS is logic high it will not send data to its host These signals are sent apart from the data...

Page 13: ...can be enabled A D D R E S S E D P A C K E T S When sending an addressed packet the RF packet is sent only to the receiver specified in destination address To increase the odds of successful delivery...

Page 14: ...mmands F I G U R E 1 0 P E N D I N G R F A N D D A T A I N B U F F E R F L O W Receive Mode Broadcast Packet Receive full packet and check CRC Addressed Packet Matching Destination MAC Validate CRC Du...

Page 15: ...and Client pair Sometimes referred to as a wireless bridge a point to point link replaces a single communications cable P O I N T T O M U L T I P O I N T Point to Multipoint systems have one base sta...

Page 16: ...the number of times a data packet will be transmitted by the Server MDR29x The default value is 4 attempts If communication is lost and the Clients Link LED is on try increasing this value in small in...

Page 17: ...ation Utility 4 Select the COM Port that is connected to the MDR29x unit on the PC Settings page 5 Select the Interface Baud Rate of the MDR29x unit All MDR29x units are shipped with a default rate of...

Page 18: ...PC to complete the installation Click OK to complete the installation By default the software is stored in the following location on the Start Menu Start All Programs Black Box Network Services Black...

Page 19: ...will attempt to open the port and list its status as Unavailable Open or Closed Although menus are shown for Data Bits Parity and Stop Bits only the Parity menu selection can be changed F I N D P O R...

Page 20: ...required the software will prompt the user to type a description of the changes made Auto Archive can be used to restore the radio to a previously known working configuration The first time that a rad...

Page 21: ...on the Product Mode The Info Center provides a quick description of each setting mode For detailed decriptions of the individual settings please refer to the OEM Module user s manual R E A D R A D I...

Page 22: ...utton is pressed the GUI view will be updated with the default settings for the selected product This feature is only available on the GUI Page and will not work when using the EEPROM Editor View P A...

Page 23: ...mation will be filled in and the Update button will be enabled An example is shown below Clicking the Save button will cause the baud rate shown in the Actual Baud Rate window to be displayed in the B...

Page 24: ...S E N D B U T T O N This button sends the data in the textbox out the selected port s The current user s Windows username is also sent over the RF with the data H E X A D E C I M A L A S C I I D I S P...

Page 25: ...hardware setups 1 One radio is plugged into a serial or USB port on a PC The second radio is plugged into a separate power supply with a loopback adapter connected 2 One radio is plugged into a serial...

Page 26: ...ceived packets can either be displayed in ASCII or Hexadecimal format marked with a time stamp and show only when an error has occurred T A B L E 6 T E S T S E L E C T I O N S E T T I N G S TE S T S E...

Page 27: ...7 F i g u re 1 1 M D R 29 x M ec h an i c a l 0 000 0 250 Ante SMA 0 000 0 375 0 000 0 536 0 060 D Connector 0 dia pin and g pin is PWR J3 J4 2 375 2 750 4 500 4 750 2 0 0 15 4 p 1 170 0 565 4 185 Sta...

Reviews: