5
ENGLISH
ENGLISH
Intended use
Your Black & Decker water filter has been designed to
deliver pure filtered water quickly, removing high levels of
chlorine and limescale. This product is intended for
household use only.
Using your filter jug
X
Only filter cold water.
X
Do not use the filter jug for any other purpose than
filtering water.
X
Treated water should be consumed or discarded within
two days.
X
If the water filter has not been used for more than
48 hours, flush the filter twice with fresh cold water and
discard the water before using as normal.
X
If the water filter is not be used for an extended period,
remove the filter cartridge, place it in a clean plastic bag
and store it in a refrigerator. Before using the filter after
storage, follow the preparation instructions in this
manual.
X
Always store filter cartridges out of direct sunlight and
away from heat sources.
Additional safety instructions for non-rechargeable
batteries
X
Never attempt to open for any reason.
X
Do not store in locations where the temperature
may exceed 40 °C.
X
When disposing of batteries, follow the instructions
given in the section "Protecting the Environment".
X
Do not incinerate the batteries.
X
Never try to recharge non-rechargeable batteries.
X
Install batteries correctly.
X
Make sure the contact faces are clean.
X
Do not mix different types or brands of batteries.
X
Keep batteries away from small children.
X
Under extreme conditions, battery leakage may occur. If
liquid is noticed on the batteries, carefully wipe the liquid
off using a cloth. Avoid skin contact.
Features
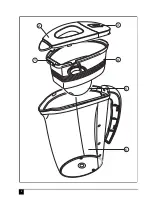
1. Spout
2. Lid
3. Cartridge life indicator
4. Water tank
5. Aqua Optima
TM
filter cartridge
6. Filter jug
7. Seal
Unpacking
X
Remove all packaging from the filter jug.
X
Remove the lid by gripping the sides of the lid (2) and
lifting it from the filter jug.
X
Take the water tank (4) and the filter cartridge (5) out of
the filter jug (6) and remove any packaging.
X
Clean the filter jug (6) with cold fresh water.
Assembly
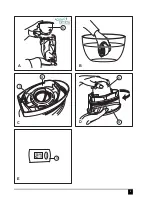
Preparing the water filter cartridge (fig. A and B)
X
Prepare the filter cartridge (5) by carefully following all
the instructions on the packaging.
X
Remove the cartridge (5) from the packaging (fig. A).
Note:
There may be a small residue of black carbon particles
in the packaging or adhering to the body of the cartridge.
This is normal, these particles are harmless and will be
washed off during the following preparation process.
X
Immerse the cartridge (5) in cold fresh water and shake
the cartridge (5) to remove the air trapped within the
cartridge (5) (fig B).
Note:
Some loose carbon particles may be released during
this process. This is normal and does not affect the
performance of the filter cartridge.
Fitting the Aqua Optima
TM
filter cartridge (fig. C and D)
X
Remove the lid (2).
X
Remove the water tank (4) from the filter jug (6).
X
Make sure that the seal (7) is seated correctly in the
base of the water tank (4) (fig. C).
Note:
If the seal is missing or incorrectly fitted, unfiltered
water may leak into the filter jug.
X
Put the filter cartridge (5) into the recess in the base of
the water tank (4).
X
Press the filter cartridge (5) against the seal (7) and turn
it clockwise to lock it in place (fig. D).
X
Make sure that the filter cartridge (5) is securely locked
in place.
X
Put the water tank (4) into the filter jug (6).
X
Fit the lid (2).
X
Fill the water tank (4) with cold water, the water will pass
through the cartridge (5) into the filter jug (6).
X
Discard the water.
X
Repeat the process of filling and discarding once more.
X
Fill the water tank (4), the filter jug (6) is now ready for
use.
Filter cartridge life indicator (fig. E)
The cartridge life indicator (3) will remind you when to
change the filter cartridge (5).
Note:
It is recommended that the filter cartridge is changed
every four weeks.
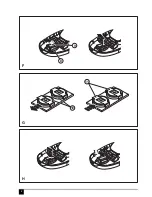
To set the cartridge life indicator (3):
Summary of Contents for wjd225
Page 1: ...500m l 1000m l M AX ENGLISH 5 ITALIANO 8 ΕΛΛΗΝΙΚΑ 11 ...
Page 2: ...2 500m l 1000m l M AX 4 1 5 6 3 2 ...
Page 3: ...3 B A D C E 5 4 5 7 4 3 RESET ...
Page 4: ...4 H F G 8 10 11 9 ...
Page 14: ...14 ...


