background image

4

3

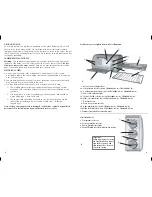
Product may vary slightly from what is illustrated.

  1.  Easy-view curved glass door
† 2.  Temperature selector (Part # TRO490W-01 (w), TRO490B-01 (b))
† 3.  Cooking function selector (Part # TRO490W-02 (w), TRO490B-02 (b)
  4.  Power ON indicator light
† 5.  TOAST/TIMER selector (Part # TRO490W-03 (w), TRO490B-03 (b))
† 6.  Slide-out crumb tray (Part # TRO490W-04 (w), TRO490B-04 (b))
  7.  Dual rack slots
  8.  Extra-deep curved interior
† 9.  Bake pan/drip tray (Part # TRO490-06 (w), TRO490B-06 (b))
† 10. Slide rack/broil rack (Part # TRO490W-05 (w), TRO490B-05 (b))
†  Consumer replaceable/removable parts

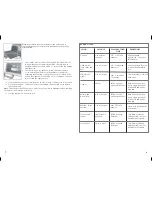
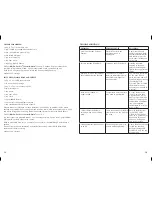
CONTROL PANEL

1.  Temperature selector
2.  Cooking function selector
3.  Power ON indicator light
4.  TOAST/TIMER selector with Stay On setting

B

Important: 

When making toast or using 

the TIMER function, always 

turn the dial past 10 and 

then turn back or forward 

to desired setting.

A

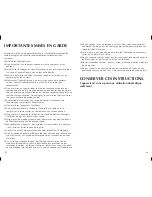
GROUNDED PLUG

As a safety feature, this product is equipped with a grounded plug, which will 

only fit into a three-prong outlet. Do not attempt to defeat this safety feature. 

Improper connection of the grounding conductor may result in the risk of electric 

shock. Consult a qualified electrician if you are in doubt as to whether the outlet 

is properly grounded.
TAMPER-RESISTANT SCREW
Warning:
 This appliance is equipped with a tamper-resistant screw to prevent 

removal of the outer cover. To reduce the risk of fire or electric shock, 

do not 

attempt to remove the outer cover. There are no user-serviceable parts inside. 

Repair should be done only by authorized service personnel.
ELECTRICAL CORD
a)  A short power-supply cord (or detachable power-supply cord) is to be 

provided to reduce the risk resulting from becoming entangled in or tripping 

over a longer cord.

b) Longer detachable power-supply cords or extension cords are available and 

may be used if care is exercised in their use.

c)  If a long detachable power-supply cord or extension cord is used,
 

1)  The marked electrical rating of the detachable power-supply cord or  


extension cord should be at least as great as the electrical rating of the  


appliance,


2)  If the appliance is of the grounded type, the extension cord should be  


a grounding-type 3-wire cord, and


3)  The longer cord should be arranged so that it will not drape over the  


countertop or tabletop where it can be pulled on by children or  


tripped over.

Note: If the power supply cord is damaged, it should be replaced by qualified 

personnel or in Latin America by an authorized service center.

Summary of Contents for Toast-R-Oven TRO490BC

Page 1: ...applicaconsumerproductsinc com Accessories Parts USA Canada Accessoires Pièces É U Canada 1 800 738 0245 Register your product online at www prodprotect com applica for a chance to WIN 100 000 For US residents only Inscrivez votre produit en ligne à l adresse www prodprotect com applica et courez la chance de GAGNER 100 000 Aux résidents du É U seulement Models Modèles TRO490BC TRO490WC ...

Page 2: ...tric burner or in a heated oven Extreme caution must be used when moving an appliance containing hot oil or other hot liquids To disconnect turn any control to OFF then remove plug from wall outlet Do not use appliance for other than intended use Oversized foods or metal utensils must not be inserted in a toaster oven as they may create a fire or risk of electric shock A fire may occur if toaster ...

Page 3: ...you are in doubt as to whether the outlet is properly grounded TAMPER RESISTANT SCREW Warning This appliance is equipped with a tamper resistant screw to prevent removal of the outer cover To reduce the risk of fire or electric shock do not attempt to remove the outer cover There are no user serviceable parts inside Repair should be done only by authorized service personnel ELECTRICAL CORD a A sho...

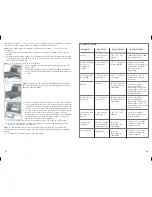
Page 4: ...ust set the timer or select STAY ON I for the oven to function 5 The blue indicator light comes on and will remain lit during the entire baking time 6 The heating elements will cycle on and off to maintain even heat distribution 7 Once oven has preheated open oven door and insert food Close oven door Note You can bake 3 ways Use the bake pan drip tray placed on the oven rack G Place the bake pan d...

Page 5: ... fork and bake until tender Turn halfway through baking period check at minimum baking time Turn halfway through baking period check at minimum baking time Note Be sure food does not extend past the outer limits of the bake broil pan to prevent grease dripping onto the heating elements H Use a metal glass or ceramic baking dish placed on the rack in either the upper or lower slot position Be sure ...

Page 6: ...STAY ON I to control cooking time yourself Be sure to use a kitchen timer 4 If you need to insert bake pan drip tray slide it under the baking rack and place the food directly on the rack Note Be sure food does not extend past the outer limits of the bake pan drip tray to prevent grease dripping onto the heating elements Also be sure the top of the food is at least 1 inches from the top heating el...

Page 7: ...nel CLEANING YOUR OVEN Important Before cleaning any part be sure the oven is off unplugged and has cooled completely Always dry parts thoroughly before using oven after cleaning 1 Clean the glass door with a sponge soft cloth or nylon pad and sudsy water Do not use a spray glass cleaner 2 To remove the slide rack open the door pull the rack out Wash the slide rack in sudsy water or in the dishwas...

Page 8: ... do not seem to be on The heating elements cycle on and off during baking Check the oven to make certain the function desired is being used On broil only the top element is on CREAMY CORNBREAD 1 pkg 8 5 oz corn muffin mix cup cooked or canned whole kernel corn 2 tbsp canned diced green chilies 2 tbsp diced pimentos tsp taco seasoning cup sour cream 1 large egg slightly beaten Preheat Black Decker ...

Page 9: ... ou d en retirer des composantes Ne pas utiliser un appareil dont la fiche ou le cordon est abîmé qui fonctionne mal ou qui a été endommagé de quelque façon que ce soit Pour un examen une réparation ou un réglage rapporter l appareil à un centre de service autorisé Ou composer le numéro sans frais inscrit sur la page couverture du présent guide L utilisation d accessoires non recommandés par le fa...

Page 10: ...usses électriques Communiquer avec un électricien certifié lorsqu on se demande si la prise est bien mise à la terre VIS INDESSERRABLE Avertissement L appareil est doté d une vis indesserrable empêchant l enlèvement du couvercle extérieur Pour réduire les risques d incendie ou de secousses électriques ne pas tenter de retirer le couvercle extérieur L utilisateur ne peut pas remplacer les pièces de...

Page 11: ...ée dans les crochets articulés comme indiqué ci dessus 2 Tourner le sélecteur de température à la température désirée de 65 C à 232 C 3 Tourner le sélecteur de fonction de cuisson à CUISSON 4 Régler la minuterie à la position 10 puis tourner le bouton vers la gauche ou la droite jusqu au temps de cuisson désiré en incluant le délai de préchauffage F E Utilisation L appareil est conçu pour une util...

Page 12: ...de cuisine Nota Vous devez régler la minuterie ou sélectionner le mode I pour que le four fonctionne 5 Le témoin de fonctionnement bleu s allume et reste allumé pendant tout le cycle de cuisson 6 Les éléments chauffants s allument et s éteignent pour maintenir la température voulue 7 Une fois que le four a préchauffé ouvrir la porte et placer les aliments à l intérieur du four Fermer la porte du f...

Page 13: ...la placer sous la grille de cuisson et déposer les aliments directement sur la grille Nota S assurer que les aliments ne débordent pas de la plaque de cuisson plateau d égouttage pour éviter que les graisses tombent sur les éléments chauffants S assurer aussi que les aliments ou le plat de cuisson soient à au moins 3 8 cm 1 po des éléments cha uffants supérieurs 5 Faire griller les aliments selon ...

Page 14: ...ièce de ce produit Confier l entretien à un technicien qualifié NETTOYAGE DU FOUR Important Avant de nettoyer l une des pièces s assurer que le four est éteint débranché et refroidi Après avoir lavé les pièces toujours les laisser sécher complètement avant d utiliser le four de nouveau 1 Nettoyer la porte de verre à l aide d une éponge d un linge doux ou d un tampon de nylon et d eau savonneuse Ne...

Page 15: ...a fonction désirée Pendant le grillage seul l élément du haut fonctionne PAIN DE MAÏS CRÉMEUX 1 paquet 250 g 8 5 oz de mélange à muffin au maïs 125 ml tasse de maïs en grains cuit ou en conserve 30 ml 2 c à table de piments verts en dés en conserve 30 ml 2 c à table de piments rouges en dés 2 5 ml c à thé d assaisonnement à taco 125 ml tasse de crème sure 1 gros œuf légèrement battu Préchauffer le...

Page 16: ... province to province BESOIN D AIDE Pour communiquer avec les services d entretien ou de réparation ou pour adresser toute question relative au produit composer le numéro sans frais approprié indiqué sur la page couverture Ne pas retourner le produit où il a été acheté Ne pas poster le produit au fabricant ni le porter dans un centre de service On peut également consulter le site web indiqué sur l...

Page 17: ...ryland É U 2008 2 28 68E F 1200 W 120 V 60 Hz CAT NO EHB500 TYPE 1 160 W 120 V AC ONLY 60Hz Copyright 2008 Applica Consumer Products Inc Made in People s Republic of China Printed in People s Republic of China Fabriqué en République populaire de Chine Imprimé en République populaire de Chine Printed on recycled paper Imprimé sur du papier recyclé ...

Reviews: