background image

2

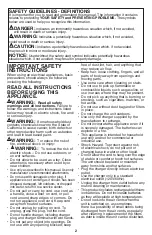
SAFETY GUIDELINES - DEFINITIONS 

It is important for you to read and understand this manual. The information it contains 

relates to protecting YOUR SAFETY and PREVENTING PROBLEMS. The symbols 

below are used to help you recognize this information. 

DANGER:

 Indicates an imminently hazardous situation which, if not avoided, 

will result in death or serious injury.

WARNING:

 Indicates a potentially hazardous situation which, if not avoided,

could result in death or serious injury.

CAUTION:

 Indicates a potentially haz ard ous situation which, if not avoided,

may result in minor or mod er ate injury.

NOTICE:

 Used without the safety alert symbol indicates potentially hazardous

situation which, if not avoided, may result in property damage.

IMPORTANT SAFETY 

INSTRUCTIONS

When using an electrical appliances, basic 

precautions should always be followed, 

including the following:

READ ALL INSTRUCTIONS 

BEFORE USING THIS 

APPLIANCE.

WARNING:


Read all safety 

warnings and all instructions. Failure to 

follow the warnings and instructions listed 

below may result in electric shock, fire and/

or serious injury.

WARNING:


Some household dust 

contains chemicals known to the State of 

California to cause cancer, birth defects or 

other reproductive harm such as asbestos 

and lead in lead based paint.

WARNING:


To reduce the risk of 

fire, electrical shock or injury:

•  

WARNING:


To reduce the risk of 

electric shock – Do not use outdoors or 

on wet surfaces.

•  Do not allow to be used as a toy. Close 

attention is necessary when used by or 

near children.

• Use only as described in this manual. Use only 

manufacturer’s recommended attachments.

•  Do not use with damaged cord or plug. If 

appliance is not working as it should, has been 

dropped, damaged, left outdoors, or dropped 

into water, return it to a service center.

•  Do not pull or carry by cord, use cord as 

a handle, close a door on cord, or pull 

cord around sharp edges or corners. Do 

not run appliance over cord. Keep cord 

away from heated surfaces.

•  Do not unplug by pulling on cord. To 

unplug, grasp the plug, not the cord.

•  Do not handle charger, including charger 

plug, and charger terminals with wet hands.

•  Do not put any object into openings. Do 

not use with any opening blocked; keep 

free of dust,lint, hair, and anything that 

may reduce air flow.

•  Keep hair, loose clothing, fingers, and all 

parts of body away from openings and 

moving parts.

•  Use extra care when cleaning on stairs.

•  Do not use to pick up flammable or 

combustible liquids, such as gasoline, or 

use in areas where they may be present.

•  Do not pick up anything that is burning or 

smoking, such as cigarettes, matches, or 

hot ashes.

•  Do not use without dust bag and/or filters 

in place.

•  Do not charge the unit outdoors.

•  Use only the charger supplied by the 

manufacturer to recharge.

•  Do not incinerate the appliance even if it 

is severely damaged. The batteries can 

explode in a fire.

•  This appliance is intended for household 

use only and not for commercial or 

industrial use.

•  Shock Hazard. To protect against risk 

of electrical shock, do not put unit or 

charging base in water or other liquid.

•  Do not allow the cord to hang over the edge 

of a table or counter or touch hot surfaces. 

The unit should be placed or mounted 

away from sinks and hot surfaces.

•  Plug the charger directly into an electrical 

outlet.

•  Use the charger only in a standard 

electrical outlet (120V/60Hz).

•  Unplug the charger from outlet before any 

routine cleaning or maintenance.

•  This product includes rechargeable lithium-

ion batteries.  Do not incinerate batteries 

as they will explode at high temperatures.

•  Do not look into the air vents when the 

unit is switched on, as sometimes  

there is a possibility of small debris being 

discharged from the air vents, especially 

after cleaning / replacement of the filters 

as debris inside the unit can be disturbed.

Summary of Contents for HSVJ415JMFE

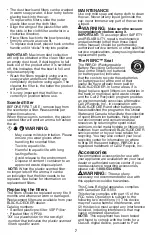
Page 1: ...ave access to the Internet call 1 800 544 6986 from 8 a m to 5 p m EST Mon Fri to speak with an agent Please have the catalog number available when you call SAVE THIS MANUAL FOR FUTURE REFERENCE VEA EL ESPANOL EN LA CONTRAPORTADA INSTRUCTIVO DE OPERACIÓN CENTROS DE SERVICIO Y PÓLIZA DE GARANTÍA ADVERTENCIA LÉASE ESTE INSTRUCTIVO ANTES DE USAR EL PRODUCTO CATALOG NUMBERS HSVJ415JMFE HSVJ415JMPS HSV...

Page 2: ...or carry by cord use cord as a handle close a door on cord or pull cord around sharp edges or corners Do not run appliance over cord Keep cord away from heated surfaces Do not unplug by pulling on cord To unplug grasp the plug not the cord Do not handle charger including charger plug and charger terminals with wet hands Do not put any object into openings Do not use with any opening blocked keep f...

Page 3: ...perature above 266 F 130 C may cause explosion f Have servicing performed by a qualified repair person using only identical replacement parts This will ensure that the safety of the product is maintained WARNING Do not attempt to modify or repair the appliance SAVE THESE INSTRUCTIONS Symbols The label on your tool may include the following symbols The symbols and their definitions are as follows V...

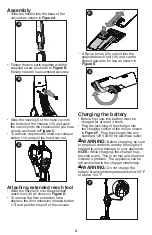
Page 4: ...on release button 17 and pull the tube off of the vacuum D A flip up brush 20 is built into the extended reach tool 18 and can be flipped upwards for use as shown in Figure E E Charging the battery Before first use the battery must be charged for at least 4 hours Plug the jack plug of the charger into the charging socket of the tool as shown in Figure F Plug the charger into any standard 120 Volt ...

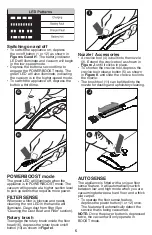
Page 5: ...Bowl and Filter section Rotary brush To engage the rotary brush inside the floor head 16 depress the rotary brush on off button 13 as shown in Figure I I Nozzle Accessories A crevice tool 4 is built into the nozzle 3 Extend the crevice tool as shown in Figure J until it clicks in place To shorten the crevice tool depress the crevice tool release button 5 as shown in Figure K and slide the crevice ...

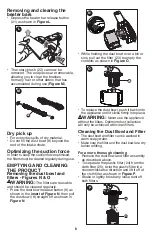
Page 6: ...as shown in the insert of Figure N then pull the dust bowl 8 straight off as shown in Figure N N While holding the dust bowl over a bin or sink pull out the filter 23 to empty the contents as shown in Figure O O 23 To replace the dust bowl push it back onto the appliance until it clicks firmly into place WARNING Never use the appliance without the filters Optimum dust collection will only be achie...

Page 7: ...ever let any liquid get inside the vac never immerse any part of the vac into a liquid WARNING Make sure the vacuum is completely dry before using it IMPORTANT To assure product SAFETY and RELIABILITY repairs maintenance and adjustment other than those listed in this manual should be performed by authorized service centers or other qualified service organizations always using identical replacement...

Page 8: ...BLACK DECKER and its Authorized Service Centers A defective product meeting the warranty conditions set forth herein will be replaced or repaired at no charge in either of two ways The first which will result in exchanges only is to return the product to the retailer from whom it was purchased provided that the store is a participating retailer Returns should be made within the time period of the ...

Page 9: ...elle n est pas évitée peut résulter en des dommages à la propriété Consulter le site Web www BlackandDecker com NewOwner pour enregistrer votre nouveau produit MODE D EMPLOI SANS FIL 2 EN 1 BÂTON VAC Merci d avoir choisi BLACK DECKER Consulter le site Web www BlackandDecker com NewOwner pour enregistrer votre nouveau produit À LIRE AVANT DE RETOURNER CE PRODUIT POUR QUELQUE RAISON QUE CE SOIT Si d...

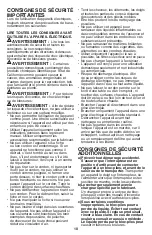
Page 10: ...uvant réduire la circulation d air Tenir les cheveux les vêtements les doigts et toutes les parties du corps à distance des ouvertures et des pièces mobiles Être très prudent lors du nettoyage des escaliers Ne pas utiliser cet appareil pour ramasser des liquides inflammables ou des combustibles comme de l essence et ne pas l utiliser dans les endroits où ces substances sont présentes Ne pas ramass...

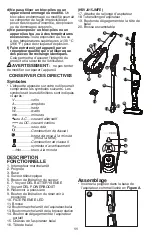
Page 11: ...diqués ci après V volts A ampères Hz hertz W watts min minutes ou AC courant alternatif ou DC courant continu no sous vide Construction de classe I borne de mise à la minute mis à la terre Construction de classe II symbole d avertissement min tours à la minute DESCRIPTION FONCTIONNELLE 1 Interrupteur marche arrêt 2 Poignée 3 Buse 4 Suceur télescopique 5 Bouton de libération du suceur 6 7 Voyant DE...

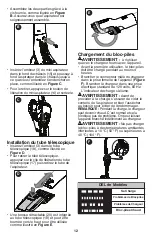
Page 12: ... haut pour être utilisée comme illustré en Figure E E Chargement du bloc piles AVERTISSEMENT à n utiliser qu avec le chargeur fourni avec l appareil Avant la première utilisation le bloc piles doit être chargé pendant au moins 4 heures Brancher le connecteur mâle du chargeur dans la prise femelle de l appareil Figure F Brancher le chargeur dans une prise électrique standard de 120 volts 60 Hz L in...

Page 13: ...servoir à poussière et du filtre Brosse rotative Pour insérer la brosse rotative dans la tête de sol 16 appuyez sur le bouton marche arrêt de la brosse rotative 13 comme illustré en Figure I I Buse Accessoires Un suceur 4 est intégré à la buse 3 Tirez sur le suceur comme illustré en figure J jusqu à ce qu il s enclenche en place Pour replier le suceur appuyez sur le bouton de libération du suceur ...

Page 14: ...tré sur l encadré en Figure N puis retirez le réservoir à poussière 8 comme illustré en Figure N N Tenir le réservoir à poussière au dessus d une poubelle ou d un évier puis retirer le filtre 23 pour vider le contenu du réservoir comme le montre la figure O O 23 Pour réinstaller le réservoir à poussière le remettre sur la poignée de manière à ce qu il s enclenche en position AVERTISSEMENT Ne jamai...

Page 15: ... le remplacement des filtres Remplacement des filtres Les filtres doivent être remplacés tous les 6 à 9 mois et chaque fois qu ils sont usés ou endommagés Des filtres de remplacement sont disponibles auprès de votre distributeur BLACK DECKER Numéros de catalogue Filtre plastique parfumé VSPF10XX Filtre en tissu VBF20 XX est un espace réservé au nombre à deux chiffres indiquant le parfum particulie...

Page 16: ...l institution responsable de la conformité peut faire annuler le droit de l utilisateur d utiliser ce matériel Cet appareil numérique de la classe B est conforme à la norme NMB 003 du Canada GARANTIE LIMITÉE DE DEUX ANS Black Decker É U Inc garantit que le produit est exempt de défauts de matériau et de fabrication pendant deux 2 ans à partir de la date d achat à condition que le produit soit util...

Page 17: ...puede provocar daños en la propiedad Gracias por elegir BLACK DECKER Visite www BlackandDecker com NewOwner para registrar su nuevo producto LEA EL MANUAL ANTES DE DEVOLVER ESTE PRODUCTO POR CUALQUIER MOTIVO Si tiene una consulta o algún inconveniente con su producto BLACK DECKER visite http www blackanddecker com instantanswers para obtener respuestas instantáneas las 24 horas del día Si no encue...

Page 18: ...s partes del cuerpo alejados de los orificios y de las piezas en movimiento Tenga mucho cuidado al limpiar en escaleras No utilice la unidad para recoger líquidos inflamables o combustibles como gasolina ni la utilice en áreas en las que estas sustancias puedan estar presentes No recoja ninguna cosa que esté quemándose o humeante como cigarrillos fósforos o cenizas calientes No utilice la unidad s...

Page 19: ...no velocidad sin carga Construcción Clase I terminal a tierra mis à la terre Construcción de clase II simbolo de alerta min revoluciones o minuto seguridad DESCRIPCIÓN DE LAS FUNCIONES 1 Botón de encendido apagado 2 Mango 3 Boquilla 4 Herramienta extensible para ranuras 5 Botón de liberación de la herramienta para ranuras 6 Indicador de carga LED 7 Indicador LED POWERBOOST 8 Depósito para polvo 9 ...

Page 20: ...girado hacia abajo 20 en el tubo de extensión para pisos 18 que se puede girar hacia arriba para utilizarlo como se muestra en la Figura E E Carga de la batería ADVERTENCIA Para ser utilizado únicamente con el cargador suministrado Antes del primer uso la batería debe cargarse durante 4 horas como mínimo Inserte la clavija del cargador en el enchufe de carga de la herramienta Figura F Enchufe el c...

Page 21: ...para polvo y del filtro Cepillo giratorio Para acoplar el cepillo giratorio en el cabezal para pisos 16 presione el botón de encendido apagado del cepillo giratorio 13 como se muestra en la Figure I I Boquilla Accesorios Una herramienta para ranuras 4 está integrada en la boquilla 3 Extienda la herramienta para ranuras como se muestra en la Figura J hasta que esté en su sitio y haga clic La herram...

Page 22: ...el depósito para polvo 9 como se muestra en el círculo de la Figura N luego tire recto del depósito para polvo 8 como se muestra en la Figura N N Mientras sostiene el depósito para polvo sobre una papelera o fregadero extraiga el filtro 23 para vaciar el contenido como se muestra en la Figura O O 23 Para reinstalar el depósito para polvo vuelva a colocarlo sobre el mango hasta que encaje firmement...

Page 23: ...uación la información sobre los filtros de repuesto Reemplazo de los filtros Los filtros se deben reemplazar cada 6 a 9 meses y cuando estén gastados o dañados Los filtros de repuesto pueden obtenerse en su distribuidor de BLACK DECKER Números de catálogo Filtro de plástico perfumado VSPF10XX Filtro de tela VBF20 XX es un marcador de posición para el número de dos dígitos que indica el aroma espec...

Page 24: ...io para operar el equipo Este aparato digital de la clase B se conforma con ICES 003 canadiense GARANTÍA LIMITADA DE DOS AÑOS Black Decker U S Inc garantiza que este producto está libre de defectos de material o mano de obra durante un período de dos 2 años desde la fecha de compra siempre y cuando el producto se utilice en un entorno doméstico Esta garantía limitada no cubre contra fallas debidas...

Page 25: ...in cargo alguno para el cliente incluyendo la mano de obra esta incluye los gastos de trasportación erogados para lograr cumplimiento de esta garantía en los domicilios diversos señalados Para hacer efectiva esta garantía deberá presentar su herramienta y esta póliza sellada por el establecimiento comercial donde se adquirió el producto Nos comprometemos a entregar el producto en un lapso no mayor...

Page 26: ...26 ...

Page 27: ... 61 86 82 Gpo Comercial de Htas y Refacciones de Occidente S A de C V Av La Paz No 1779 Col Americana S Juaréz Guadalajara Jalisco Tel 01 33 38 25 69 78 Herramientas y Equipos Profesionales Av Colón 2915 Ote Col Francisco I Madero Monterrey Nvo León Tel 01 81 83 54 60 06 Htas Portátiles de Chihuahua S A de C V Av Universidad No 2903 Col Fracc Universidad Chihuahua Chihuahua Tel 01 614 413 64 04 Fe...

Page 28: ...28 Cat No HSVJ415JMFE HSVJ415JMPS HSVJ520JMHS HSVJ520JMHS Form No 90635494 Copyright 2016 BLACK DECKER Printed in China May 2016 ...

Reviews: