9
E N G L I S H
Switching on
◆
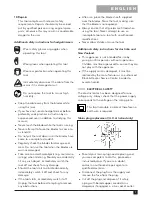
Squeeze both the front handle switch (1) and
the trigger switch (2).
Switching off
◆
Release the front handle switch (1) or the
trigger switch (2).
Never attempt to lock a switch in the on
position.
Hints for optimum use
◆
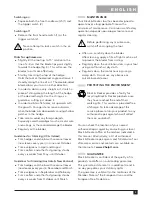
Slightly tilt the tool (up to 15
°
relative to the
line of cut) so that the blade tips point slightly
towards the hedge (fig. E). This will cause the
blades to cut more effectively.
◆
Start by trimming the top of the hedge.
Hold the tool at the desired angle and move it
steadily along the line of cut. The double-sided
blade allows you to cut in either direction.
◆
In order to obtain a very straight cut, stretch a
piece of string along the length of the hedge
at the desired height. Use the string as a
guideline, cutting just above it.
◆
In order to obtain flat sides, cut upwards with
the growth. Younger stems move outwards
when the blade cuts downwards, causing shallow
patches in the hedge.
◆
Take care to avoid any foreign objects.
Especially avoid hard objects such as metal wire
and railings, as these could damage the blades.
◆
Regularly oil the blades.
Guidelines for trimming (UK & Ireland)
◆
Trim hedges and shrubs with seasonal leaves
(new leaves every year) in June and October.
◆
Trim evergreens in April and August.
◆
Trim conifers and other fast growing shrubs
every six weeks from May until October.
Guidelines for trimming (Australia & New Zealand)
◆
Trim hedges and shrubs with seasonal leaves
(new leaves every year) in December and March.
◆
Trim evergreens in September and February.
◆
Trim conifers and other fast growing shrubs
every six weeks from October until March.
MAINTENANCE
Your Black & Decker tool has been designed to
operate over a long period of time with a
minimum of maintenance. Continuous satisfactory
operation depends upon proper tool care and
regular cleaning.
Before performing any maintenance,
switch off and unplug the tool.
◆
After use, carefully clean the blades.
After cleaning, apply a film of light machine oil
to prevent the blades from rusting.
◆
Regularly clean the ventilation slots in your tool
using a soft brush or dry cloth.
◆
Regularly clean the motor housing using a
damp cloth. Do not use any abrasive or
solvent-based cleaner.
PROTECTING THE ENVIRONMENT
Black & Decker provides a facility for
recycling Black & Decker products once
they have reached the end of their
working life. This service is provided free
of charge. To take advantage of this
service please return your product to any
authorised repair agent who will collect
them on our behalf.
You can check the location of your nearest
authorised repair agent by contacting your local
Black & Decker office at the address indicated in
this manual. Alternatively, a list of authorised
Black & Decker repair agents and full details of our
after-sales service and contacts are available on
the Internet at:
www.2helpU.com
.
GUARANTEE
Black & Decker is confident of the quality of its
products and offers an outstanding guarantee.
This guarantee statement is in addition to and in
no way prejudices your statutory rights.
The guarantee is valid within the territories of the
Member States of the European Union and the
European Free Trade Area.
Summary of Contents for GT246
Page 1: ...1 GT26 GT246 GT250 GT251 GT260 GT261 GT262 ...
Page 2: ...2 Copyright Black Decker ...
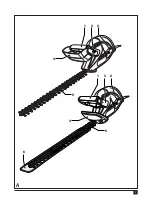
Page 3: ...3 A 5 5 1 3 2 4 1 3 2 4 6 ...
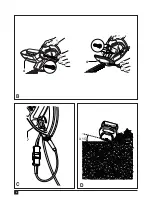
Page 4: ...4 4 B C D 4 7 0 15 ...
Page 13: ...13 ...
Page 14: ...14 ...
Page 15: ...15 ...

