background image

3

4

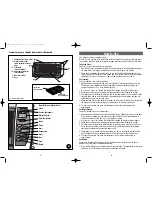
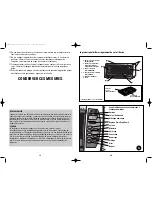
Product may vary slightly from what is illustrated.

† Broil Rack
(Part # 174296-00)

† Bake Pan
(Part # 165335-01

1. ThermaGuard™ Top & Sides
2. Digital Control Panel 

(see A below for detailed 
view)

† 3. Slide Rack 

(Part # 175800-00)

† 4. Removable Crumb Tray 

(Part # 174096)

5. Nonstick Interior
6. Vent

���

���

���

���

���

���

† Consumer replaceable

Detail of Digital Control Panel

Clock

Celsius/Fahrenheit

Digital display

Time/Temp/Toast

Bake

Timer

Broil

Convection

Start

Toast

Stop

Bagel 

How to Use

This product is for household use only.
Before first use, remove the Slide Rack, Broil Rack and Bake Pan from Oven. Wash in hot,
sudsy water, rinse and dry with dishtowel or paper toweling. Replace Slide Rack in Oven.

To Set the Clock:

You must set the clock for the oven to operate.
1. Plug the unit into a standard wall outlet. The digital display will show 12:00 blinking and

the word "clock" will appear and blink in the upper left corner of the display.

2. Touch the Clock button, then using the + or - on the Temp/Time/Toast button, set the

correct time of day. Touch the Clock button again. The word "clock" will appear steady
in the upper left corner. The clock is now set and will keep the correct time.

For Toasting:  

The Toast button is pre-set at 4 (medium).
1. Open Oven door and place bread slices on Slide Rack in Oven; close door. Press the

Toast button; the red indicator will light and blink. The digital display will show the
number 4 and 4 bars. This is the medium setting.   

2. Use the + or - from 1 to 7 on the Temp/Time/Toast button for lighter or darker toast.  
3. Touch the Start button; the red indicator light will change from blinking to steady.
4. The leftmost bar in the display will blink, and as toasting progresses, the next bar to the

right will blink, and so on until toasting is done. Opening the door during toasting will
automatically cancel the toasting cycle.

5. When toasting is done, five beeps will sound, the bars in the display will be steady, and

the light on the Toast button will go out. The display will return to time of day.

6. For your convenience, the Oven will remember the last toast setting that was

programmed.

For Bagel Setting: 

The Bagel button is pre-set at 4 (medium).
1. Open Oven door and place one or more bagel halves on Slide Rack in Oven; close door.

Press the Bagel button; the red indicator will light and blink. The digital display will
show the numeral 4 and 4 bars. This is the medium setting.   

2. Use the + or - from 1 to 7 on the Temp/Time/Toast button for lighter or darker bagels.  
3. Touch the Start button; the red indicator light will change from blinking to steady.
4. The leftmost bar in the display will blink, and as the bagel cycle progresses, the next

bar to the right will blink, and so on until the cycle is done. Opening the door during
toasting will automatically cancel the bagel cycle.

5. When bagel cycle is done, 5 beeps will sound, the bars in the display will be steady,

and the light on the Bagel button will go out. The display will return to time of day.

6. For your convenience, the Oven will remember the last bagel setting that was

programmed.

For Baking:

The Oven will automatically preheat to the temperature you set for baking. To cancel
baking at any time, press the Stop button twice.
1. Press the Bake button; the red indicator will light and blink. The digital display will show

350, and a small F (Fahrenheit) in the lower left corner will blink.

A

CTO95OOPub179001-02  3/12/03  11:39 AM  Page 4

Summary of Contents for CTO9500 Series

Page 1: ...500 Series Accessories Parts USA Canada 1 800 738 0245 Accesorios Partes EE UU Canadá Accessoires Pièces É U Canada USA Canada 1 800 231 9786 Mexico 01 800 714 2503 www blackanddecker com Digital Advantage Series Countertop Convection Oven Broiler Horno de convección asador para el mostrador Four à convection rôtissoire de comptoir CTO95OOPub179001 02 3 12 03 11 39 AM Page 1 ...

Page 2: ...nded use Oversize foods or metal utensils must not be inserted in this appliance as they may create a fire or risk of electric shock A fire may occur if the toaster oven is covered or touching flammable material including curtains draperies walls and the like when in operation Do not store any item on top of unit when in operation Do not store any material other than manufacturer s recommended acc...

Page 3: ...y 4 The leftmost bar in the display will blink and as toasting progresses the next bar to the right will blink and so on until toasting is done Opening the door during toasting will automatically cancel the toasting cycle 5 When toasting is done five beeps will sound the bars in the display will be steady and the light on the Toast button will go out The display will return to time of day 6 For yo...

Page 4: ...to the temperature you set for the convection setting 1 Press the Convection button the red indicator will light and blink The digital display will show 350 and a small F Fahrenheit in the lower left corner will blink 2 The oven is pre set to 350º F If you want to convection cook at this temperature just press the Start button The fan inside the Oven will automatically start and the Oven will preh...

Page 5: ...Spread 1 4 cup salsa over tortillas Top with half the cheese mixture half the zucchini corn mixture half the red peppers and 1 tablespoon cilantro Repeat with another layer of tortillas salsa cheese and vegetables in same order 4 Top with remaining 2 tortillas salsa cilantro and 1 4 cup Monterey Jack cheese Cover pan with aluminum foil and bake at 450 F 232 C for 30 minutes Let stand covered for 5...

Page 6: ...tador sobre ni cerca de una hornilla de gas o eléctrica ni cerca de un horno caliente Se debe tener mucha prudencia para retirar la bandeja o para desechar la grasa caliente Ajuste todos los controles a la posición de apagado OFF antes de enchufar o desconectar el aparato Para interrumpir el ciclo de tostado presione STOP Para apagar el horno gire el control a la pocisión STOP Nunca introduzca los...

Page 7: ...igital exhibirá el número 4 y aparecerán cuatro barras Esto indica la posición media 2 Utilice los símbolos o entre el 1 y el 7 del botón de regular la temperatura la duración del ciclo y el tostado Temp Time Toast para regular el grado de tostado 3 Presione el botón Start para dar inicio al ciclo de tostado la luz indicadora roja cambiará de intermitente a fija 4 Observe las barras en la pantalla...

Page 8: ...mbolos o del botón Temp Time Toast hasta alcanzar el tiempo deseado 14 13 4 Presione el botón nuevamente El tiempo aparecerá en la pantalla contando para atrás hasta completar el ciclo programado 5 Una vez transcurrido el tiempo el horno producirá cinco tonos y luego se apagará La pantalla exhibirá la hora actual nuevamente Para hornear por convección El modo de convección se puede emplear para ho...

Page 9: ...0 minutos hasta que el queso se derrita y se dore ligeramente Rinde para 8 raciones 16 15 de limpiarlo El exterior se debe limpiar con un paño o con una esponja humedecida y se debe secar con un paño suave o con una toalla de papel Recipientes de cocinar 1 El interior del horno mide 26 cm por 12 cm por 36 cm 10 3 pulg x 4 9 pulg x 14 25 pulg Estas dimensiones le permiten utilizar distintos recipie...

Page 10: ...ès d un enfant ou lorsque ce dernier s en sert Débrancher l appareil lorsqu on ne s en sert pas et avant de le nettoyer Le laisser refroidir avant d y ajouter ou d en retirer un accessoire et de le nettoyer Ne pas utiliser un appareil dont la fiche ou le cordon est abîmé qui présente un problème de fonctionnement qui est tombé par terre ou qui est endommagé Retourner le produit au centre de servic...

Page 11: ...avec un électricien certifié Il ne faut pas neutraliser ce dispositif de sécurité CORDON La longueur du cordon de l appareil a été choisie afin d éviter les risques d enchevêtrement et de trébuchement que présente un long cordon Tout cordon de rallonge d au moins 15 ampères ou de 6 ampères dans le cas des produits de 220 volts peut servir au besoin Lorsqu on utilise un cordon de rallonge s assurer...

Page 12: ...pour baguels s éteint L affichage retourne à l heure juste 6 Par souci de commodité l appareil garde en mémoire le dernier réglage pour baguels Cuisson Le four se réchauffe automatiquement jusqu à la température réglée pour la cuisson Pour interrompre la cuisson en tout temps il suffit d enfoncer le bouton d arrêt à deux reprises 1 Enfoncer le bouton de cuisson Bake Le témoin rouge s allume et cli...

Page 13: ...de minimiser les risques d égratignures utiliser un tampon à récurer en polyester ou en nylon Plateau à miettes Saisir la poignée à l avant du four et retirer le plateau à miettes Se débarrasser des miettes et laver le plateau dans de l eau chaude savonneuse Enlever les taches tenaces avec un tampon en nylon Bien assécher le plateau avant de le remettre dans l appareil Intérieur antiadhésif 1 Débr...

Page 14: ... four au préalable à 232 C 450 F 2 Lorsqu on fait dorer les courges mélanger la ricotta 250 ml 1 t de fromage monterey le cumin ainsi que le sel et le poivre au goût Hamburgers éspicés 1 2 t de ketchup 1 4 c à thé de cannelle 1 petit oignon haché 1 4 c à thé de muscade 2 gousses d ail émincées 1 58 kg 3 1 2 lb de bœuf haché maigre 2 c table de mélasse 0 22 kg 1 2 lb de bacon cuit et émietté 1 1 2 ...

Page 15: ... or serviced outside the country of purchase Glass parts and other accessory items that are packed with the unit Shipping and handling costs associated with the replacement of the unit Consequential or incidental damages please note however that some states do not allow the exclusion or limitation of consequential or incidental damages so this limitation may not apply to you How does state law rel...

Page 16: ...sted Qué relación tiene la ley estatal con esta garantía Esta garantía le otorga derechos legales específicos y el consumidor podría tener otros derechos que varían de una región a otra BESOIN D AIDE Pour communiquer avec les services d entretien ou de réparation ou pour adresser toute question relative au produit composer le numéro sans frais approprié indiqué sur la page couverture Ne pas retour...

Page 17: ...México Produit fabriqué au Mexique Imprimé au Mexique 1500 W 120 V 60Hz In Latin America only En Latino América únicamente En Amérique latine seulement MÉXICO Lázaro Cárdenas 18 Col Obrera Del Cuauhtémoc Mex D F C P 06800 Tel 01 800 714 2503 Fecha de compra Modelo SELLO O FIRMA DEL DISTRIBUIDOR El consumidor podrá solicitar que se haga efectiva la garantía en cualquiera de nuestras Sucursales o Ce...

Reviews: