Always choose a safe location for the sandwich press, keeping in mind the safety
precautions outlined. Ensure all packaging has been removed from the unit before use.
This appliance requires no installation.
WARNING:
STEAM MAY BE EJECTED FROM BETWEEN THE PLATES
DURING THE COOKING PROCESS. TAKE CARE NOT TO COME INTO
CONTACT WITH THE STEAM AS IT MAY CAUSE BURNS.
WARNING:
CAUTION! HOT SURFACE
Place the unit on a dry, level and heat-resistant surface, away from the edge of the work surface.
Ensure that the cord has been fully unwound and does not overhang the work surface as this is a
hazard. Do not use the unit on the floor.
Before using your sandwich press for the first time, clean the appliance and plate as described in
the ‘Cleaning’ section. Brush a little cooking oil on the plate. Heat the appliance with the lid open
for 5 minutes. Unplug and allow to cool, then remove any surplus oil with absorbent paper. The
sandwich press is now ready for use. When using your sandwich press for the first time you may
notice a fine smoke haze being emitted. This is normal and is due to the initial heating of the
internal components.
1. Close the lid of the sandwich press.
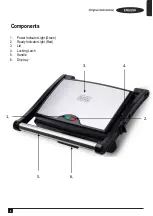
2. Plug the appliance into the power supply. The red light will glow indicating that the sandwich
press is heating, whilst the green light remains off. Once the correct temperature for use has
been reached, the red light will remain on and the green light will come on. This green light
will switch on and off (temperature control).
3. Whilst the sandwich press is heating, prepare the bread and filling.
4. For golden toasted sandwiches, spread butter on the outside of the bread. Beware of some
spreads which are not suitable for toasting. Always choose bread of a suitable size to fit the
plate. Place the filling between the unbuttered sides of bread. Ensure the sandwiches are
evenly filled to assist with even browning.
5. Open the sandwich press by lifting the lid.
6. Place the sandwiches into the appliance.
7. Close the lid, using a wooden spoon or heat resistant plastic spatula to hold the bread in
place if necessary. Do not force the lid closed. If the lid is difficult to close, you may have too
much filling or the bread slices may be too thick.
8. Allow the sandwich to toast for 3-8 minutes according to taste and ensuring that raw
ingredients (e.g. bacon) are thoroughly cooked. Alternatively, pre-cook them before toasting.
Beware of steam which may escape from the front of the appliance.
9. Open the sandwich press in one swift movement and remove the toasted sandwiches. Do
not use a metal implement for this as it may damage the toasting plate.
10. After use, unplug the appliance and allow to cool.
Operating your Sandwich Press
5

