background image

7

English

leaving the Battery Pack in the Charger

The charger and battery pack can be left connected with 
the charge indicator showing pack charged.

hot/Cold Pack Delay

When the charger detects a battery pack that is too hot 
or too cold, it automatically starts a Hot/Cold Pack Delay, 
suspending charging until the battery pack has reached an 
appropriate temperature. The charger then automatically 
switches to the pack charging mode. This feature ensures 
maximum battery pack life.
A cold battery pack may charge at a slower rate than a 
warm battery pack.

Important Charging Notes

1.  Longest life and best performance can be obtained if 

the battery pack is charged when the air temperature 

is between 65 °F – 75 °F (18 ° C– 24 °C). DO NOT charge 

when the battery pack is below +40 °F (+4.5 °C), or 

above +104 °F (+40 °C). This is important and will 

prevent serious damage to the battery pack.

2.  The charger and battery pack may become warm to the 

touch while charging. This is a normal condition, and 

does not indicate a problem. To facilitate the cooling of 

the battery pack after use, avoid placing the charger or 

battery pack in a warm environment such as in a metal 

shed or an uninsulated trailer.

3.  If the battery pack does not charge properly:

a.  Check operation of receptacle by plugging in a lamp 

or other appliance;

b.  Check to see if receptacle is connected to a light 

switch which turns power off when you turn out  

the lights;

c.  Move the charger and battery pack to a location 

where the surrounding air temperature is 

approximately 65 °F – 75 °F (18 °C – 24 °C);

d.  If charging problems persist, take the tool, battery 

pack and charger to your local service center.

4.  The battery pack should be recharged when it fails to 

produce sufficient power on jobs which were easily 

done previously. DO NOT CONTINUE to use under these 

conditions. Follow the charging procedure. You may also 

charge a partially used pack whenever you desire with 

no adverse effect on the battery pack.

5.  Foreign materials of a conductive nature such as, but 

not limited to, grinding dust, metal chips, steel wool, 

aluminum foil, or any buildup of metallic particles 

should be kept away from charger cavities. Always 

unplug the charger from the power supply when there 

is no battery pack in the cavity. Unplug the charger 

before attempting to clean.

6.  Do not freeze or immerse the charger in water or any 

other liquid.

Charger Cleaning Instructions


WARNING: 

Shock hazard. Disconnect the charger 

from the AC outlet before cleaning. Dirt and grease 
may be removed from the exterior of the charger using 
a cloth or soft non-metallic brush. Do not use water or 
any cleaning solutions.

.

Intended Use

This drill/driver is designed for household drilling and 
screwdriving applications.

DO nOT

 use under wet conditions or in presence of 

flammable liquids or gases.

DO nOT

 let children come into contact with the tool. 

Supervision is required when inexperienced operators use 
this tool.

ASSEMBLY AND ADJUSTMENTS


WARNING: To reduce the risk of serious personal 

injury, turn unit off and remove the battery pack 

before making any adjustments or removing/

installing attachments or accessories.

 An 

accidental start-up can cause injury.

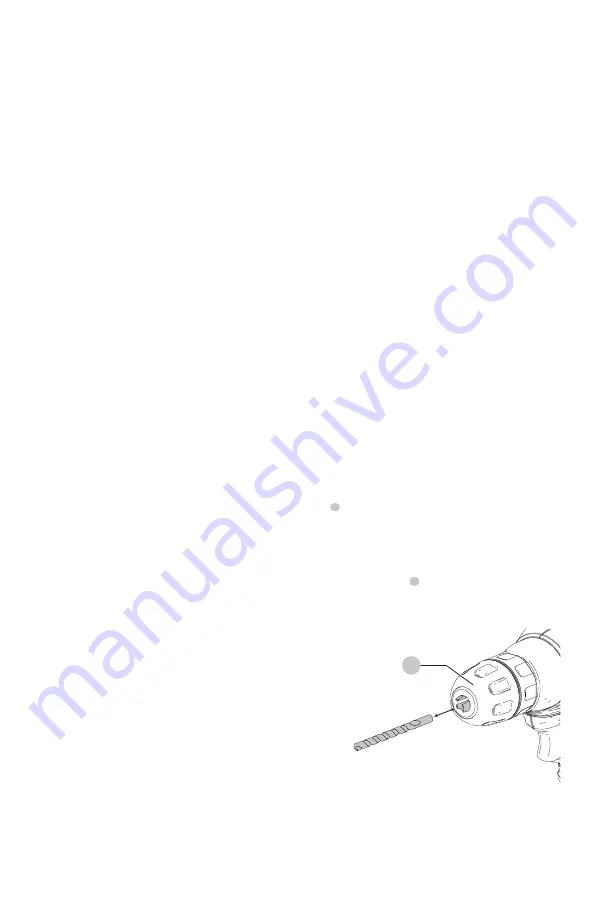
Installing a Bit or Accessory into a 

Keyless Two Sleeve Chuck (Fig. B)


WARNING:

 Do not attempt to tighten drill bits (or 

any other accessory) by gripping the front part of the 
chuck and turning the tool on. Damage to the chuck 
and personal injury may result. Always lock off trigger 
switch and disconnect tool from power source when 
changing acces sories.


WARNING:

 Always ensure the bit is secure before 

starting the tool. A loose bit may eject from tool 
causing possible personal injury.

To insert a drill bit or other accessory, follow these steps.

1.  Turn tool off and remove battery pack.
2.  Grasp the rear chuck sleeve with one hand and 

use the other hand to rotate the front chuck sleeve 

 4 

 counterclockwise far enough to accept the 

desired accessory.

3.  Insert the accessory about 3/4" (19 mm) into the chuck 

and tighten securely by holding the rear chuck sleeve 
with one hand and use the other hand to rotate the 
front chuck sleeve 

 4 

 clockwise until the accessory is 

held tightly in the chuck.

To release the accessory, repeat steps 1 and 2 above.

Fig. B

4

Summary of Contents for BDCD12BC

Page 1: ...nt de retourner ce produit pour quelque raison que ce soit Lea el manual antes de devolver este producto por cualquier motivo INSTRUCTION MANUAL MODE D EMPLOI MANUAL DE INSTRUCCIONES BDCD12BC 12V MAX CORDLESS DRILL PERCEUSE SANS FIL 12V MAX TALADRO INALÁMBRICO 12V MÁX ...

Page 2: ...ttp www blackanddecker com instantanswers If you can t find the answer or do not have access to the Internet call 1 800 544 6986 from 8 a m to 5 p m EST Mon Fri to speak with an agent Please have the CATALOG NUMBER available when you call To register your new product visit www BlackandDecker com NewOwner Consulter le site Web www BlackandDecker com NewOwner pour enregistrer votre nouveau produit V...

Page 3: ...h if not avoided may result in minor or moderate injury Used without word Indicates a safety related message NOTICE Indicates a practice not related to personal injury which if not avoided may result in property damage WARNING Read all safety warnings and all instructions Failure to follow the warnings and instructions may result in electric shock fire and or serious injury WARNING To reduce the r...

Page 4: ...e operating power tools may result in serious personal injury b Use personal protective equipment Always wear eye protection Protective equipment such as a dust mask non skid safety shoes hard hat or hearing protection used for appropriate conditions will reduce personal injuries c Prevent unintentional starting Ensure the switch is in the off position before connecting to power source and or batt...

Page 5: ...t contacting the workpiece resulting in personal injury Apply pressure only in direct line with the bit and do not apply excessive pressure Bits can bend causing breakage or loss of control resulting in personal injury breakage of parts and any other condition that may affect the power tool s operation If damaged have the power tool repaired before use Many accidents are caused by poorly maintaine...

Page 6: ...d all documentation IPXX IP symbol Additional Safety Information WARNING Never modify the power tool or any part of it Damage or personal injury could result WARNING ALWAYS use safety glasses Everyday eyeglasses are NOT safety glasses Also use face or dust mask if operation is dusty ALWAYS WEAR CERTIFIED SAFETY EQUIPMENT ANSI Z87 1 eye protection CAN CSA Z94 3 ANSI S12 6 S3 19 hearing protection N...

Page 7: ...ted and well insulated from materials that could contact them and cause a short circuit NOTE Li ion batteries should not be put in checked baggage Do not store or use the tool and battery pack in locations where the temperature may reach or exceed 104 F 40 C such as outside sheds or metal buildings in summer For best life store battery packs in a cool dry location NOTE Do not store the battery pac...

Page 8: ...zed service center Make sure that the cord is located so that it will not be stepped on tripped over or otherwise subjected to damage or stress Do not use an extension cord unless it is absolutely necessary Use of improper extension cord could result in risk of fire electric shock or electrocution When operating a charger outdoors always provide a dry location and use an extension cord suitable fo...

Page 9: ... not limited to grinding dust metal chips steel wool aluminum foil or any buildup of metallic particles should be kept away from charger cavities Always unplug the charger from the power supply when there is no battery pack in the cavity Unplug the charger before attempting to clean 6 Do not freeze or immerse the charger in water or any other liquid Charger Cleaning Instructions WARNING Shock haza...

Page 10: ...on release the trigger and depress the forward reverse control button on the right side of the tool To select reverse depress the forward reverse control button on the left side of the tool NOTE The center position of the control button locks the tool in the off position When changing the position of the control button be sure the trigger is released NOTE Continuous use in variable speed range is ...

Page 11: ...and adjustment including brush inspection and replacement when applicable should be performed by a BLACK DECKER factory service center or a BLACK DECKER authorized service center Always use identical replacement parts Do not mix or stir flammable liquids labeled accordingly Screwdriving Recommendations for Screwdriving 1 Pull the trigger switch applying pressure in a straight line with the bit unt...

Page 12: ...ranty gives you specific legal rights aand you may have other rights which vary from state to state or province to province Should you have any questions contact the manager of your nearest THIS PRODUCT USES THE BATTERY AND CHARGER LISTED IN THE CHART BELOW Description Catalog Number 12V Max Lithium Ion Battery LBXR12 12V Max Lithium Ion Battery Charger LCS12 TROUBLE SHOOTING Problem Possible Caus...

Page 13: ... Si utilisé sans aucun terme Indique un message propre à la sécurité AVIS indique une pratique ne posant aucun risque de dommages corporels mais qui par contre si rien n est fait pour l éviter pourrait poser des risques de dommages matériels AVERTISSEMENT lire tous les avertissements de sécurité et toutes les directives Le non respect des avertissements et des directives pourrait se solder par un ...

Page 14: ... de choc électrique f S il est impossible d éviter l utilisation d un outil électrique dans un endroit humide brancher l outil dans une prise ou sur un circuit d alimentation dotés d un disjoncteur de fuite à la terre GFCI L utilisation de ce type de disjoncteur réduit les risques de choc électrique 3 Sécurité personnelle a Être vigilant surveiller le travail effectué et faire preuve de jugement l...

Page 15: ...e celle pour laquelle il a été conçu est dangereuse h Garder vos mains et les surfaces de prise sèches propres et libres de graisse et de poussière Les mains et les surfaces de prise glissante ne permettent pas la manutention et le contrôle sécuritaires de l outil dans les situations imprévues 5 Utilisation et entretien du bloc piles a Ne recharger l outil qu au moyen du chargeur précisé par le fa...

Page 16: ...peut bloquer si surchargée ou mal utilisée causant une torsion Attendez vous toujours à un blocage Saisissez solidement la perceuse pour contrôler le mouvement Consigne de sécurité supplémentaire AVERTISSEMENT ne jamais modifier l outil électrique ni aucun de ses composants car il y a risques de dommages corporels ou matériels AVERTISSEMENT porter SYSTEMATIQUEMENT des lunettes de protection Les lu...

Page 17: ...arbonates organiques liquides et de sels de lithium Le contenu des cellules d une pile ouverte peut causer une irritation respiratoire En cas d inhalation exposer l individu à l air libre Si les symptômes persistent consulter un médecin AVERTISSEMENT risques de brûlure Le liquide de la pile peut s enflammer s il est exposé à des étincelles ou à une flamme LIRE TOUTES LES CONSIGNES Consignes import...

Page 18: ...K DECKER ou chez votre détaillant afin qu elles y soient recyclées On peut en outre se renseigner auprès d un centre de recyclage local pour connaître d autres sites les acceptant SRPRCMD est une marque déposée de l Appel à Recycler Canada Inc Le sceau SRPRCMD Le sceau SRPRCMD Société de recyclage des piles rechargeables du Canada apposé sur une pile au nickel cadmium à AVERTISSEMENT risques d inc...

Page 19: ...rvice autorisé calibrage américain normalisé des fils électriques Plus le calibre est petit et plus sa capacité est grande Un calibre 16 par exemple a une capacité supérieure à un calibre 18 L usage d une rallonge de calibre insuffisant causera une chute de tension qui entraînera perte de puissance et surchauffe Si plus d une rallonge est utilisée pour obtenir une certaine longueur s assurer que c...

Page 20: ...ner l outil le bloc piles et son chargeur dans un centre de réparation local 4 Recharger le bloc piles lorsqu il ne produit plus assez de puissance pour effectuer un travail qu il faisait facilement auparavant NE PAS CONTINUER à l utiliser dans ces conditions Suivre la procédure de charge Si nécessaire il est aussi possible de recharger un bloc piles partiellement déchargé sans effet nuisible sur ...

Page 21: ...ins illustrée AVERTISSEMENT pour réduire tout risque de dommages corporels graves maintenir SYSTÉMATIQUEMENT l outil fermement pour anticiper toute réaction soudaine La position correcte des mains requiert une main sur la poignée principale 3 et l autre sur le bloc piles Gâchette de vitesse variable et bouton de commande avancer reculer Fig A L outil est mise en marche ou éteinte en appuyant et en...

Page 22: ... cause du blocage NE PAS APPUYER NI RELÂCHER LA GÂCHETTE DANS LE BUT DE DÉMARRER UN OUTIL BLOQUÉ CELA PEUT ENDOMMAGER L OUTIL Pour minimiser le blocage ou le bris du matériau réduisez la pression sur la perceuse et facilitez le passage de la mèche dans la dernière partie due trou Les gros trous 5 16 pi à 1 2 po 7 9 mm à 12 7 mm dans l acier peuvent être faits plus facilement si un trou de départ 5...

Page 23: ... un centre de service de BLACK DECKER L outil acheté n est pas prévu pour usage commercial conséquemment un tel usage annulera sa garantie Les présentes constituent un désistement à toute garantie expresse ou implicite d autres sources AMÉRIQUE LATINE La présente garantie ne s applique pas aux produits vendus en Amérique latine Pour les produits vendus en Amérique latine consulter les renseignemen...

Page 24: ...c piles Le bloc piles ne se charge pas Chargeur non branché Brancher le chargeur dans une prise qui fonctionne Se reporter à la rubrique Remarques importantes de chargement pour plus de renseignements Température ambiante trop chaude ou froide Déplacer le chargeur et l outil à une température ambiante de plus de 4 5 C 40 F ou sous les 40 5 C 104 F Pour de l aide avec l outil consulter notre site W...

Page 25: ...es leves o moderadas Utilizado sin palabras indica un mensaje de seguridad relacionado AVISO Se refiere a una práctica no relacionada a lesiones corporales que de no evitarse puede resultar en daños a la propiedad ADVERTENCIA Lea todas las advertencias de seguridad e instrucciones El incumplimiento de las advertencias e instrucciones puede provocar descargas eléctricas incendios o lesiones graves ...

Page 26: ...el exterior utilice un cable prolongador adecuado para tal uso Utilice un cable adecuado para uso en exteriores a fin de reducir el riesgo de descarga eléctrica f Si el uso de una herramienta eléctrica en un lugar húmedo es imposible de evitar utilice un suministro protegido con un interruptor de circuito por falla a tierra GFCI El uso de un GFCI reduce el riesgo de descargas eléctricas 3 Segurida...

Page 27: ...as condiciones de trabajo y el trabajo que debe realizarse El uso de la herramienta eléctrica para operaciones diferentes de aquéllas para las que fue diseñada podría originar una situación peligrosa h Mantenga las manijas y superficies de sujeción secas limpias y libres de aceite y grasa Las manijas y superficies de sujeción resbalosas no permiten el manejo y control seguros de la herramienta en ...

Page 28: ...o del taladro Si su Instrucción Adicional de Seguridad ADVERTENCIA Nunca modifique la herramienta eléctrica ni tampoco ninguna de sus piezas Podría producir lesiones corporales o daños ADVERTENCIA Use SIEMPRE lentes de seguridad Los anteojos de diario NO SON lentes de seguridad Utilice además una cubrebocas o mascarilla antipolvo si la operación de corte genera demasiado polvo SIEMPRE LLEVE EQUIPO...

Page 29: ...batería entra en contacto con la piel lave el área de inmediato con agua y un jabón suave Si el líquido de la batería entra en contacto con sus ojos enjuáguelos con agua y los ojos abiertos por 15 minutos o hasta que cese la irritación Si se requiere de asistencia médica el electrolito de la batería está BATERÍAS Y CARGADORES La batería no viene completamente cargada de fábrica Antes de utilizar l...

Page 30: ...directa y del exceso de calor o frío 2 Para resultados óptimos durante tiempos prolongados de almacenamiento se recomienda almacenar la unidad de batería completamente cargada en un lugar fresco y seco fuera del cargador NOTA Las unidades de batería no deberían almacenarse completamente descargadas La unidad de batería deberá recargarse antes de ser usada Instrucciones de Limpieza del Batería Para...

Page 31: ... del paquete de batería No use un alargador a menos que sea absolutamente necesario El uso de un alargador incorrecto podría producir riesgo de incendios descargas eléctricas o electrocución Cuando opere un cargador al exterior hágalo siempre en un lugar seco y use un alargador apropiado para uso al exterior El uso de un alargador apropiado para uso al exterior reduce el riesgo de descarga eléctri...

Page 32: ...ía caliente fría y suspende la carga hasta que la batería alcanza una temperatura adecuada En ese momento el cargador inicia automáticamente el modo de carga de la batería Esta función garantiza la máxima duración de la batería Una batería fría puede cargar más lentamente que una batería caliente Notas Importantes Sobre la Carga 1 Se puede obtener una mayor duración y un mejor rendimiento si la un...

Page 33: ...a de la manija de la herramienta Para cargar insértela en el cargador como se describe en la sección de cargador de este manual Después de retirar la batería apriete el gatillo de la herramienta durante tres segundos para disipar la ligera carga eléctrica que aún puede haber en la herramienta La luz de trabajo puede encenderse por un breve momento OPERACIÓN ADVERTENCIA Para reducir el riesgo de le...

Page 34: ...1 800 544 6986 BLACK DECKER Limpieza ADVERTENCIA Sople la suciedad y el polvo de todos los conductos de ventilación con aire seco al menos una vez por semana Para reducir el riesgo de lesiones utilice siempre protección para los ojos aprobada ANSI Z87 1 al realizar esta tarea ADVERTENCIA Nunca utilice solventes ni otros químicos abrasivos para limpiar las piezas no metálicas de la herramienta Esto...

Page 35: ...__________ Marca ______________________________________ Núm de serie _________________________________ Datos para ser llenados por el distribuidor Fecha de compra y o entrega del producto ___________________________________________ Nombre y domicilio del distribuidor donde se adquirió el producto ___________________________________________ Este producto está garantizado por un año a partir de la f...

Page 36: ...NTÍA Si completa esta tarjeta podrá obtener un servicio en garantía más eficiente en caso de que exista un problema con su producto CONFIRMATCIÓN DE PROPIEDAD En caso de una pérdida que cubra el seguro como un incendio una inundacíon o un robo el registro de propiedad servirá como comprobante de compra PARA SU SEGURIDAD Si registra el producto podremos comunicarnos con usted en el caso improbable ...

Page 37: ...ncione Consulte Notas importantes sobre la carga para conocer más detalles La temperatura ambiental está demasiado caliente o demasiado fría Traslade el cargador y el paquete de baterías a una temperatura ambiental que esté por encima de 4 5 C 40 F o por debajo de 40 C 104 F Para conocer la ubicación del centro de servicio más cercano a fin de recibir ayuda con su producto visite nuestro sitio Web...

Page 38: ......

Page 39: ......

Page 40: ...06 19 Part No N656812 Black Decker U S Inc 701 East Joppa Road Towson MD 21286 Copyright 2019 ...

Reviews: