background image

26

27

ADDITIoNAL  INFoRMATIoN  “AFTER  AN  ACCIDENT”  WITH 

YoUR BiXS PEDELEC

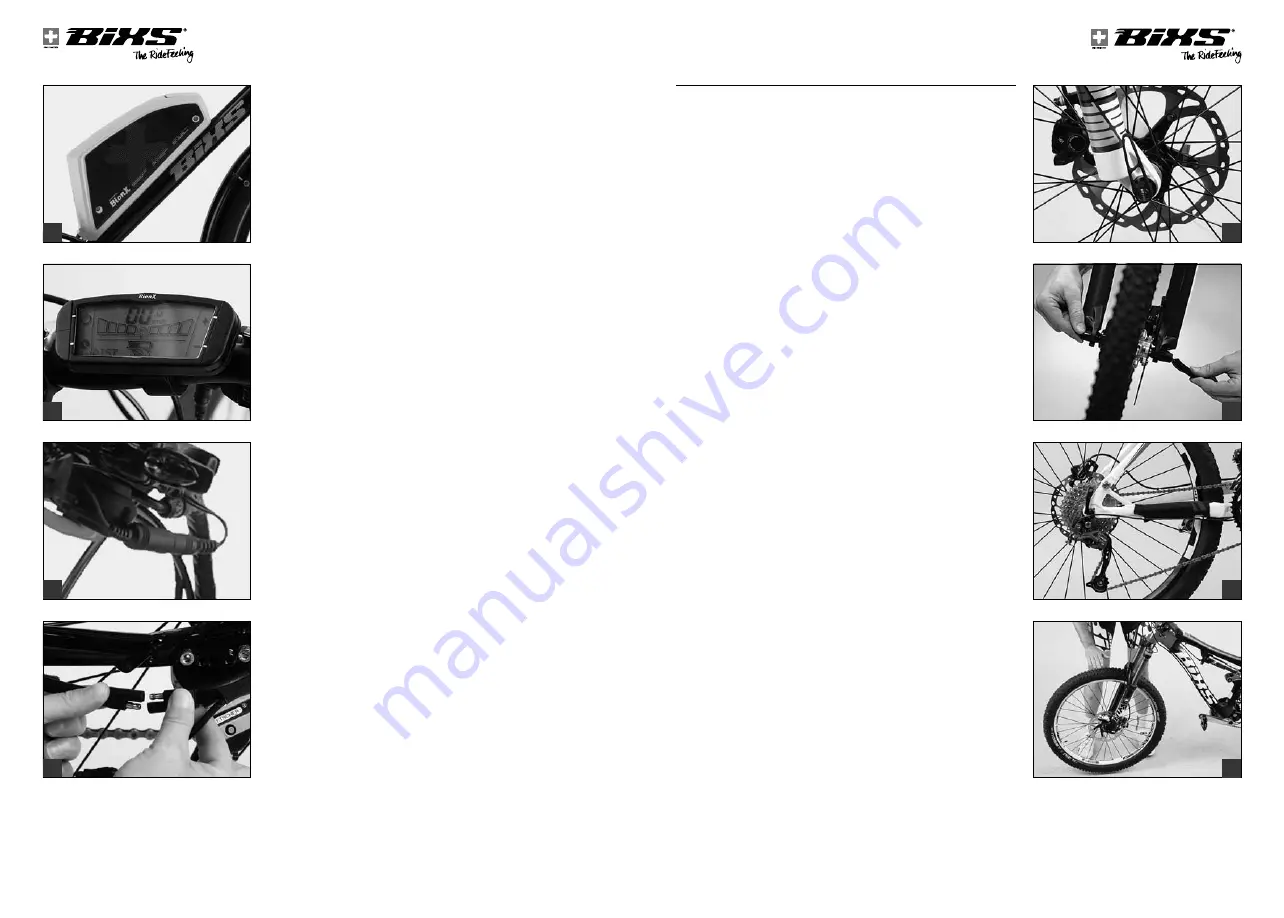
1.  Check the rechargeable battery 

(a)

. If the rechargeable battery is 

no longer properly in its holder or shows any damage, do not use 
your BiXS pedelec any longer, or at least, not in assistance mode. 
Switch off the motor and the battery separately, if necessary. A 
damaged battery can lead to a short-circuit or a sudden failure of 
your BiXS pedelec assistance right at the moment when you need 
it.


Damage to the outer housing of the rechargeable battery can result 
in the entry of water or moisture and that can lead to short circuits 
or  electric  shocks.  The  rechargeable  battery  could  catch  fire  or 
even explode! In such a case contact your BiXS bicycle dealer im-
mediately.

2.  Check the display 

(b)

. Are all the values displayed as usual?


Do not use your BiXS pedelec if the display shows an error mes-
sage or a warning. If necessary, switch off the system completely 
and wait at least 10 seconds before checking it again.


Do not set off on your BiXS pedelec with drive assistance if the 
control element shows a warning. In such a case contact your BiXS 
bicycle dealer immediately.


You  can  find  further  information  in  the  chapter 

“operating  the 

bionx propulsion System” 

in  your  BionX  system  operating  in-

structions.

3.  Let your BiXS pedelec bounce on the ground from a low height. If 

there is any rattling, see where it comes from. Check the bearings, 
the bolts and the proper seating of the battery and the connectors 

(c+d)

, as necessary.


You can find further information in the chapter 

“inserting and re-

moving the battery” 

in your BionX system operating instructions.

how to uSe Quick-releaSeS and 
thru axleS

QUICK-RELEASES

Most mountain bikes are fitted with quick-releases to ensure fast ad-
justments,  assembly  and  disassembly.  Be  sure  to  check  that  all  the 
quick-releases are tight before you set off on your BiXS bicycle. Quick-
releases should be handled with the greatest care, as they directly af-
fect your safety.

Practise the proper use of quick-releases to avoid any accidents.

Quick-release  mechanisms  essentially  consist  of  two  operative  ele-
ments:

1.  The hand lever on one side of the hub which creates a clamping 

force via a cam when you close it 

(e)

.

2.  The tightening nut on the other side of the hub with which the initial 

tension on the threaded rod (quick-release axle) is set 

(f)

.

G

  Make  sure  that  the  levers  of  both  wheel  quick-releases 

are always on the side opposite the chain drive. This will 
help you to avoid accidentally mounting the front wheel the 
wrong way round. In the case of bicycles with disc brakes 
and quick-releases having a 5-mm-axle, it may be reason-
able to mount both quick-releases with the lever on the side 
of the chain drive 

(g)

. This would help you not to come into 

contact with the rotor and prevent you from having your fin-
gers burnt. If you are in doubt or if you have any questions, 
then contact your BiXS bicycle dealer.

G

  Never ride your BiXS bicycle without having checked first 

whether the wheels are securely fastened 

(h)

danger of 

an accident

!

G

  Do not touch the rotor directly after having stopped – you 

may burn your fingers! Always let the rotor cool down be-
fore opening the quick-release!

A

  If your BiXS bicycle is equipped with quick-releases, be sure 

to lock the wheels together with the frame to an immovable 
object when you leave the bicycle outside.

a

b

c

d

e

f

g

h

Summary of Contents for Chamois

Page 1: ...ide Please observe bike card Your BiXS bicycle and this translation of these original operating instructions comply with the safety requirements laid down in the European standard EN 14766 mountain bi...

Page 2: ...lay and control element 11 Crankset 12 Pedal 13 Stem 14 Handlebar 15 Brake lever 16 Shifter 17 Headset 18 Front light 19 Fork 20 Front brake 21 Rotor Wheel 22 Quick release thru axle 23 Spoke 24 Rim 2...

Page 3: ...warnings or information relate only to pedelecs then these will be marked with a special symbol Pay particular attention to the following symbols gThis symbol indicates an imminent risk to your life o...

Page 4: ...ered to countries outside Europe supplemen tary information has to be provided by the bicycle manufacturer as the case may be Technical details in the text and illustrations of these operating instruc...

Page 5: ...stem 98 Battery Powered Lighting 98 Things YOU NEED TO Know about Bicycles and Cycling 99 Cycling Helmets and Glasses 99 Clothing 99 Pedals and Shoes 100 Accessories 101 Transporting Baggage 104 Takin...

Page 6: ...ion provided in these operating instructions only refer to this BiXS mountain bike or BiXS pedelec The information included here is not applicable to any other bicycle type As bicycles and pedelecs co...

Page 7: ...unforeseeable consequences 1 cross bikes are equipped with 28 wheels inner diameter 622 mm and intended for hard surface roads They are also suitable for off road cycling on gravel field tracks howeve...

Page 8: ...sory either but highly recommended The starting or pushing aid provides assistance during pushing or when doing a hill start even without pedalling up to a speed of 6 kmh 3 7 mph These BiXS pedelecs a...

Page 9: ...Core 29 HT Alloy 12 16 75 87 91 130 no 25 Storm HT Alloy 13 17 75 88 92 130 no 25 Sportivo HT Alloy 12 16 75 87 91 130 no 25 68 69 Bike card Hint to the dealer Please copy the bike card and the hando...

Page 10: ...u can find further information in the chapter Gears and in the instructions from the parts manufacturers which you can find on the enclosed CD 5 Are both the saddle and handlebars properly adjusted Th...

Page 11: ...an area free of traffic You can find further information in the chapters Useful Tips for Riding a BiXS Pedelec and Riding a BiXS Speed Pedelec Special Features and in your BionX system operating instr...

Page 12: ...th your insurers that the pedelec as well as the storekeeping and the charging of lithium ion batteries are covered by your household and fire insurance Read the daily press to keep yourself informed...

Page 13: ...nents retract and extend as usual e f You can find further information in the chapters Suspension Forks and Rear Shock and in the instructions from the parts manufacturers which you can find on the en...

Page 14: ...outs and whether the rims are still centred with respect to the frame or fork e Spin the wheels and observe the gap either between brake pads and rim sides or between frame and tyre If the width of t...

Page 15: ...ent through this check without any problems e Do not accelerate or brake hard and do not ride your bicy cle out of the saddle If you are in doubt about the performance of your BiXS bicycle have yourse...

Page 16: ...ur BionX system operating instructions How to Use Quick Releases and Thru Axles Quick releases Most mountain bikes are fitted with quick releases to ensure fast ad justments assembly and disassembly B...

Page 17: ...htening nut on the opposite side clockwise by half a turn Close the quick release lever and check it again for tightness Finally lift the bicycle a few centimetres so that the wheel no longer touches...

Page 18: ...heel into the correct position between the drop outs and slide the axle with the open Maxle quick release lever from the right side through the drop out and the hub As soon as the axle thread engages...

Page 19: ...portions up to a certain degree g These include the seat post the stem and the brake levers As these adjustments require know how experience the appropriate tools and a certain amount of skill you sho...

Page 20: ...tight by taking hold of the saddle at both ends and then trying to rotate the seat post inside the seat tube If it does rotate gently retighten the clamping bolt by half a turn and do the check again...

Page 21: ...tions from the parts manufacturers which you can find on the enclosed CD A Make sure the handlebar stem combination is approved by the handlebar and or stem manufacturer A Check that the area of the s...

Page 22: ...e stem manufacturer which you can find on the enclosed CD G In the case of turned stems it is possible that the cables are too short In this case riding can be unsafe Ask your BiXS bicycle dealer for...

Page 23: ...n the event of an accident G Be aware that the distance you need to stop your bicycle increases if you are riding with your hands on the bar ends or on multi position handlebars The brake levers are n...

Page 24: ...in doubt or if you have any questions then contact your BiXS bicycle dealer Adjusting Saddle Position and Tilt Patent clamping with one bolt or two parallel bolts e With patent seat posts a single bo...

Page 25: ...interface with most performance bicycle saddles featuring round 7 mm diameter rails including all saddles Replacement outer clamps are also available to accommodate ovalized rails of 8 mm height x 8...

Page 26: ...he front end of the saddle When you have found the perfect position tighten the bolts to the specified maximum torque which is listed on the seat post in newton meters Nm Carbon Important Information...

Page 27: ...e hazardous to your life and limb Always protect yourself with appropriate and suitable clothing aDue to the specific intended use some dirt bikes are fitted with only one brake Do not ride these BiXS...

Page 28: ...adjusted by press ing a button on the handlebars Read the operating instruc tions which you can find on the enclosed CD BRAKE SYSTEM General Information on Brakes Brakes e are used to adjust your spee...

Page 29: ...and over hilly terrain can accelerate wear on both braking surfaces Some rims are provided with wear indicators e g grooves or circular indentations If the rim is worn down to the point where the gro...

Page 30: ...lly with the rim when you pull them hard Disc Brakes Operation and Wear The most striking feature of disc brakes is their outstanding braking power They respond a lot faster in wet conditions than rim...

Page 31: ...e must be replaced immediately as they could snap Risk of accidents Wear and Maintenance To a certain extent the wear of the brake pads can be compensated for directly at the brake lever Unscrew the...

Page 32: ...et in some other cases it is integrated into the right crank Sealed bottom brackets are maintenance free and de livered without play ex works The bottom bracket in the frame must be checked for play a...

Page 33: ...shifter lever e or the adjusting bolt through which it runs into the rear derailleur f To do so shift to the smallest sprocket and turn the bolts anticlockwise in half turns until the cable is slightl...

Page 34: ...its service life It is not the quantity but the distribution and regular application of lubricant that counts Clean the dirt and oil off your chain with an oily rag e from time to time Special degreas...

Page 35: ...o more resistant to punctures An insuf ficiently inflated tyre can easily get pinched snakebite when it goes over a sharp kerb The air pressure recommended by the manufacturer is given on the tyre sid...

Page 36: ...turer c on the enclosed CD If you are in doubt or if you have any questions then contact your BiXS bicycle dealer Rim Trueness and Spoke Tension For the true running of the wheel it is imperative that...

Page 37: ...el as described in the chapter How to Use Quick Releases and Thru Axles If you cannot remove the front wheel after releasing the lever this is due to the drop out safety tabs They come as metal catche...

Page 38: ...r ence This should normally be possible without using tools Stick the valve of the inner tube through the hole in the rim b Inflate the inner tube slightly so that it becomes round and push it into th...

Page 39: ...en the other Press both tyre beads all the way around into the well of the rim and ensure that the special valve is centred between the tyre beads Press onto the tyre from above over the entire circum...

Page 40: ...reason follow precisely the instruc tions of the manufacturer in the attached instructions I See the video to enable you to properly glue Continental tubular tyres at www conti online com Wheel Mounti...

Page 41: ...em is characterised by the fact that the stem is not in the fork steerer tube but clamps it from outside Hence the stem is an important constituent part of the headset clamping it therefore also sets...

Page 42: ...road surfaces and en sures more ground contact for the tyre It noticeably reduces the strain on you and your bicycle caused by the mechanical shocks from the terrain Suspension forks differ in their...

Page 43: ...the setting of the springs is too soft In this case the spring preload the pressure must be increased If the adjust ment range of the coil spring is too small have it replaced by your BiXS bicycle dea...

Page 44: ...off for your next ride 4 Do not use a steam jet or aggressive cleaning agents for cleaning Ask your BiXS bicycle dealer for suitable cleaning material 5 If your suspension fork has an elastomer filli...

Page 45: ...bicycle dealer will be pleased to help you In the case of air rear shocks the spring rate is adjusted by the air pressure in the rear shock The pressure must be adjusted with a spe cial high pressure...

Page 46: ...l which you can find on the enclosed CD G Do not turn any screws in the vague hope of adjusting them somehow You could release the fastening mechanism thus causing an accident All manufacturers normal...

Page 47: ...e a year at least Pedelecs Useful Tips for Riding a BiXS Pedelec Your BiXS pedelec e f is designed to be used like a conventional BiXS bicycle The unique riding experience however starts when you actu...

Page 48: ...oads with this fact in mind and anticipate the actions of other road users Risk of ac cidents H Keep in mind that pedestrians do not hear you when you ap proach at high speed Therefore ride especially...

Page 49: ...elec that is fitted according to the regulations you can ride without the battery even in darkness Ask your BiXS bicy cle dealer for advice If your BiXS pedelec is fitted with a lighting set that is p...

Page 50: ...rake very carefully Useful Information for Proper Handling of the Battery Remove the rechargeable battery e if you are not going to use your pedelec for a longer period of time e g during the winter s...

Page 51: ...d battery can only be recharged in exceptional cases and with special chargers Contact your BiXS bicycle dealer S If the rechargeable battery or the charger or parts of it must be replaced only use or...

Page 52: ...wear a full face helmet f and protectors g if you are riding a dirt bike downhill bike or freeride bike In addition to a cycling helmet and suitable clothing cycling glasses are absolutely essential...

Page 53: ...roblem in most cas es These noises as well as lateral play of the shoe on the pedal can however be also signs of wear Check the cleats at regular intervals G Make sure the fastening bolts of the cleat...

Page 54: ...st commonly used Allen keys a spare tube a tyre repair kit your mobile phone if necessary and a little cash d In this way you will be well prepared in the event of a puncture or some other mishap Comp...

Page 55: ...aximum permis sible load G Adjust the suspension forks and the tyre pressure to the additional load A Baggage generally changes the riding characteristics of your BiXS bicycle and increases your stopp...

Page 56: ...e models available in the car accessory trade Rear carriers are becoming more and more popular e Their big ad vantage over roof carriers is that you do not have to lift up the BiXS bicycle so high to...

Page 57: ...isembarking of the train I Bear in mind than in Germany each traveller may only take one bicycle on Deutsche Bahn trains I Before you start your trip inform yourself in time about the conditions of ca...

Page 58: ...e Have your local BiXS bicycle dealer do the scheduled maintenance work This is the only way to ensure that all components function safely and reliably for many miles The bicycle will be due for its...

Page 59: ...tch out for cracks scratches dents as well as bent or discoloured material Have defective com ponents replaced immediately and touch up paint defects If you are in doubt or if you have any questions t...

Page 60: ...Check wear replace if necessary After 800 km 490 miles or 40 hours of use Crank Check and retighten if necessary Painted anodised carbon surfaces Polish At least every 6 months Wheels spokes Check fo...

Page 61: ...cturers iSome components have the maximum permissible torque values printed on them Use a torque wrench and never exceed the maximum torque value If you are in doubt or if you have any questions conta...

Page 62: ...he regulations of your country Pay particular attention to your bicycle being equipped with the prescribed set of lights a b and reflectors c d iAsk your BiXS bicycle dealer to inform you about the re...

Page 63: ...warranty rights within the first two years after purchase Please contact your BiXS bicycle dealer in the event of defects To ensure a smooth handling of your claim it is necessary to present your rec...

Page 64: ...s of the date of purchase it only applies to the direct purchaser first owner and cannot be transferred This warranty is only applicable to BiXS bicycles that had been purchased from an authorised BiX...

Page 65: ...rd Service After 4 000 kilometres 2 400 miles or 200 hours of use at the latest or after two years Order no Date Mileage All necessary maintenance work carried out see service and maintenance schedul...

Page 66: ...es 7 500 miles or 600 hours of use at the latest or after six years Order no Date Mileage All necessary maintenance work carried out see service and maintenance schedule replaced or repaired parts Sta...

Page 67: ...s 12 500 miles or 1 000 hours of use at the latest or after ten years Order no Date Mileage All necessary maintenance work carried out see service and maintenance schedule replaced or repaired parts S...

Page 68: ...nt Right lever front wheel brake rear wheel brake Left lever front wheel brake rear wheel brake Manual operating instructions Additional instructions Brake system Suspension seat post Pedal system Rea...

Page 69: ......

Reviews: