background image


SRP-Q200 

Safety Information 

  Warning

: Warnings must be heeded carefully in order to prevent serious physical harm. 

  Caution

: Cautions must be heeded in order to prevent minor injuries, equipment   

damage, or data loss. 


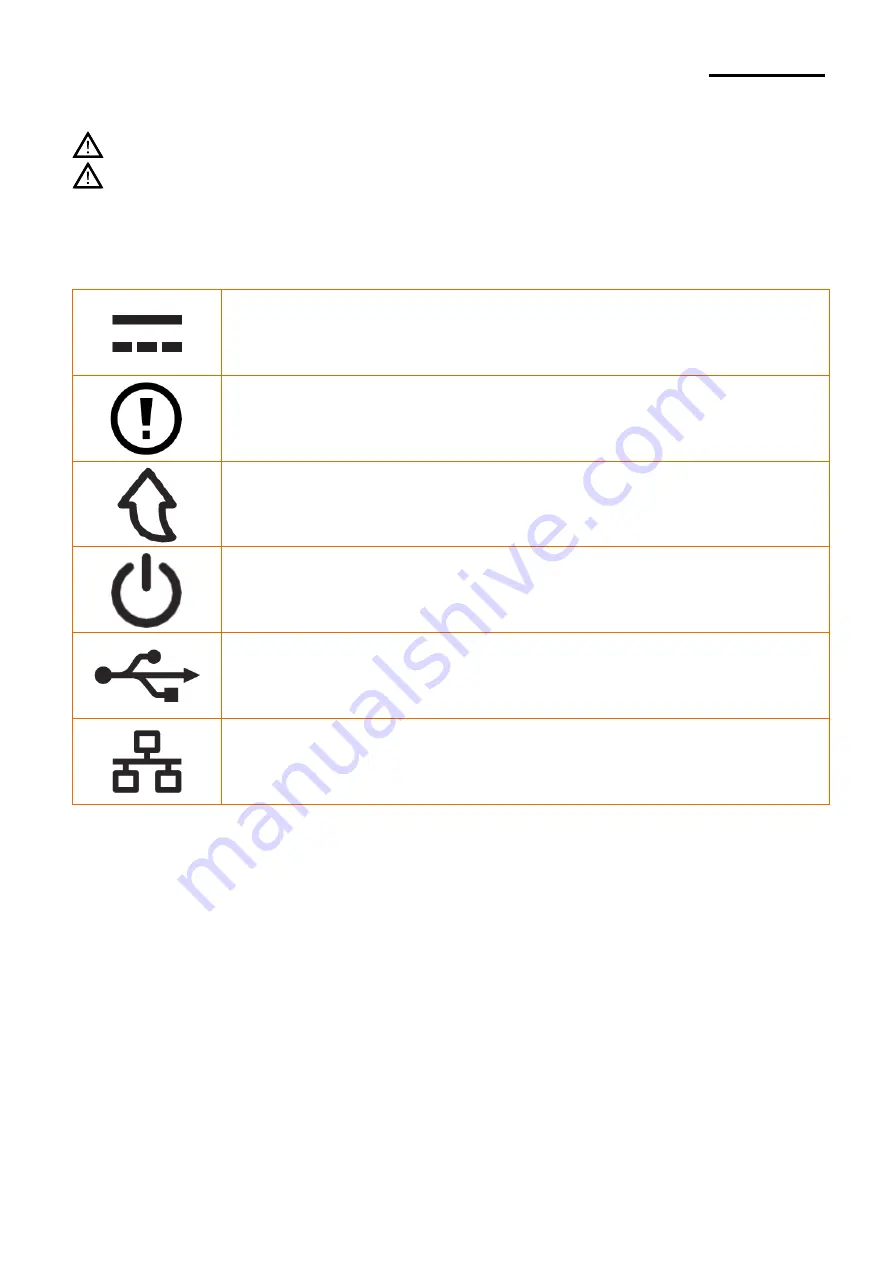
Symbol Information 


DC (Direct current) 


Error, Warning 


Paper Feeding 


Stand-By 


USB 


Ethernet 


Ver. 1.00 


- 3 - 

Summary of Contents for SRP-Q200

Page 1: ...User s Manual SRP Q200 THERMAL RECEIPT PRINTER Ver 1 00 http www bixolon com...

Page 2: ...x 109 W X D X H 5 Interface Serial USB Ethernet WLAN Bluetooth 6 Equipped with data buffer receives print data even while printing 7 Can print a range of barcodes 8 Range of printing density selectab...

Page 3: ...heeded carefully in order to prevent serious physical harm Caution Cautions must be heeded in order to prevent minor injuries equipment damage or data loss Symbol Information DC Direct current Error W...

Page 4: ...9 1 2 4 Wireless LAN Interface Option 10 1 2 5 Bluetooth Interface Option 10 1 3 Drawer Kick out Port 11 1 4 Connecting Power Supply 12 1 5 Reconfiguration of Printer 14 1 6 Installing Replacing Pape...

Page 5: ...eck the following contents list and contact your dealer for assistance if any item is missing or incorrect Product SRP Q200 Standard Components AC DC Adaptor Power Cord Installation Guide Roll Paper O...

Page 6: ...t the printer to the host computer using the right interface cable that complies with the specifications of the interface Note To detach cover rear easily press cover rear Open Button Cover Rear Open...

Page 7: ...ignation Color Function Shell Shield Drain Cable Frame Ground 1 VBUS RED Host Power 2 D WHITE Data Line D 3 D GREEN Data Line D 4 GND BLACK Signal Ground Caution After turning off the power switch of...

Page 8: ...C BLUE 5 NC WHITE BLUE 6 NC GREEN 7 RD WHITE BROWN Receive 8 RD BROWN Receive Note Information such as IP and Mac can be found by operating the function key Refer to the utility and network connection...

Page 9: ...Direction Function 1 NC 2 TxD Output Transmit Data 3 RxD Input Receive Data 6 8 RTS Output Ready To Send 4 7 CTS Input Clear To Send 5 SG Signal Ground 9 NC Caution After turning off the power switch...

Page 10: ...o the Wireless Wireless LAN Connection Manual for more detailed instructions about how to establish the connection 1 2 5 Bluetooth Interface Option 1 Bluetooth Communication Specifications Item Specif...

Page 11: ...r a separate device may result in damage to the product Do not connect a telephone line to the drawer kick out port Otherwise the telephone line and the computer may be damaged Do not allow a foreign...

Page 12: ...Supply 1 Make sure the product is turned off before connecting the power supply 2 Connect the power cable with the flat side pointing to the outside of the printer as shown in the diagram below Power...

Page 13: ...supply make sure you have a firm grasp of the plug terminal of the power cable and the printer and pull horizontally When connecting or disconnecting power make sure to remove the power supply from th...

Page 14: ...vel Print Density Print Speed MSW 1 8 MSW 1 7 MSW 1 6 Remark 1 Light 250mm s OFF OFF OFF Default 2 Middle 230mm s OFF OFF ON 3 Dark 200mm s OFF ON OFF Note Using the virtual memory switch setting you...

Page 15: ...1 6 Installing Replacing Paper 1 Open the paper roll cover by Pulling the Cover Open Lever Caution Do not open the print cover while the printer is operating otherwise the printer may be damaged Ver...

Page 16: ...SRP Q200 2 Remove the empty paper roll and replace with a new one as shown in the image Caution Check the orientation of the roll paper when inserting it into the printer O X Ver 1 00 16...

Page 17: ...amount of paper as shown in the picture and close the cover Caution When closing the cover hold down the center of printer cover firmly so that paper roll is loaded correctly Make sure to use the spec...

Page 18: ...not responsible for the damage caused by non recommended papers If you have to use other products we recommend that you use papers with a similar level of quality to the recommended ones 1 8 Removing...

Page 19: ...D indicates ON Power Button The POWER light is on whenever the printer is on Error Indicator Lamp Red light will be on in various error conditions such as out of paper cover open etc Feed Button Press...

Page 20: ...xt step after printing the following lines The paper signal light keeps blinking SELF TEST PRINTING SELECT MODES BY PRESSING FEED BUTTON Continuous test printing Less than 1 second VMSM Selection 1 se...

Page 21: ...u to select the desired setting menu Step 2 entering setting item Press and hold the button for 1 second to apply the selected item Execute the 0 Save settings and exit function to apply the changed s...

Page 22: ...elect the hexadecimal printing function in the mode selection menu to move to the hexadecimal printing mode 5 Run any software program that sends data to the printer The printer will print all the cod...

Page 23: ...ethanol or IPA 3 Clean the paper sensor and paper roller with a cotton swab or a dry cloth 4 Insert a paper roll and close the printer cover Caution When cleaning the printer head make sure that clea...

Page 24: ...with Y type cable Supply Voltage SMPS Input Voltage 100 240 VAC Frequency 50 60 Hz SMPS Output Voltage 24 VDC Environment Condition Temperature Operating 0 40 Storage 20 60 Humidity Operating 10 80 RH...

Page 25: ...nformation The BIXOLON logo is the registered trademark of BIXOLON Co Ltd All other brand or product names are trademarks of their respective companies or organizations BIXOLON maintains ongoing effor...

Page 26: ...nufacturer could void the user s authority to operate the equipment Class A Digital Device Wired Device This Apparatus complies with class A limits for radio interference as specified in the Canadian...

Page 27: ...SRP Q200 Revision history Ver Date Page Description 1 00 07 08 19 New Ver 1 00 27...

Reviews: