Bittium Respiro Operating Instructions Manual Download Page 26


Respiro


26 (48) 

Operating Instructions 

© Bittium Biosignals 2022 


Starting a recording manually 

A  recording  can  be  started  manually  by  pressing  the  power  button:  one  short 
press  (<3  seconds)  and  next  press  for  approx.  8  seconds  after  which  Respiro  vi-
brates once. Recording starts. 

2.8


Recording configuration 

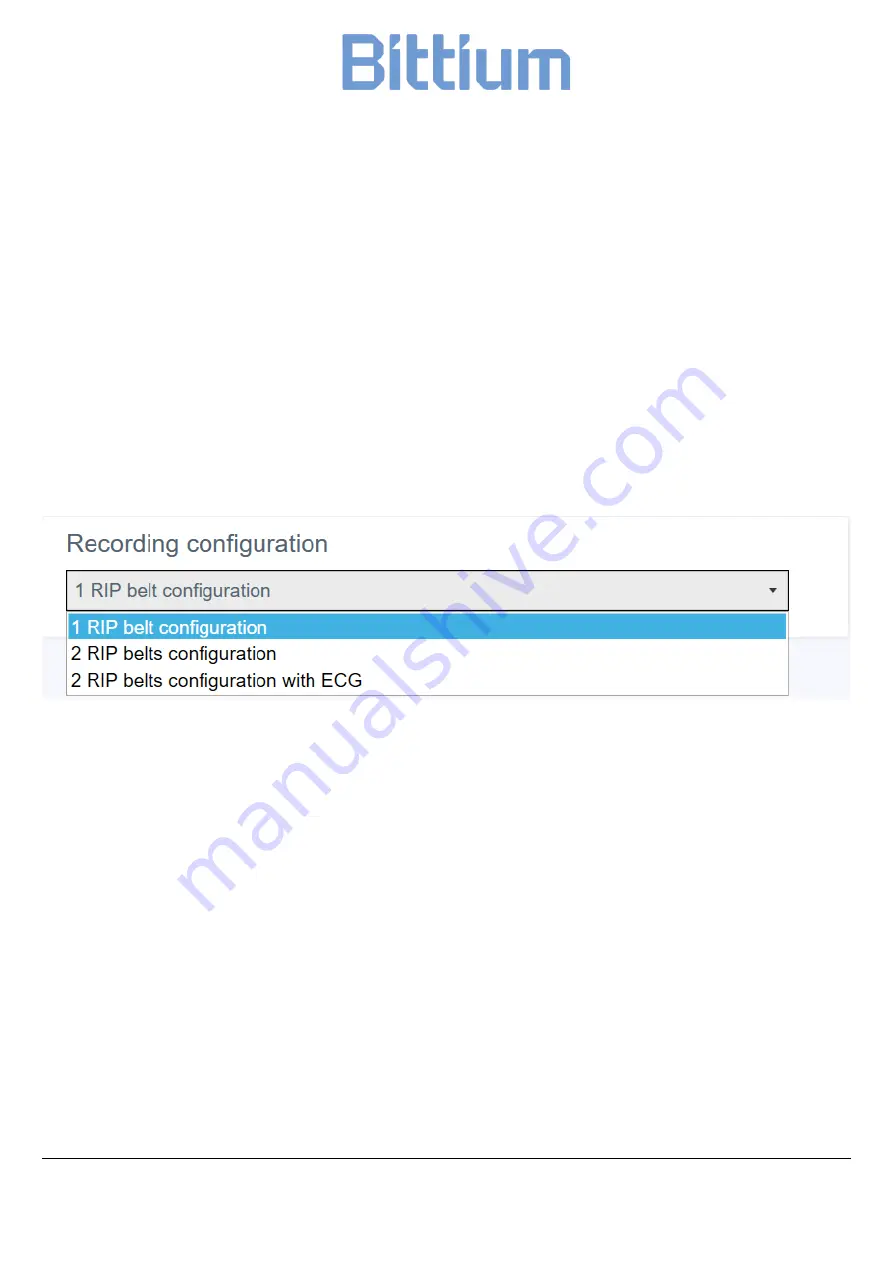
Before  starting  a  recording,  you  must  select  the  configuration  that  will  be  used 
from the drop-down list under Recording configuration. The options are: 


1 RIP belt configuration 


2 RIP belts configuration 


2 RIP belts configuration with ECG 


Figure 15 Recording configuration 

The selected option is shown in the Figure on the right. Click Save after the config-
uration is selected. 

2.9


Starting and ending a recording 

See Respiro Quick Guides. 

2.10


After the recording 

2.10.1


Uploading the recording data after HSAT recording 

Respiro Device Manager application works in Windows 10 operating system. Note: 
if  a  recording  state  is  accidentally  on  in  Respiro  device  it  is  ended  automatically 
when the Respiro device is set in the charging dock.  

Summary of Contents for Respiro

Page 1: ...Bittium Respiro Operating Instructions for healthcare professionals ...

Page 2: ...Equipment needed in recording 14 2 5 Respiro indicator LEDs and power button functions 14 2 5 1 LED indications in idle state 14 2 5 2 LED indicators during recording 14 2 5 3 LED indicators while charging Respiro 15 2 5 4 Power button functions 16 2 6 Before recording 16 2 6 1 Charging Respiro 17 2 6 2 Attaching the pulse oximeter s wristband 17 2 6 3 Checking the device pairs 19 2 6 4 Connecting...

Page 3: ...ng Respiro firmware 32 3 3 IT network 33 3 4 Battery replacement 34 3 5 User responsibility and warranty 34 4 Troubleshooting 36 5 Device disposal 39 6 Product safety and regulatory information 40 6 1 EU Declaration of Conformity 40 6 2 EMC 40 7 Technical information 41 7 1 Respiro dimensions and weight 41 7 2 Device IP classifications 41 7 3 Operating and storage conditions 41 7 4 Respiro specifi...

Page 4: ...either in a hospital or at patient s home The device records patient s biosignals The device does not actively moni tor the patient s status make diagnoses or treat the patient and it cannot be used as a life sustaining device Device does not record EMG EOG or EEG signals re quired in an extensive sleep study polysomnography Device is not designed to be used with children The device is operated by...

Page 5: ...sents the pulse oximeter and the sensor Figure 2 Pulse oximeter and sensor 1 2 Notes and warnings Do not use a broken device or electrodes cannulas whose packing is opened Use only the included charger and the charging dock when charging Respi ro The connector for the pulse oximeter is a push pull connector Do not twist or bend the connector when connecting the pulse oximeter sensor ...

Page 6: ...erfere with the pulse oximeter Do not open and or modify the equipment Keep the devices and accessories out of reach for children and pets Do not use the devices in shower or sauna EMC disturbances may cause interference and or noise to recording data Use the device only with accessories provided by Bittium Biosignals Ltd Oth er accessories may negatively affect the device performance or cause non...

Page 7: ... ECG use case Any serious incident that has occurred in relation to the device must be re ported to the manufacturer and the competent authority of the country in which the user and or patient is established See also pulse oximeter s operator s manual Operator s Manual Model 3150 WristOx2 Pulse Oximeter BLE and USB https www nonin com support 3150 ble Operator s Manual can also be found from devic...

Page 8: ...sical size Sensor adjustment out of control Amputation missing fingers both hands SpO2 measurement not possible Unfeasible to use sensors for any reason sensitive skin Artificial nails thick fingernail painting prevents SpO2 measurement Acute respiratory infection which might be a confusing factor in symptoms and interpretation A person who is unable to perform self directed independent recordings...

Page 9: ...Image Bittium Respiro screening device applied part Charger dock Medical Power Supply 7W USB Pulse oximeter Nonin 3150 with batteries type AAA 2 pcs inserted RIP Respiratory inductance plethysmogra phy belt s for attaching Respiro to body applied part Two sizes are available M and L Size M length 80 cm chest circum ference max 160 cm Default size Size L length 120 cm chest circum ference 150 240 c...

Page 10: ... 1 RIP belt applied part 2 pcs Respiro patch for 2 RIP belts applied part 2 pcs Respiro ECG Adapter applied part single use Bittium OmegaSnap ECG electrode applied part single use Bittium Respiro Quick Guide Bittium Respiro Notes and Warnings Medical tape applied part single use ...

Page 11: ...2 Cannula applied part single use eg Pro Tech or SleepSense Do not open the packing of the patch the ECG adapter or the ECG electrode before use Make sure that the cannula length is optimal for each patient Avoid using too long cannulas to ensure patient safety ...

Page 12: ... packing Figure below show the Respiro carry case contents in HSAT recording Figure 3 Carry case packing HSAT 2 3 Configuration options Respiro polygraphy recording can be carried out as an HSAT recording with three configurations 1 RIP belt configuration abdominal application ...

Page 13: ...ttium Biosignals 2022 Figure 4 1 RIP belt configuration 2 RIP belts configuration thoracic and abdominal application Figure 5 2 RIP belts configuration 2 RIP belts configuration with ECG thoracic and abdominal application with ECG electrode ...

Page 14: ...ons in idle state are as shown in the figure below Figure 7 Respiro indicator LEDs in idle state In this state there is no recording ongoing and the device is idle This is the basic state If no activity occurs in 5 minutes Respiro will shut down In that state Respi ro has no LED indications 2 5 2 LED indicators during recording Respiro LED indicators show recording status as described in Table 1 d...

Page 15: ...has first entered a patient marker indication No LEDs on Respiro in sleep mode recording ongoing Patient in supine body position Middle LED blue for 3 seconds Patient marker indication when power but ton is pressed once 2 5 3 LED indicators while charging Respiro Respiro LED indicators blink as described in Table 2 when Respiro is charged in its charging dock Table 3 LED indicators during charging...

Page 16: ...ort press 3 seconds Patient event marker set indication during record ing A press of approx 12 seconds Respiro device power off 2 6 Before recording Make sure that the Respiro device s battery charge status is sufficient at least two green LEDs are blinking successively according to Table 2 Note If scheduled recording is used all three indicator LEDs must be blinking successively to ensure suffici...

Page 17: ...tient must be instructed not to remove the ECG electrode after the first night The electrode can remain at tached also while having a shower but the electrode s stud connectors must be carefully dried after the shower 2 6 1 Charging Respiro Set Respiro in the charging dock while making sure that the charging dock is con nected to the charger Note Connect the charging dock to the charger s USB port...

Page 18: ...piro 18 48 Operating Instructions Bittium Biosignals 2022 Figure 9 Threading the short part Figure 10 Threading the long part Figure 11 Attached wristband back view Figure 12 Attached wristband front view ...

Page 19: ...the power button again approx 8 seconds until Respiro vibrates once and all 3 indicator LEDs are blinking blue 3 After Respiro has activated the recording state all 3 indicator LEDs will be blinking blue for few seconds Then after the pulse oximeter is started Respiro device s left LED indicator will be green if the finger is inserted in the sensor and yellow if it is not Respiro is not connected ...

Page 20: ...aring the serial number information in Respiro Device Manager with that shown on the pulse oximeter See 2 6 4 below 2 6 4 Connecting Respiro and the pulse oximeter Follow these instructions if you need to connect Respiro and the pulse oximeter again due to eg a device failure 1 Connect the Respiro device s charging dock to a computer with the USB ca ble 2 Set Respiro in the charging dock Respiro i...

Page 21: ...o your PC and run the Respiro Device Manager application from there You can open the File Explorer by clicking the yellow folder icon at the bottom of the desktop view a Double click Respiro device icon b Double click Respiro Device Manager folder c Double click Respiro Device Manager file ...

Page 22: ...k and that the charger dock is connected to the computer Respiro Device Manager main view opens 5 Enter the pulse oximeter s serial number in the Pulse oximeter device name field in the Respiro Device Manager main view and click Save Note If you want to add a name for the Respiro device you can enter it in the Recorder name field Do not use the patient s name ...

Page 23: ...on requests you to do so and click OK Connecting starts Respiro Device Manager application notifies you if the connecting process was successful If it was not successful try again and follow the on screen instructions See image below Note that it is also possible that the pulse oximeter is already connected with another Respiro device and this is why the connecting process ...

Page 24: ...SAT recording mode the recording is saved directly to Respiro s internal memory After the recording in HSAT recording mode Bittium RespiroTM is re turned to clinic hospital and the device is connected to PC with USB cable and the recording data is uploaded locally from the device s internal memory card and stored to the Bittium MedicalSuiteTM service platform Scheduled recording In HSAT recording ...

Page 25: ...t 3 Select the ending time from the drop down list 4 Click Save Note It is recommended to synchronize the device time with the PC time This can be done in the Respiro Device Manager main view on the lower left hand side of the view Remember to always detach Respiro safely from the computer using the Windows Safely remove hardware function or via Respiro Device Manager s Eject function ...

Page 26: ...ding configuration The options are 1 RIP belt configuration 2 RIP belts configuration 2 RIP belts configuration with ECG Figure 15 Recording configuration The selected option is shown in the Figure on the right Click Save after the config uration is selected 2 9 Starting and ending a recording See Respiro Quick Guides 2 10 After the recording 2 10 1 Uploading the recording data after HSAT recordin...

Page 27: ...RECORDING DATA RESPIRO DEVICE MEMORY S READ FUNCTION MAY MALFUNCTION AND CAUSE AN ERROR STATE THAT CAN ONLY BE REPAIRED IN A SERVICE FACILITY 3 Start Respiro Device Manager application Wait for the application to detect Respiro Respiro Device Manager main view opens See chapter 2 6 4 step 3 for information on how to start the Respiro Device Manager application 4 Select Tools from the top of the vi...

Page 28: ...Respiro 28 48 Operating Instructions Bittium Biosignals 2022 7 Select a save location for the file s and click Save ...

Page 29: ...were not removed will then remain visible in the Save recording files view 8 Click Eject You can remove Respiro from the charging dock when the appli cation instructs you to do so Note If the device contains corrupt files they will appear with a yellow notification triangle These unusable files can be deleted from the device in the same way as other files by clicking Delete from device ...

Page 30: ...st use and also af ter every recording Cannulas ECG adapter as well as ECG electrodes are disposa ble RIP belts can be used more than once with same patient Item Cleaning method Non fluffing cloth dampened with water and mild detergent Non fluffing cloth dampened with water and isopropanol alco hol Respiro X Avoid wiping the na sal cannula interface with a too wet cloth Pulse oximeter X RIP belt s...

Page 31: ...r the cleaning Use air drying and do not tumble dry the wristband for example Dispose of used na sal cannulas ECG adapters and ECG electrodes as energy waste 2 10 3 Other actions Remember to erase prior recording data from the Respiro device before preparing it for a new patient Charge the Respiro and replace the pulse oximeter batteries as required Pack the carry case for the next patient see Cha...

Page 32: ...puter with the USB cable 2 Set the Respiro device in the charging dock Ensure that the device rests properly in the charging dock 3 Start Respiro Device Manager application see Chapter 2 6 4 Wait for the application to detect the Respiro device Respiro Device Manager main view opens 4 Select Tools from the top of the view 5 Select Update firmware 6 Locate the update package by clicking the Browse ...

Page 33: ... button Respiro Device Manager returns to main view after the update is complete Remember to always detach Respiro safely from the computer using the Windows Safely remove hardware function or via Respiro Device Manager s Eject function 3 3 IT network End user is responsible that device is used according to their organization s IT procedures ...

Page 34: ...work update of equipment connected to the IT network upgrade of equipment connected to the IT network 3 4 Battery replacement Respiro device battery is an in built part of the device and can be changed only by Bittium Biosignals Ltd Battery lifetime depends on device usage modes and recharging cycles It is recommended to replace the battery after max 2 years When battery replacement is needed plea...

Page 35: ...ed to work with the following cannulas SleepSense 2 Ft Adult Nasal Oral Pressure Monitoring Cannula Pro Tech Pro Flow Nasal Cannula Adult 16 VIASYS Pro Tech Pro Flow Nasal Oral Cannula Adult 8 25 20 96 cm The use of accessories other than those approved by the manufacturer may break the device decrease its performance or cause other issues Shelf life of the accessories shipped with Respiro can be ...

Page 36: ...ough battery charge or device internal memory full Charge device or free device memory All LEDs and power button LED red Device internal error Press power but ton for 12 seconds and try starting the recording again All LEDs and power button LED red after power button is first pressed for 12 seconds to switch device off and then pressed again twice to start recording Device requires maintenance Tab...

Page 37: ... cycling from left to right Left LED yellow center green Pulse oximeter is connected but finger is not inserted in the sensor Check connection Left LED green center LED red Nasal cannula error Check connection Left LED red center LED green Pulse oximeter error Check connections Left and center LED red Pulse oximeter and nasal cannula error Check con nections Center LED green right LED red RIP belt...

Page 38: ...arging dock How to connect devices for example after a device failure See Chapter 2 2 4 Respiro LED indicators are dark during charging Ensure that the charger and the USB connector are properly connected You get the following notification when Respiro is connected to a computer Figure 16 Respiro notification Click the notification and follow the on screen instructions Remember to always detach Re...

Page 39: ...e disposed of with other household waste at the end of its life The device contains electronics that require it to be recycled in an appropriate manner Take care of the environ ment and dispose of the device according to the disposal instructions You can check the location of the nearest recycling point with your local waste disposal au thority ...

Page 40: ...MATION 6 1 EU Declaration of Conformity Certificate of Conformity and Declaration of Conformity in accordance with the applicable directives and standards can be requested from bbs bittium com 6 2 EMC This product meets the requirements of the electromagnetic compatibility EMC standard EN 60601 1 2 ...

Page 41: ...31 Pulse oximeter IP33 7 3 Operating and storage conditions Table 7 Operating and storage conditions Device Storage temperature range Operating temperature range Humidity Respiro 25 70 C 5 40 C Operating 15 90 non condensing Storage 10 90 non condensing Pulse oximeter Pressure 700 hPa 1060 hPa operating Always transport the equipment in the carry case Protect the carry case from snow and rain Remo...

Page 42: ...ing and storage rate SpO2 1 Hz Sampling and storage rate pulse rate 1 Hz Body position and move ment Acceleration range 2 g Sampling and storage rate 10 Hz ADC conversion 12 bits Respiration effort Movement range 1 5 mm Sampling and storage rate 100 Hz ADC conversion 10 bits Mode of operation Continuous Pulse oximeter s PPG sampling rate is 75 Hz SpO2 value is calculated based on PPG signal once p...

Page 43: ...ow and it is unlikely that nearby electronic devices would be disturbed RF emissions CISPR11 Class B 7 6 Immunity test levels Table 10 Immunity test levels Phenomenon Basic EMC standard or test method Immunity test level Home healthcare environment Electrostatic discharge IEC 61000 4 2 8 kV contact 2 kV 4 kV 8 kV 15 kV air Radiated RF EM fields IEC 61000 4 3 10 V m 80 MHz 2 7 GHz 80 AM 1 kHz Proxi...

Page 44: ...kV Electrical fast transients bursts IEC 61000 4 4 2kV 100kHz repetition frequency Table 11 Immunity test levels continued Test frequency MHz Band MHz Service Modulation Maximum power W Distance m Test level V m 385 380 390 TETRA 400 Pulse modulation 18 Hz 1 8 0 3 27 450 430 470 GMRS 460 FRS 460 FM 5 kHz deviation 1 kHz sine 2 0 3 28 710 704 787 LTE Band 13 17 Pulse modulation 217 Hz 0 2 0 3 9 745...

Page 45: ...osignals 2022 1845 CDMA 1900 GSM 1900 DECT LTE Band 1 3 4 25 UMTS 217 Hz 1970 2450 2400 2570 Bluetooth WLAN 802 11 b g n RFID 2450 LTE Band 7 Pulse modulation 217 Hz 2 0 3 28 5240 5100 5800 WLAN 802 11 a n Pulse modulation 217 Hz 0 2 0 3 9 5500 5785 ...

Page 46: ...s that this device shall be dis posed according to European Union directive 2012 19 EU on Waste Electrical and Electronic Equipment WEEE Consult instructions of use Wireless transmission symbol Manufacturer Do not reuse Lot number Data matrix GS1 is a two dimensional barcode consisting of black and white modules arranged in either a square or rectangular pattern also known as a matrix The data to ...

Page 47: ...mber 21 Date of manufacture 11 Use by date Date of manufacture Medical device IP31 Device is protected against small objects 2 5 mm and condensation IP67 Device is dust protected and protected against the effects of immersion in water between 15 cm and 1 m for 30 minutes ...

Page 48: ...ting Instructions Bittium Biosignals 2022 MANUFACTURER Bittium Biosignals Ltd Pioneerinkatu 6 70800 Kuopio Finland Phone 358 0 17 581 7700 bbs bittium com www bittium com medical support bittium com 5800666A02 08 07 2022 ...

Reviews: