19
<Using the swing arms>
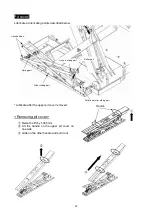
Exit the vehicle after storing swing arms in the arm support.
①
Completely store the slide arms inside lift
arms once the vehicle servicing is completed.
②
Lower the lift to the lowest position.
③
Rotate the swing arm and align it with the position where it can be stored inside the arm support
(where it comes into contact with the stopper).
If a swing arm cannot be stored because of
interference with an arm support or the like,
lift the swing arm again and set it so that the
swing arm can be stored inside the arm
support, and then perform the lowering
operation.
④
The frame attachment is protruded above the floor Level. Remove it if it gets in the way.
⑤
Drive the vehicle out slowly.
7-8. Cleaning After Completion of Work
Once the vehicle servicing has been completed, wipe off oil and grease attached on supporter and
inside the lift area to clean. In the event any abnormality is discovered on such occasion, consult the lift
supplier immediately. Lower the lift to the lowest position and shut off the power supply (circuit breaker)
for purpose of safety.
Drain the compressor also to ensure that the air supplied to the lift is dry and clean.
* Once the vehicle servicing has been completed, store the slide arms all the way inside lift
arms, then lower the lift to the lowest position. Lowering the lift to the lowest position while
the slide arms are still extended out can cause the slide arms to come into contact with the
floor and deform the arm pins.
* Arm lowering button can only be operated when the lift unit is at the lowest lowered position.
Drive the vehicle out carefully and do not
start or stop the vehicle suddenly. Do not
turn the steering wheel while the vehicle is
on the swing arms or frame attachments.
Doing so may potentially lead to damage of
the vehicle or the lift.
Caution
Lift arm
Sliding arm
Store
Caution
Frame attachment
Swing arm
Rotate


