background image

BIH11-AHB User’s Manual


8 | Chapter 2: Hardware installation


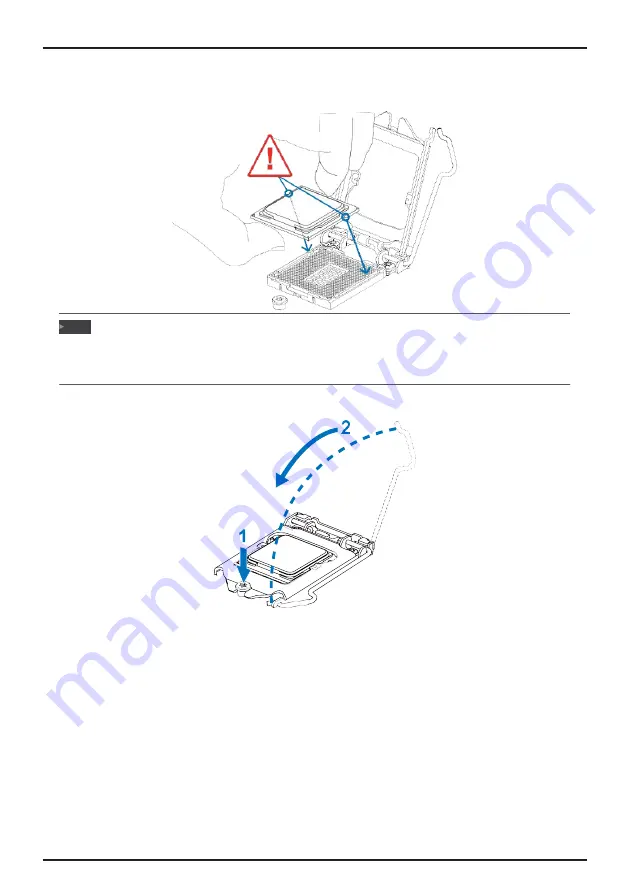
Step 4: Hold processor with your thumb and index fingers, oriented as shown. Align the 
notches with the socket. Lower the processor straight down without tilting or sliding the 
processor in the socket.


» 

Ensure that you install the correct CPU designed for LGA1151 socket.


» 

The CPU fits only in one correct orientation. Do not force the CPU into the socket to prevent 

damaging the CPU.


Step 5: Hold the CPU down firmly, and then lower the lever to locked position to complete the 
installation.


Note


Summary of Contents for BIH11-AHB

Page 1: ...ential installation This equipment generates uses and can radiate radio frequency energy and if not installed and used in accordance with the instructions may cause harmful interference to radio commu...

Page 2: ...Before You Start 3 1 2 Specifications 4 1 3 Rear Panel Connectors 5 1 4 Motherboard Layout 6 Chapter 2 Hardware installation 7 2 1 Central Processing Unit CPU 7 2 2 Install a Heatsink 9 2 3 Connect Co...

Page 3: ...or the rear side of the board unless necessary Hold the board on the edge do not try to bend or flex the board Do not leave any unfastened small parts inside the case after installation Loose parts w...

Page 4: ...under power off mode It s for wake up use 2x USB 2 0 connectors2x RJ 45 Gigabit LAN 3x Audio Jack Line in Line out Mic On Board Headers Connectors TPM 2 0 chip onboard TPM IC SLB9670 Non SMT by defaul...

Page 5: ...4 RS 422 2 4 4 6 4 6 5 6 RS 485 7 9 9 11 9 11 8 10 10 12 10 12 Note RS 232 Default RS 422 RS 485 Pin Assignment 1 Carrier detect DCD 422 TXD 485 DATA 2 Received data RXD 422 TXD 485 DATA 3 Transmitted...

Page 6: ...BIH11 AHB User s Manual 6 Chapter 1 Introduction 1 4 Motherboard Layout represents the 1st pin Note...

Page 7: ...re installation and make good preservation for future use When the CPU is removed cover the Pin Cap on the empty socket to ensure pin legs won t be damaged The motherboard might equip with two differe...

Page 8: ...the processor straight down without tilting or sliding the processor in the socket Ensure that you install the correct CPU designed for LGA1151 socket The CPU fits only in one correct orientation Do...

Page 9: ...motherboard holes Orient the assembly and make the fan cable is closest to the CPU fan connector Step 2 Press down two fasteners at one time in a diagonal sequence to secure the CPU fan assembly in pl...

Page 10: ...onnect the fan cable to the connector while matching the black wire to pin 1 CPU_FAN1 CPU Fan Header Pin Assignment 1 GND 2 FANPVOUT 3 FAN_TACH 4 FANPWMOUT SYS_FAN1 2 System Fan Header System Fan Head...

Page 11: ...ly and firmly into the slot until the retaining clips snap back in place and the DIMM is properly seated If the DIMM does not go in smoothly do not force it Pull it all the way out and try again Memor...

Page 12: ...each slot a total of 32GB s PEX4_1 PCI Express x4 Slot Intel H110 x4 speed PCI Express 2 0 compliant Data transfer bandwidth up to 2GB s per direction 4GB s in total PCI_1 2 3 4 5 Peripheral Component...

Page 13: ...ins the jumper is close if not that means the jumper is open Pin opened Pin closed Pin 1 2 closed JCMOS1 Clear CMOS Jumper Placing the jumper on pin2 3 allows user to restore the BIOS safe setting and...

Page 14: ...or For better compatibility we recommend to use a standard ATX 24 pin power supply for this connector Make sure to find the correct orientation before plugging the connector Pin Assignment Pin Assignm...

Page 15: ...I02 5 DO02 6 DI03 7 DO03 8 DI04 9 DO04 10 GND JPANEL1 Front Panel Header This connector includes Power on Reset HDD LED and Power LED connections It allows user to connect the PC case s front panel sw...

Page 16: ...orage devices Pin Assignment 1 GND 2 TX 3 TX 4 GND 5 RX 6 RX 7 GND F_USB1 2 USB 2 0 Header The mainboard provides USB 2 0 pin header Each header allows you to connect 2 additional USB 2 0 ports F_AUDI...

Page 17: ...tor This header allows you to connector printer on the PC JSEL1 JSEL2 RS 232 422 485 Switch Headers for COM1 The headers determine that COM1 belongs to RS 232 Default 422 or 485 JCOM6 5 4 3 Serial Por...

Page 18: ...rdware installation JP1 2 3 4 5 6 Serial Port Voltage Switch Jumper for JCOM1 2 3 4 5 6 Pin 1 2 Close Pin9 Ring Default Pin Assignment 1 RI to conn 2 Buffer to RI 3 RI to conn 4 VCC5 5 RI to conn 6 VC...

Reviews: