


How to use BFM-900L
31
BFM-900L
FETAL MONITOR
(Ver 1.1)
30
How to use BFM-900L
5.7 How to use Printer
The printer used in BFM-900L is a 4 inch Porti-M400V, made by Wooshim System. It uses 9V
Power and the width of the printing paper is 112mm.
■
■
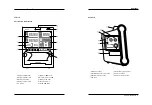
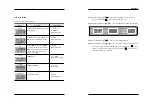
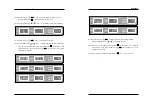
Printer Operation
(1) “REC” indicator will turns on as red color after pressing the “Print”(or “Record”) key once.
And the FHR1, FHR2, UC, and the Fetal Movement (FM 1, FM 2) are recorded. FM will not
be recorded by the user’s menu setting.
(2) If you press the “Print” key once again the red colored LED will disappears and the recording
stops. The Printer scrolls out 1~2cm of extra sheet after the recording has stopped.
(3) The FHR 2 graph can be p20bpm more than the FHR 1 area. If you turn on the offset,
“Offset” indicator will turns on as green color
■
■
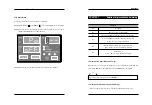
Auto Operation
(1) Control the print time. Print time is set by 10min, 20min, 30min, 40min, 50min, 60min and
off. If you use “OFF”, it will stop printing by press the “Print” button or out of paper.
(2) After finishing the setting by users, it will apply to the initial printing. This setting applies to
the “AUTO PRINT” area. This setting value is displayed the remained operation time.
■
■
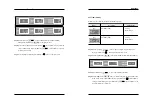
FHR 2 Offset Operation
(1) Using 2 Probes simultaneously to measure FHR 1, 2, and the value comes out similar is when
it’s most effective. The Offset draws a graph by incr20bpm from the FHR 2 value.
(2) Before using the printer, use the “Up/Down/Enter” key to turn the Offset On.
(3) Once the “Offset : On” status is confirmed, another 20 is added to the FHR 2 value. After
finishing the setting by users, it will apply to the initial printing.
■
■
ZOOM Operation
(1) Use this function when you want to see the changes in the FHR more closely.
(2) When you select “On” in the “Zoom” category in the Print Setup, the FHR area is expanded
about 105 ~ 200 BPM than the normal range. After finishing the setting by users, it will apply
to the initial printing.
■
■
SPEED Operation
(1) Control the print speed.(1cm/min, 2cm/min and 3cm/min)
(2) After finishing the setting by users, it will apply to the initial printing
■
■
CONTRAST Operation
(1) Control the contrast of print by 3-step. High number is thicker to print.
(2) After finishing the setting by users, it will apply to the initial printing. This setting does not
apply during the printing. This setting also applies to the graph area.
■
■
FM Operation
(1) FM record on the paper is decided by setting.
(2) After finishing the setting by users, it will apply to the initial printing. This setting does not
apply during the printing. This setting also applies to the graph area.
■
■
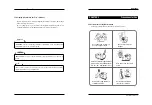
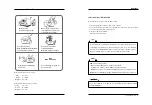
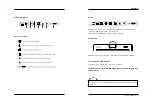
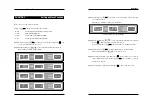
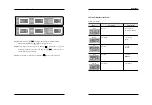
Reading the Recorded Sheet
Press the “Print” key once to begin recording and the sheet ejects as described below.
The recording areas are divided into two main categories - the text area and the graph area. The
text and graph show as soon as the printing begins. The text is repeated at paper top area on 10
minute and is included the setup value of print-(1) Date (2) Time (3) Status of DOP 1, DOP 2
Probe and UC Probe (4) Status of FM (5) Print Speed (6) Status of Offsset and (7) Status of
ZOOM.
During printing, you cannot change the printer setting. If you want to change the setting, you
should stop to print.
Changed setting value without ZOOM is not changed even though you turn off the system.
Zoom is initialized after turning off.