30
9.
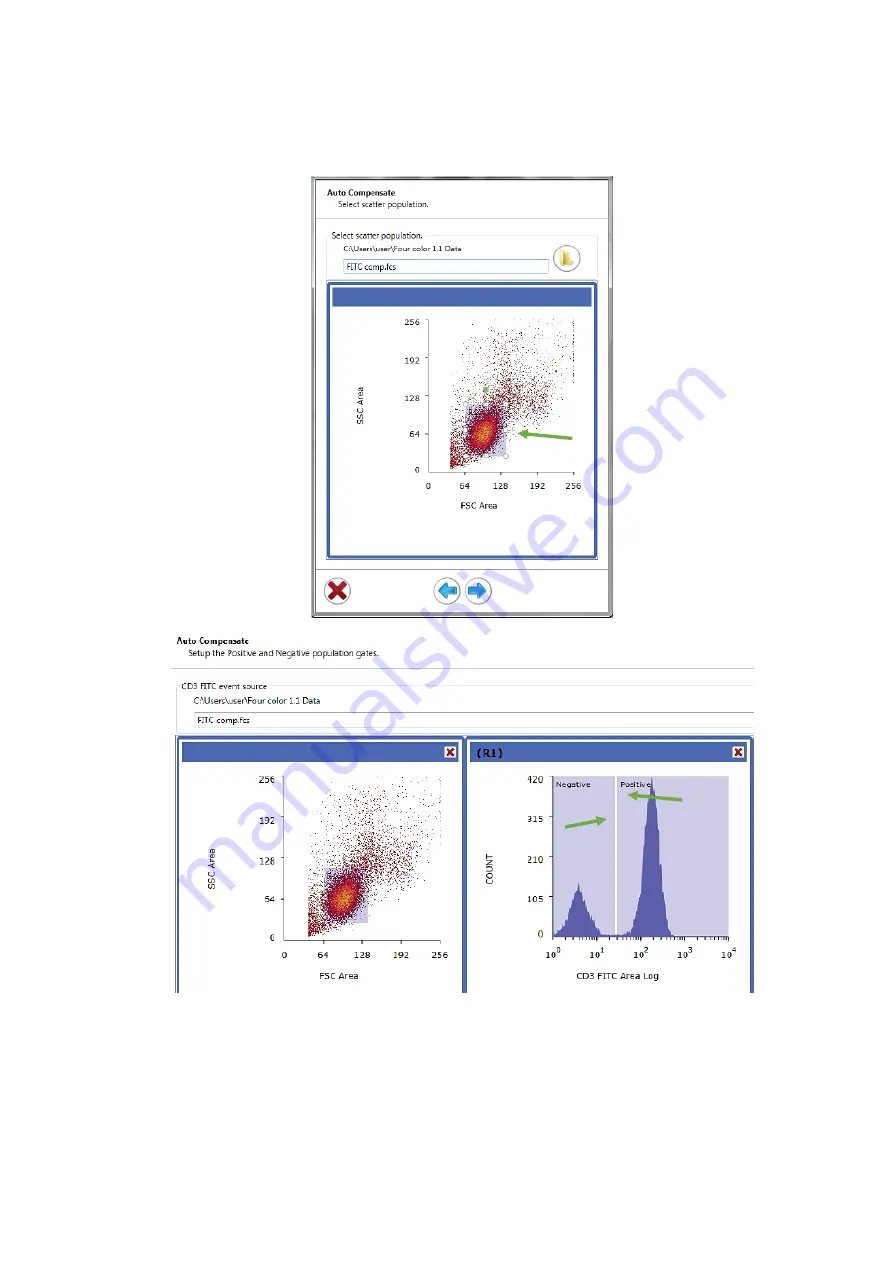
Adjust the scatter, negative, and positive regions as necessary.
Note
that the
positive and negative population gates
must not overlap
10.
Click the blue forward arrow to go to the next control
11.
Repeat steps 9 and 10 for remaining controls
Page 1: ...Flow Cytometry FACS Bio Rad S3e Cell Sorter...
Page 2: ...7 WARNINGS and Advice 8 Available Techniques 9 Set Up 9 Sample Preparation 9 Initial Set Up Start up and Fluidics Procedure 20 minutes 10 Initial Set Up Quality Control 10 minutes 12 Final Set Up Low...
Page 3: ...lex presort setup with a unique technology ProDrop technology In detail this cell sorter brings forward several automated features such as Startup shutdown Stream to laser alignment Hands free alignme...
Page 4: ...l Sorter operated by the ProSort software version 1 6 Suggestion for Acknowledgements This work was partially supported by PPBI Portuguese Platform of BioImaging PPBI POCI 01 0145 FEDER 022122 co fund...
Page 5: ...cy 37 43 kHz Sorting type True jet in air for high performance sorting Sorting rate No hardware limitations for sort rate limited only by droplet frequency and application Sorting purity 99 pure Nozzl...
Page 6: ...6 565 554 578 584 FL3 BP 615 25 PI PE Texas Red 536 496 565 617 619 FL4 655 LP PE Cy5 PE Cy5 5 PE Cy7 496 565 490 565 496 565 670 693 785 561 FL2 BP 586 25 PE tdTomato RFP DsRed 496 565 554 554 554 57...
Page 7: ...Computer Type Desktop Brand Dell Inc Model OptiPlex 3020 Features Intel I5 4590 up to 3 7 GHz quad core 4GB RAM 500 GB HDD OS Windows 7 Professional Available Software ProSort Monitor Brand Asus Model...
Page 8: ...ube and nozzle tip Do not open the nozzle door Keep the green containment door closed as often as possible during the sorting procedure Never try to access the laser beam paths Any adjustment to the t...
Page 9: ...70 ethanol and MiliQ water as cleaning solutions Please let us know if some solution or fluidic is running out Make sure to save all the data to your own storage device or cloud as we routinely wipe o...
Page 10: ...d quality control procedures NEVERTHELESS DO NOT FORGET TO CHECK THE FLUIDICS IF NEEDED PERFORM THE HOT SWAP PROCEDURE See Swapping Fluidics During Sorting Hot Swap 1 Open the bulk fluidics door 2 Det...
Page 11: ...r a click 9 Switch on the computer 10 Double click in the ProSort icon in the desktop 11 Log in into the group account Contact the responsible people for more log in options 12 In the Setup and Mainte...
Page 12: ...T SWAP PROCEDURE See Swapping Fluidics During Sorting Hot Swap 1 Vortex a bottle of ProLine Calibration Beads and place 8 10 drops into a 5 ml sorter tube Do not dilute these particles 2 Place the tub...
Page 13: ...QC procedure estimates the optimal drop delay and performs the side and forward scatter detectors calibration 6 A QC report window will appear showing the QC test results If all parameters have passe...
Page 14: ...in the Clean System button 4 A Clean Warning dialog will open with a prompt warning for the fact that the tube solution will be rapidly consumed Click in the Yes option 5 In the Clean System Modes win...
Page 15: ...70 ethanol 2 Load the tube into the sample station and move it to the run position 3 In the Set Up and Maintenance tab click in the Clean System button 4 A Clean Warning dialog will open with a prompt...
Page 16: ...Click in the Shutdown button in the Setup and Maintenance tab 10 Select the Yes option to confirm that the system should be shut down at this time 11 Select the Yes option to continue without saving p...
Page 17: ...and Shutdown window load a tube of water MiliQ and move the loading stage into the run position 15 After the cleaning procedure move the loading stage into the wash position 16 At this time the syste...
Page 18: ...t plot by clicking in the Histogram and Density buttons of the Home tab 3 Load the sample into the sample input station and move the loading stage into the run position 4 Detectors can be renamed for...
Page 19: ...threshold value 7 In the Instrument Control Panel window click in the Start button to begin sample acquisition 8 Adjust photomultiplier tube PTM voltages to place populations 9 Adjust the target even...
Page 20: ...fresh button can be used to refresh the data as adjustments are being made 12 Re collect the sample and save the FCS format file if Auto Save has not been boxed 13 Unlock the loading stage and remove...
Page 21: ...o set compensation for multi coloured samples see Auto Compensation Wizard Sorting 1 Go to File New Protocol or Open Protocol see Protocols and Workspace 2 Create at least one histogram and dot plot b...
Page 22: ...e dot plot The signal intensity and time should be displayed on the y and x axes respectively Then select as many dots as possible linearly disposed as if in a direct proportion The dots contained in...
Page 23: ...ight click in the desired region to be sorted and select the sort direction 7 Repeat with a second region if two way sorting is desired 8 Click in the Sort Logic button and select a collection vessel...
Page 24: ...negative match events advised for low concentrations The Purity sort mode stands for sorting only positive match events although there may be double or more events sorted at once The Single sort mode...
Page 25: ...ction device at the previously selected positions 12 Make sure the 5 ml tubes if it is the case have at least 0 5 ml of buffer to cushion the sorted cells 13 Close the sort chamber door and click in t...
Page 26: ...26 14 The Sort Statistics window will appear and sorting will be initiated This window can be reopened by clicking the Sort Statistics button in the toolbar...
Page 27: ...ore clicking the Swap Fluidics button as the swap time is limited to only 3 minutes before the system starting to shut down due to low fluid levels Read carefully all procedure before starting the Hot...
Page 28: ...tton 5 Lift the quick disconnect until it engages the magnetic holder This will hold the quick disconnect away from the exchange area 6 Slightly lift and pull out the container 7 Uncap the cap assembl...
Page 29: ...n single controls for each parameter and your multi stained sample 2 Save the acquisitions as FCS files 3 Go to Home Compensation Wizard 4 Select the parameters for compensation 5 Click the file icon...
Page 30: ...er negative and positive regions as necessary Note that the positive and negative population gates must not overlap 10 Click the blue forward arrow to go to the next control 11 Repeat steps 9 and 10 f...
Page 31: ...that have values lesser than zero to be correctly displayed This data display format is used only for compensated data It converts a small portion of the scale around zero to linear and adds a small a...
Page 32: ...rotocol can also be opened from a saved FCS file see below how to perform this in another way Saving Protocols Each protocol is saved with the following information plots regions gates trigger thresho...
Page 33: ...Remember that you can save FCS files after running acquisition or sorting procedures In addition the FCS files will not only save the procedures statistics as will also store the protocol in use Furth...